Blogger

Releasing iThesis Free Premium Blogger Template

Today we are proud to release our first Free Premium Blogger Template “iThesis”. This is our 100th post so we are Releasing iThesis Theme For Blogger. This is simple, clean, seo optimized . iThesis Blogger Template have 2 columns, where you can place many widgets and Ads.

iThesis Theme For BloggerLive Demo

Features of iThesis Blogger Template

  • SEO optimized
  • Clean and neat interface
  • Premium features like , page numbered navigation
  • Easy to customize
  • Stylish Footer
  • Cool Sidebar
  • Cool with Header Banner Ad
  • Navigation bar with sub nav
  • Awesome Heading styles
  • 2 Navigation Menu for easy interface
  • WordPress Like Stylish Commenting system

How To Get This  iThesis Blogger Template For Free

I offer resources to loyal subscribers only.

Like us and get download button :


Subscribe and Download

You can download this template now just by liking our page or subscribing.


Respect Copyrights:

credits

This kind of Template is Usually for Premium sale.But i am giving it free for you guys and may not be redistributed or republished without having permission from AllBloggingtips. Kindly respect the several hours of effort placed in scripting this web template and giving it for free. The template includes a link back to AllBloggingTips Blog as a attribution.Do not ever try to remove it. Regarding to any infringement I will report that Blog URL to DMCA. The violator will probably be pushed aside as a reader and removed from the subscription list.

Just kidding guys i won’t report to DMCA .I am no that much hard.It’s just a small footer link only no one is going to see this man then why you are removing.

Customization

Below are step by step guides to customize this ithesis theme

Top Menu Configuration

To customize your menu find below code and replace all links to your link and text is not that simple?

<div id=’top’>
<ul class=’nav1′>
<li class=’current_page_item’><a href=’#’><span>Home</span></a></li>
<li class=’page_item’><a href=’#’><span>Contact Me</span></a></li>
<li class=’page_item’><a href=’#’><span>Blogs</span></a></li>
<li class=’page_item’><a href=’#’><span>Tools</span></a></li>
<li class=’page_item’><a href=’#’><span>Link to Us</span></a></li>
<li class=’page_item’><a href=’#’><span>Archive</span></a></li>
</ul>
</div>

Sub Navigation Bar

To customize sub navigation bar, search for the following code code and replace the link with your own.

<div id=’category_menu_container’>
<ul id=’category_menu’>
<li><a href=’#’>WordPress</a>
</li>
<li><a href=’#’>Tutorials</a>

</li>
<li><a href=’#’>Tips and Tricks</a>
</li>
<li><a href=’#’>Downloads</a>
</li>
<li><a href=’#’>WordPress Themes</a>
</li>
<li><a href=’#’>Uncategorized</a>
</li>
</ul>
</div>


Header Banner

You can see, a default ad display on the header bar, to place your ad instead of that – Go toPage Elements and click on HTML/Javascript box and replace the code with your banner code.

header-ad

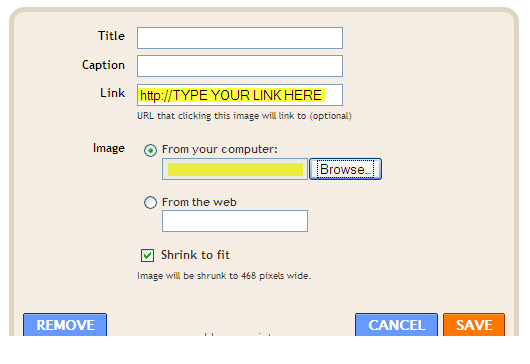
I have also added a picture box, where you can add an image and link the image to any affiliate links. You can either upload image from your computer or you can link it from your web server. By default all the image will be shrink to 468 pixels wide.
haeder-ad1 copy

Now, you are ready to use this template! Enjoy the new Thesis Blogger Template. If you have any problem regarding this template, you are free to ask me. You can suggest me any thing that you are thinking to do new in this template.

Customize Threaded Comments with Reply Options

threaded comments

To customize threaded comment and reply option just find XXXXXXXXXXXXXXXX and replace it with your current blog ID.

I’ll update this template with more new feature. Please subscribe to our feed using your Email address to get the new updated template direct to your inbox.
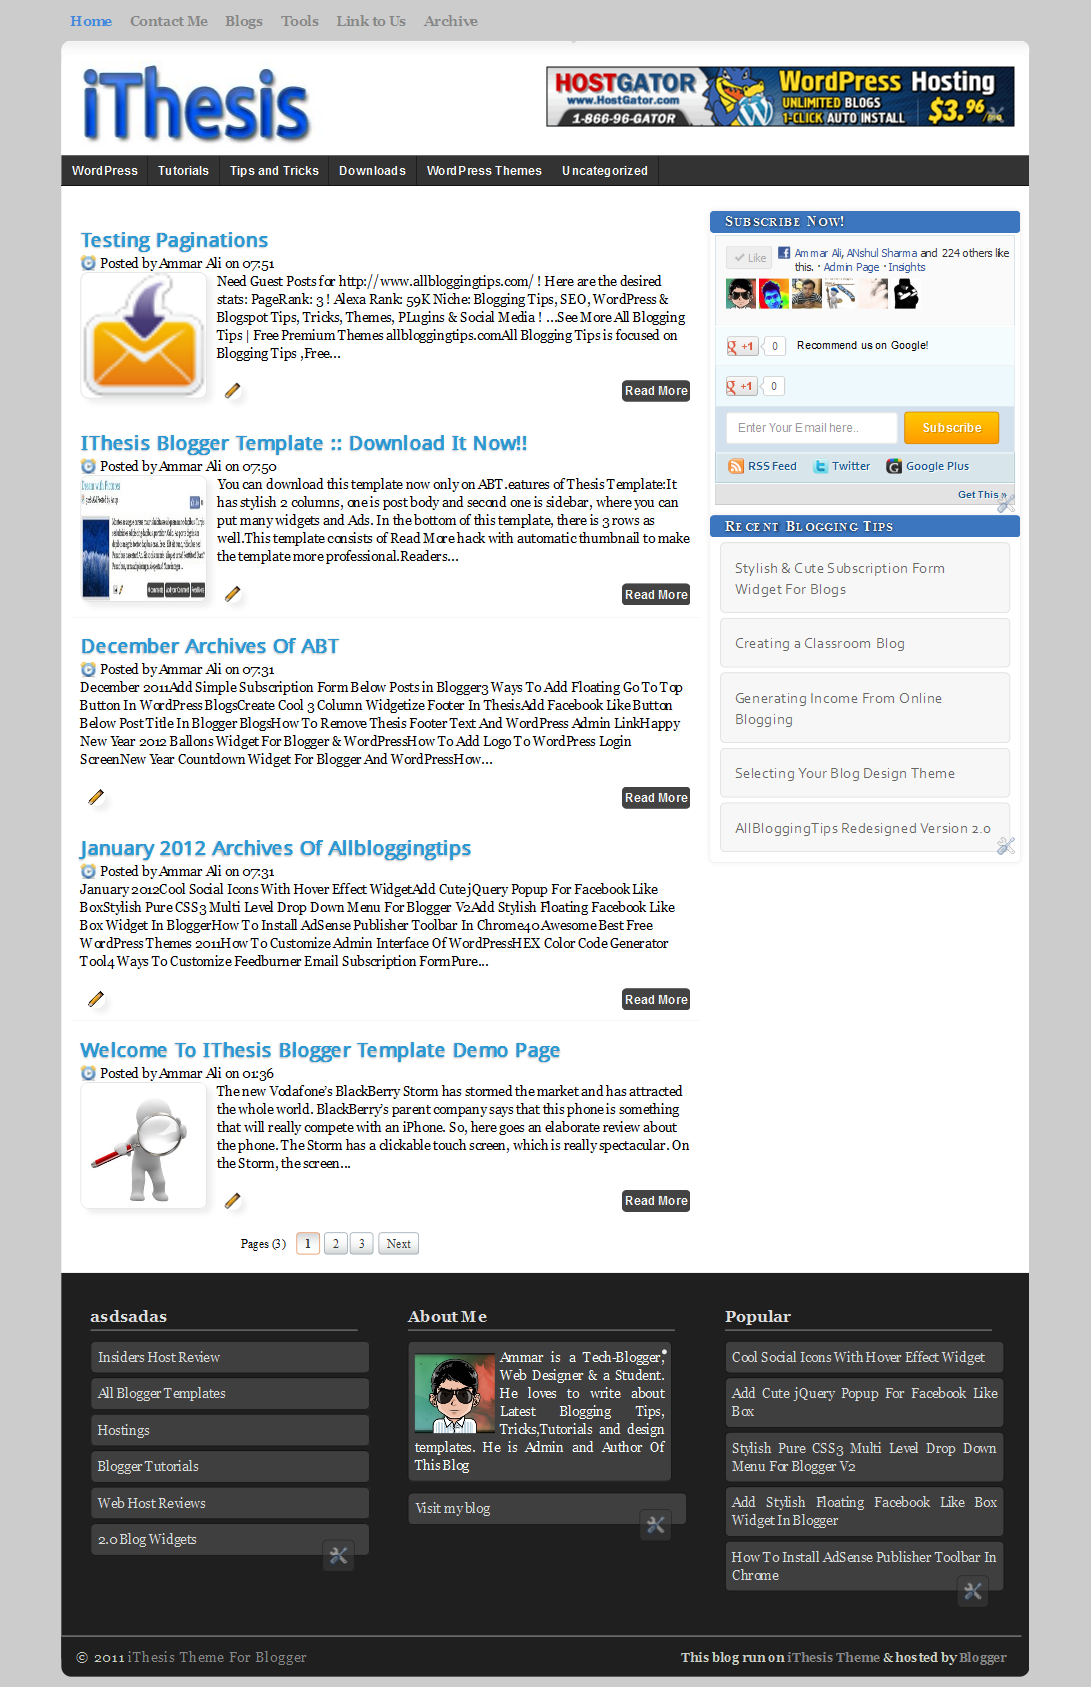
 

Stylish & Cute Subscription Form Widget For Blogs

subscribe box v1 demo abtMost of peoples want simple, clean yet Stylish and Cute Subscription Form for their WordPress and Blogger/blogspot Blogs. Today we came with Stylish and Cute Subscription Form Widget  For Blogs , Easy to edit subscription form dozed with new CSS effects. This widget will keep your sidebar neat and clean and will surely attract visitors to subscribe. Follow following steps to add this Stylish and Cute Subscription Form Widget to WordPress and Blogspot
 TipCopy the code given below and paste it inside this editor to see a live demo.

Live Demo

Adding Stylish and Cute Subscription Form Widget

You just need to place a code to your blog widget Follow following steps to add Stylish and Cute Subscription Form Widget to WordPress and Blogger.

Adding To Blogger

  1. Go to Design > Page Elements.
  2. Click Add A Gadget.
  3. In Add A Gadget window, select HTML/Javascript .
  4. Copy the code below and paste it inside the content box.
  5. Save the gadget.
  6. Drag the gadget and reposition it under Blog Posts gadget.
  7. Click Save button (top right hand corner).

Adding To WordPress

  1. Go to Dashboard > Appearance > Widgets > Available Widgets.
  2. Drag Text widget into a sidebar.
  3. Paste in the code.
  4. Save.
Note: If This widget is not working on you blogspot and wordpress blogs then download this code  and place it as a widget nstead of give below.
 <style>
.abt-email{
background:url(https://lh3.googleusercontent.com/-3mMr7bVkJEA/T2mKAcZEBkI/AAAAAAAAAZI/IWMC_nG_foU/h120/service-email.jpg) no-repeat -8px 10px ;
width:240px;
padding:10px 0 0 65px;
float:left;
font-size:1.2em;
font-weight:bold;
margin:0 0 10px 0;
color:#0084CE;
box-shadow: 1px 1px 5px 1px #eee;
-moz-border-radius:10px;
-webkit-border-radius:10px;
border-radius:10px;
}

.abt-emailsubmit{
background:#9B9895;
cursor:pointer;
color:#fff;
border:none;
padding:4.4px;
text-shadow:0 -1px 1px rgba(0,0,0,0.25);
-moz-border-radius:6px;
-webkit-border-radius:6px;
border-radius:6px;
font:12px sans-serif; box-shadow:inset 4px 4px 3px rgba(0,0,0,0.1);

}
.abt-emailsubmit:hover{
background:#0084CE; box-shadow:inset 8px 8px 6px rgba(0,0,0,0.1);
}
.textarea{background: #fff !important;box-shadow:inset 4px 4px 3px rgba(0,0,0,0.1);
border: 1px solid #d2d2d2;
padding: 0px 8px 0px 8px;
color: #888; font-size: 12px;
height: 25px; width: 165px;
border-radius: 5px;
-moz-border-radius: 5px;
-webkit-border-radius: 5px;
margin:0px; }

</style>

<div class='abt-email'>
Subscribe via Email
<form action="http://feedburner.google.com/fb/a/mailverify" id="feedform" method="post" target="popupwindow" onsubmit="window.open('http://feedburner.google.com/fb/a/mailverify?uri=AllBloggingTips', 'popupwindow', 'scrollbars=yes,width=550,height=520');return true">
<input gtbfieldid="3" class="textarea" name="email" onblur="if (this.value == &quot;&quot;) {this.value = &quot;Enter email address here&quot;;}" onfocus="if (this.value == &quot;Enter email address here&quot;) {this.value = &quot;&quot;;}" value="Enter email address here" type="text" />
<input type="hidden" value="AllBloggingTips" name="uri"/><input type="hidden" name="loc" value="en_US"/>
<input class="abt-emailsubmit" value="Submit" type="submit" />
</form> 

</div>

Now make these changes,

  • Now replace AllBloggingTips with your Feedburner Email Feed link. You can get it by visiting your feedburner account then navigate to Publicize and then to Email Subscriptions.
  • Replace AllBloggingTips with your feed title. It appear at the end of your feed link. In my case it is AllBloggingTips

Save your widget and view your blog to see it showcasing live! :)

That’s All!

Do let me know if you needed any help in customizing the widget.

How to Embed Tweets In your Blogpost using New Twitter?

Using new Twitter is really easy and it is a matter of fun too. It is more than a simple new layout
and a new and refreshing look. Twitter has incorporated some new features in new rollout to
compete with rising competition from giants like Facebook and Google. Embedding tweets
inside the blog has never been such easier.
embed tweets
The new twitter layout brings refreshingly new fresh intuitive UI along with heaps on new
features. If you are not aware of how to use the new twitter to embed tweets in any of your
websites or blogs, just have a look at the step-by-step instructions. Also read our post on twitter
apps for Windows Phone users.

How to Embed Tweets In your Blogpost using New Twitter?

To enjoy embedding tweets using the new Twitter you have to enable the new Twitter.

  1. Visit directly to the page of the New Twitter.
  2. You can also visit the ‘user profile’ for embedding tweets.
  3. However, you should remember that you must not use any third party access.
  4. Now you have choose the tweets that you want to embed
  5. The next step is to position the pointer of your mouse on that particular tweet
  6. You will find selection criteria appearing on that tweet
  7. Now click ‘Open’.
  8. Then click ‘Details’.
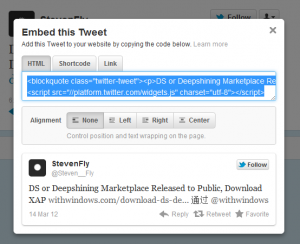
  9. This will open that tweet with that option by which you can embed the tweet
  10. Now is the final step. You have to click ‘Embed this tweet’.
  11. You will see a pop-up appearing with the code that has been already highlighted.

Twitter borrows pages from the YouTube playbook to offer codes. These codes will help you to
share any interactive tweets with all the visitors of your blogs or websites. Using these tweets
will help to increase the lifespan and visibility of some special tweets.

You can alter the code and if you want you can also keep the code as it is. To keep the code same
you can copy it and paste it when you wish to embed your tweet. The readers of this embedded
tweet can retweet and reply this tweet. They can also favorite tweet by visiting your blogs or
websites. They can also find the option that will give them access to follow that person who has
created that tweet.

So if you want to try something new and interesting, embedding tweets using the new Twitter
is for you. It is needless to mention the popularity of Twitter as one of the top social networking
sites. It is really a wonder that make people able to connect and reconnect within short time. The
new Twitter is also not an exception and it is easier to use, particularly when you want to embed
tweets using it.

This guest post is written by Ricky Shah, a Windows Phone fanatic from India. Follow his unofficial Windows Phone blog to know more about his interest and to find out twitter apps for Windows Phone users.

How to Create a SCADA System For Your Blog

Content might be king, but there’s plenty more that goes into running a successful blog. The content is just the first step. Without that, success is not possible. But there are a host of other issues that every blogger wants to address in order to succeed.

The best way to think about this is like a SCADA system. For those unfamiliar, SCADA stands for supervisory control and data acquisition. Companies from far-ranging industries use SCADA systems to provide them with real-time information, so they know if problems arise and where. You can Create a SCADA System For Your Blog for your blog, so you can stay on top of everything related to your blog.

Checking for malfunctions

Many oil and gas companies use SCADA systems to pinpoint leaks in their pipes. When they get the information they can determine the source of the problem, the reason, and then act to solve it. Blog owners should employ a similar system for their blogs. This particularly involves ensuring that blog posts go up as scheduled, and that they broadcast to all the appropriate networks.

WordPress owners might know this all too well: sometimes blog posts don’t go live at their scheduled times. There’s an easy fix to this: subscribe to all of your blogs feeds. This means RSS, Facebook, Twitter, and any other place that automatically broadcasts your blog posts. That way you’ll know that the blog post went up as scheduled — and WordPress is notorious for missing schedules. It will also let you know that all of your feeds are working properly. If one of them doesn’t broadcast correctly, you’ll know you have to fix it.

Monitoring comments

Staying on top of the comments section can be a time suck. Comments are important, to be sure. They help foster discussion and encourage people to return to your blog. But a bad comments section can turn people away. As such, you’ll want to monitor what happens in your comments section. Thankfully, there’s an easy way to do this.

WordPress and other blog platforms will send you comments via email. I know many people who set up filters for these, so that they don’t see them. This is a mistake. Comment emails are highly useful. They first let you know that you got a comment. They then instantly let you know the nature of the comment. If it’s something that warrants a reply, you can click a link and reply. If it’s inappropriate, you can delete with a link from the email.

Keeping updated

Blog software often requires updates. Not only does WordPress release a new version every couple of months, but there are also updates for plugins. Keeping on top of these updates will keep your blog running efficiently. Thankfully, WordPress lets you know exactly when you need updates. There’s no need to check all of them; when you need an update, WordPress will let you know. You can even update right from your WordPress Dashboard.

Staying on top of keywords

Surely you want to stay on top of certain keywords, for SEO purposes. One way you can do this is to subscribe to a Google Alert. You can create Google Alerts for all keywords relevant to your niche, and stay on top of what shows up for each keyword. The idea is to eventually see your own content appear in these keywords.

What they’re saying about you

It might seem egotistical, but bloggers can certainly benefit from searching out their names and blog titles. It can provide insight into what people are saying about you and your site. It might not be necessary to engage everyone who says something, but just knowing they’re saying it can provide helpful tips.

You can also do this through Google Alerts, making sure to include blogs in the search. A Twitter search for your name and your blog’s name can help, too. That way you’ll know when people are talking, and what they’re talking about. The information can help you improve your blog.

There you have it: a complete SCADA system for your blog. Once you have it set up, it’s all automatic. You’ll see all of these alerts exactly when you need to see them. You can then take in the information and determine the appropriate course of action. Setting up a system like this turns something complex into something simple, allowing you to focus more on content, which is still king.

4 Tips To Force Visitors Not To Leave Your Blog

After Getting a good number of traffic to your blog the second question is that how to make them addicted to your blog ? If they Find your blog helpful for them they will surely Hold on your blog.  If there will be on your blog for a long while they will help you to improve your alexa rank and PR. When your blog gets much traffic, some of them are advertisers they will place ads on your blog and you can earn money from it. Lets come on the topic. Here are some working  4 Tips To Force Visitors Not To Leave Your Blog which will truly help you.

Clean Theme (Template)

Having a clean template of your blog will allow to read content with peace. If your blog’s theme is clean it will look professional. Don’t use too dark colors in background, use some light and impressing colors. Dark color will harass readers and force them to leave your blog. So better is that to keep an light color. Use simple fonts in blog posts so readers can read content easily.

Content Is King

Readers read blogs to enlarge their knowledge. If they don’t get enough good content they will read more and more posts of your blog. If they will find your blog’s content useless they will take your blog as garbage and never visit your blog again. Write quality content for your readers. Design a Request Accepting page where visitors ask you to share about their requirement.

Don’t set any pop-ups

If your blog have pop-ups, It will disturb users to read content. So they will go away from your blog. So be careful that your blog have no pop-ups.

Backlinks to other posts

After one paragraph, Give links of similar posts. This is a super duper trick to make keep reader for more and more time. If he will find the article helpful he will surely think that another post will be beneficial too. So that he will read another post and will get another link there and this chain continues for a long time.

Make Sub-Titles Attractive (Bonus Tip)

When you write a post usually you set some sub-titles there. If they are attractive readers will read full content in it. Try to make sub-titles as better as you can. If sub-title are good then users will believe content in it also good. So they read all and get help from it and comment it. It makes your blog’s alexa rank better.