Widget

Cool Floating Recent Tweets Widget for Blogs

cool floating twitter follower boxI recently Posted a cool twitter follower widget for blogger blog. Previous one is  a simple widget for sidebar.Today I’ve Floating Recent Tweets Widget For Blogger and WordPress Blog. When you move cursor on it. It pop out with Cool Floating Recent Tweets Widget. This is a great widget for you to increase twitter followers and force visitors to follow you. ;)
 
Below I’ll show you how to add this Cool Floating Recent Tweets Widget In Blogger and WordPress.


Live Demo

Adding Cool Floating Floating Recent Tweets Widget.

Adding Recent Tweets Widget To Blogger

  1. Go to Dashboard > Design > Page Elements.
  2. Click Add A Gadget. In window, select HTML/Javascript .
  3. Copy the code below and paste it inside the box.
  4. Click Save button.

Adding Recent Tweets Widget To WordPress

  1. Go to Dashboard > Appearance > Widgets > Available Widgets.
  2. Drag Text widget into a sidebar.
  3. Paste in the code.
  4. Save.
<style>img,a{border:0;}#on{visibility:visible;}#off{visibility:hidden;}#facebook_div{width:196px;height:353px;overflow:hidden;}#twitter_div{width:246px;height:353px;overflow:hidden;}#google_plus_div{width:152px;height:97px;overflow:hidden;margin-left:50px;margin-top:10px;}#knfeedburner_div{width:300px;height:97px;margin-top:25px;overflow:hidden;}#kakinetwork_div{width:300px;height:97px;overflow:hidden;}

#twitter_right{z-index:10004;border:2px solid #6CC5FF;background-color:#6CC5FF;width:246px;height:353px;position:fixed;right:-250px;}#twitter_right_img{position:absolute;top:-2px;left:-35px;border:0;}

#kakinetwork_right{z-index:10003;border:2px solid #303030;background-color:#fff;width:300px;height:97px;position:fixed;}#kakinetwork_right img{position:absolute;top:-2px;left:-101px;}/* left side style */#facebook_left{z-index:10005;border:2px solid #3c95d9;background-color:#fff;width:196px;height:353px;position:fixed;left:-200px;}#facebook_left img{position:absolute;top:-2px;right:-35px;}#facebook_left iframe{border:0px solid #3c95d9;overflow:hidden;position:static;height:360px;right:-2px;top:-3px;}#twitter_left{z-index:10004;border:2px solid #6CC5FF;background-color:#6CC5FF;width:246px;height:353px;position:fixed;left:-250px;}#twitter_left_img{position:absolute;top:-2px;right:-35px;border:0;}
#kakinetwork_left{z-index:10003;border:2px solid #303030;background-
color:#fff;width:300px;height:97px;position:fixed;}#kakinetwork_left img{position:absolute;top:-2px;right:-101px;}

</style><script src='http://ajax.googleapis.com/ajax/libs/jquery/1.7.1/jquery.min.js'></script><script type="text/javascript" src="http://apis.google.com/js/plusone.js"></script><script type="text/javascript">jQuery(document).ready(function(){ jQuery("#facebook_right").hover(function(){ jQuery(this).stop(true,false).animate({right:  0}, 500); },function(){ jQuery("#facebook_right").stop(true,false).animate({right: -200}, 500); });    jQuery("#twitter_right").hover(function(){ jQuery(this).stop(true,false).animate({right:  0}, 500); },function(){ jQuery("#twitter_right").stop(true,false).animate({right: -250}, 500); });     jQuery("#google_plus_right").hover(function(){ jQuery(this).stop(true,false).animate({right:  0}, 500); },function(){ jQuery("#google_plus_right").stop(true,false).animate({right: -154}, 500); });    jQuery("#feedburner_right").hover(function(){ jQuery(this).stop(true,false).animate({right:  0}, 500); },function(){ jQuery("#feedburner_right").stop(true,false).animate({right: -303}, 500); });    });</script>

<div id="on"><div id="twitter_right" style="top: 20%;"><div id="twitter_div"><img id="twitter_right_img" src="http://2.bp.blogspot.com/-fcEMbjMcVhI/UDzNfUCWxcI/AAAAAAAAAt4/p0lew_c7Sxw/s320/allbloggingtips.com-twitter-icon.png" /><script src="http://widgets.twimg.com/j/2/widget.js"></script><script>new TWTR.Widget({version: 2,type: 'profile',rpp: 4,interval: 1000,width: 246,height: 260,theme: {shell: {background: '#63BEFD',color: '#FFFFFF'},tweets: {background: '#FFFFFF',color: '#000000',links: '#47a61e'}},features: { loop: false,live: true,scrollbar: false,hashtags: false,timestamp: true,avatars: true,behavior: 'all' }}).render().setUser('allbloggingtips').start();</script></div></div></div>

</div>

Just replace allbloggingtips with your twitter username. That’s it! :D

Visit your Blogs to see it floating at the right side of your webpage. I hope this Floating Recent Tweets Widget will help you in increasing the number of your Twitter Followers. That’s all. If you face any problem in Floating Floating Recent Tweets Widget then don’t stop just drop your comments and Feel free to ask.

Animated Social Sharing Widget with Cool Hover!

You must have heard about Shareaholic, The Leader in the creation of stylish sharing scripts. After Their Great Success of The Sexy Bookmarks, recently they just have created another awesome design which is known as SassyBookmarks ( Social Sharing Widget ). Here in this post i’ll let you know how to implement SassyBookmarks or Social Sharing Widget on your wordpress and blogger site! :)

animated social sharing widgets
Live Demo!

How to Add Animated Social Sharing Widget to blogs? (Updated!)

Adding to WordPress!

  • Go To Your dashboard, Then Click On Appearance and then Navigate To Editor.
  • Now on The Right Side you can a list of template files, move your mouse to footer.php and then click on that
  • As Soon the page loads completely, Press CTRL+F and Find </body>
  •  Now be careful and paste the below code just about it !
  • Hit on Update File, Now Visit Your WordPress Blog ! You can see it located on The Bottom Left

Adding to Blogger/Blogspot!

  • Go to Blogger Dashboard > Template
  • Take a backup of your template.
  • Now find for below code in your template </body>
  • Add below piece of code just above/before of above code.


<!-- Start Social Sharing Widget Sassy Bookmarks HTML (allbloggingtips.com)-->
<div class="shr_ss shr_publisher">

</div>
<!-- End Shareaholic Sassy Bookmarks HTML -->
<!-- Start Shareaholic Sassy Bookmarks settings -->
<script type="text/javascript">
  var SHRSS_Settings = {"shr_ss":{"src":"//dtym7iokkjlif.cloudfront.net/media/downloads/sassybookmark","link":"","service":"5,7,2,313,38,201,88,74","apikey":"b87f5899d80a5edce8b5e55f58542ef0f","localize":true,"shortener":"bitly","shortener_key":"","designer_toolTips":true,"tip_bg_color":"black","tip_text_color":"white","viewport":true,"twitter_template":"${title} - ${short_link} via @Shareaholic"}};
  </script>
 <!-- End Shareaholic Sassy Bookmarks settings -->
<!-- Start Shareaholic Sassy Bookmarks script -->
<script type="text/javascript">
       (function() {
            var sb = document.createElement("script"); sb.type = "text/javascript";sb.async = true;
            sb.src = ("https:" == document.location.protocol ? "https://dtym7iokkjlif.cloudfront.net" : "http://cdn.shareaholic.com") + "/media/js/jquery.shareaholic-publishers-ss.min.js";
            var s = document.getElementsByTagName("script")[0]; s.parentNode.insertBefore(sb, s);
        })();
        </script>

<!-- End Shareaholic Sassy Bookmarks script -->


Endlines.
Hope You’ve find this implementation interesting. This Social Sharing Widget Code Snippet is a the property of Shareholic so please don’t remove the copyrights ! Peace and Blessing pals :D

New Year Countdown Widget For Blogger And WordPress

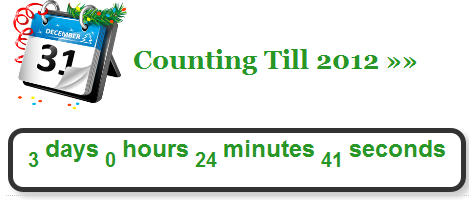
First of all I would like to wishes you Happy New Year 2012. I now comes with a cool New Year CountDown Widget For Blogger And WordPress Blogs for all Muslims, Christian and others. The countdown widget counts down to 31 December 2011 and in military time format by counting days, hours, minutes and seconds left for the coming New Year 2012  event. It also alerts and wishes New Year 2012 by generating a pop-up once the count down ends.

LIVE DEMO

See Previous Blogger Tutorial >> How Add Animated Favicons To Blogger

Add CountDown Gadget To Blogspot

  1. Go To Blogger > Design
  2. Choose HTML/JavaScript widget
  3. Paste the following code inside it,

<style style=”text/css”>

.lcdstyle{ /*Example CSS to create LCD countdown look*/
background:#fff;
color:#289728;
font: bold 20px arial;
padding: 15px;

border:5px solid #333333;

border-radius:15px;
-moz-border-radius:15px;
-webkit-border-radius:15px;
box-shadow: 5px 5px 5px #CCCCCC;
}

.lcdstyle sup{ /*Example CSS to create LCD countdown look*/
font-size: 120%
}

</style>

<script type=”text/javascript”>

function cdtime(container, targetdate){
if (!document.getElementById || !document.getElementById(container)) return
this.container=document.getElementById(container)
this.currentTime=new Date()
this.targetdate=new Date(targetdate)
this.timesup=false
this.updateTime()
}

cdtime.prototype.updateTime=function(){
var thisobj=this
this.currentTime.setSeconds(this.currentTime.getSeconds()+1)
setTimeout(function(){thisobj.updateTime()}, 1000) //update time every second
}

cdtime.prototype.displaycountdown=function(baseunit, functionref){
this.baseunit=baseunit
this.formatresults=functionref
this.showresults()
}

cdtime.prototype.showresults=function(){
var thisobj=this
var timediff=(this.targetdate-this.currentTime)/1000 //difference btw target date and current date, in seconds
if (timediff<0){ //if time is up
this.timesup=true
this.container.innerHTML=this.formatresults()
return
}
var oneMinute=60 //minute unit in seconds
var oneHour=60*60 //hour unit in seconds
var oneDay=60*60*24 //day unit in seconds
var dayfield=Math.floor(timediff/oneDay)
var hourfield=Math.floor((timediff-dayfield*oneDay)/oneHour)
var minutefield=Math.floor((timediff-dayfield*oneDay-hourfield*oneHour)/oneMinute)
var secondfield=Math.floor((timediff-dayfield*oneDay-hourfield*oneHour-minutefield*oneMinute))
if (this.baseunit==”hours”){ //if base unit is hours, set “hourfield” to be topmost level
hourfield=dayfield*24+hourfield
dayfield=”n/a”
}
else if (this.baseunit==”minutes”){ //if base unit is minutes, set “minutefield” to be topmost level
minutefield=dayfield*24*60+hourfield*60+minutefield
dayfield=hourfield=”n/a”
}
else if (this.baseunit==”seconds”){ //if base unit is seconds, set “secondfield” to be topmost level
var secondfield=timediff
dayfield=hourfield=minutefield=”n/a”
}
this.container.innerHTML=this.formatresults(dayfield, hourfield, minutefield, secondfield)
setTimeout(function(){thisobj.showresults()}, 1000) //update results every second
}

/////CUSTOM FORMAT OUTPUT FUNCTIONS BELOW//////////////////////////////

//Create your own custom format function to pass into cdtime.displaycountdown()
//Use arguments[0] to access “Days” left
//Use arguments[1] to access “Hours” left
//Use arguments[2] to access “Minutes” left
//Use arguments[3] to access “Seconds” left

//The values of these arguments may change depending on the “baseunit” parameter of cdtime.displaycountdown()
//For example, if “baseunit” is set to “hours”, arguments[0] becomes meaningless and contains “n/a”
//For example, if “baseunit” is set to “minutes”, arguments[0] and arguments[1] become meaningless etc
function formatresults(){
if (this.timesup==false){//if target date/time not yet met
var displaystring=arguments[0]+” days “+arguments[1]+” hours “+arguments[2]+” minutes “+arguments[3]+” seconds left until December 25, 2011 18:25:00″
}
else{ //else if target date/time met
var displaystring=””
}
return displaystring
}

function formatresults2(){
if (this.timesup==false){ //if target date/time not yet met
var displaystring=”<span class=’lcdstyle’>”+arguments[0]+” <sup>days</sup> “+arguments[1]+” <sup>hours</sup> “+arguments[2]+” <sup>minutes</sup> “+arguments[3]+” <sup>seconds</sup></span> ”
}
else{ //else if target date/time met
var displaystring=”” //Don’t display any text
alert(“HAPPY NEW YEAR EVERYBODY!“) //Instead, perform a custom alert
}
return displaystring
}

</script>
<table><tbody>
<tr>
<td>
<img style=”float:left; ” src=”http://3.bp.blogspot.com/-id6x2AOCGc4/TvoJfxRT-oI/AAAAAAAAFso/HKKnQ5bcnGY/s400/NEW%2BYEAR.png” width=”125px”/>
<h1 style=”color:#289728; padding-top:40px;”>Counting Till 2012 »»</h1><br/>
</td></tr>

<tr><td>
<div id=”countdowncontainer”></div>
<br />
<div id=”countdowncontainer2″></div>

<script type=”text/javascript”>

var futuredate=new cdtime(“countdowncontainer”, “March 23, 2009 18:25:00”)
futuredate.displaycountdown(“days”, formatresults)

var currentyear=new Date().getFullYear()
//dynamically get this Christmas’ year value. If Christmas already passed, then year=current year+1
var thischristmasyear=(new Date().getMonth()>=11 && new Date().getDate()>31)? currentyear+1 : currentyear
var christmas=new cdtime(“countdowncontainer2”, “December 31, “+thischristmasyear+” 0:0:00″)
christmas.displaycountdown(“days”, formatresults2)

</script>

</td></tr>
</tbody></table>


Add CountDown Widget to WordPress

Add below code to your sidebar widget and you have done.

<style style=”text/css”>

.lcdstyle{ /*Example CSS to create LCD countdown look*/
background:#fff;
color:#289728;
font: bold 20px arial;
padding: 15px;

border:5px solid #333333;

border-radius:15px;
-moz-border-radius:15px;
-webkit-border-radius:15px;
box-shadow: 5px 5px 5px #CCCCCC;

}

.lcdstyle sup{ /*Example CSS to create LCD countdown look*/
font-size: 120%
}

</style>

<script type=”text/javascript”>

function cdtime(container, targetdate){
if (!document.getElementById || !document.getElementById(container)) return
this.container=document.getElementById(container)
this.currentTime=new Date()
this.targetdate=new Date(targetdate)
this.timesup=false
this.updateTime()
}

cdtime.prototype.updateTime=function(){
var thisobj=this
this.currentTime.setSeconds(this.currentTime.getSeconds()+1)
setTimeout(function(){thisobj.updateTime()}, 1000) //update time every second
}

cdtime.prototype.displaycountdown=function(baseunit, functionref){
this.baseunit=baseunit
this.formatresults=functionref
this.showresults()
}

cdtime.prototype.showresults=function(){
var thisobj=this

var timediff=(this.targetdate-this.currentTime)/1000 //difference btw target date and current date, in seconds
if (timediff<0){ //if time is up
this.timesup=true
this.container.innerHTML=this.formatresults()
return
}
var oneMinute=60 //minute unit in seconds
var oneHour=60*60 //hour unit in seconds
var oneDay=60*60*24 //day unit in seconds
var dayfield=Math.floor(timediff/oneDay)
var hourfield=Math.floor((timediff-dayfield*oneDay)/oneHour)
var minutefield=Math.floor((timediff-dayfield*oneDay-hourfield*oneHour)/oneMinute)
var secondfield=Math.floor((timediff-dayfield*oneDay-hourfield*oneHour-minutefield*oneMinute))
if (this.baseunit==”hours”){ //if base unit is hours, set “hourfield” to be topmost level
hourfield=dayfield*24+hourfield
dayfield=”n/a”
}
else if (this.baseunit==”minutes”){ //if base unit is minutes, set “minutefield” to be topmost level
minutefield=dayfield*24*60+hourfield*60+minutefield
dayfield=hourfield=”n/a”
}
else if (this.baseunit==”seconds”){ //if base unit is seconds, set “secondfield” to be topmost level
var secondfield=timediff
dayfield=hourfield=minutefield=”n/a”
}
this.container.innerHTML=this.formatresults(dayfield, hourfield, minutefield, secondfield)
setTimeout(function(){thisobj.showresults()}, 1000) //update results every second
}

/////CUSTOM FORMAT OUTPUT FUNCTIONS BELOW//////////////////////////////

//Create your own custom format function to pass into cdtime.displaycountdown()
//Use arguments[0] to access “Days” left
//Use arguments[1] to access “Hours” left
//Use arguments[2] to access “Minutes” left
//Use arguments[3] to access “Seconds” left

//The values of these arguments may change depending on the “baseunit” parameter of cdtime.displaycountdown()
//For example, if “baseunit” is set to “hours”, arguments[0] becomes meaningless and contains “n/a”
//For example, if “baseunit” is set to “minutes”, arguments[0] and arguments[1] become meaningless etc

function formatresults(){
if (this.timesup==false){//if target date/time not yet met
var displaystring=arguments[0]+” days “+arguments[1]+” hours “+arguments[2]+” minutes “+arguments[3]+” seconds left until December 25, 2011 18:25:00″
}
else{ //else if target date/time met
var displaystring=””
}
return displaystring
}

function formatresults2(){
if (this.timesup==false){ //if target date/time not yet met
var displaystring=”<span class=’lcdstyle’>”+arguments[0]+” <sup>days</sup> “+arguments[1]+” <sup>hours</sup> “+arguments[2]+” <sup>minutes</sup> “+arguments[3]+” <sup>seconds</sup></span> ”
}
else{ //else if target date/time met
var displaystring=”” //Don’t display any text
alert(“HAPPY NEW YEAR EVERYBODY!”) //Instead, perform a custom alert
}
return displaystring
}

</script>
<table><tbody>
<tr> <td>
<img style=”float:left; ” src=”http://3.bp.blogspot.com/-id6x2AOCGc4/TvoJfxRT-oI/AAAAAAAAFso/HKKnQ5bcnGY/s400/NEW%2BYEAR.png” width=”125px”/>
<h1 style=”color:#289728; padding-top:40px;”>
Counting Till 2012 »»</h1>

</td></tr>
<tr><td>
<div id=”countdowncontainer”>
</div>

<div id=”countdowncontainer2″>
</div>

<script type=”text/javascript”>

var futuredate=new cdtime(“countdowncontainer”, “March 23, 2009 18:25:00”)
futuredate.displaycountdown(“days”, formatresults)

var currentyear=new Date().getFullYear()
//dynamically get this Christmas’ year value. If Christmas already passed, then year=current year+1
var thischristmasyear=(new Date().getMonth()>=11 && new Date().getDate()>31)? currentyear+1 : currentyear
var christmas=new cdtime(“countdowncontainer2”, “December 31, “+thischristmasyear+” 0:0:00″)
christmas.displaycountdown(“days”, formatresults2)

</script>

</td></tr>
</tbody></table>

Make these changes to its colors and font if you wish:

  • To change font color of the clock edit color:#289728;
  • To change border color edit border:5px solid #333333;
  • To change the text color edit color:#289728 4. Save your widget and drag it just above your blog posts body.
  • The purple texts can be easily edited to any message you wish to write.