WordPress

New Mashable Style Social Subscription Widget

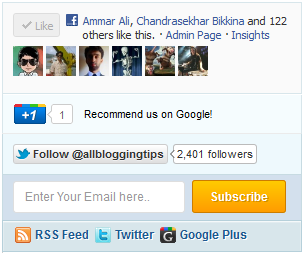
Today we comes with New Mashable Style Social Subscription Widget.  You can add this to your wordpress or blogger/blogspot blogs. It includes Like Button, Google+, Twitter follower with a cool subscribe box. New Mashable Style Social Subscription Widget an attractive subscription form that will further increase the number of your Email subscribers. The conversion didn’t took me very long and I am pleased to present it to all of you. Kindly see a demo first:

 Live Demo

Adding New Mashable Style Social Subscription Widget

You just need to place a code to your blog widget Follow following steps to add New Mashable Style Social Subscription Widget to WordPress and Blogger.

Adding To Blogger

  1. Go to Design > Page Elements.
  2. Click Add A Gadget.
  3. In Add A Gadget window, select HTML/Javascript .
  4. Copy the code below and paste it inside the content box.
  5. Save the gadget.
  6. Drag the gadget and reposition it under Blog Posts gadget.
  7. Click Save button (top right hand corner).

Adding To WordPress

  1. Go to Dashboard > Appearance > Widgets > Available Widgets.
  2. Drag Text widget into a sidebar.
  3. Paste in the code.
  4. Save.

Note: If This widget is not working on you blogspot and wordpress blogs then download this code   and place it as a widget nstead of give below.

<style>
    /* Social Widget */
    #ABT-mashable-bar {
        border: 0;
        margin-bottom: 10px;
        margin: 0 auto;
            width:300px;
    }
    .fb-likebox {
        background: #fafafa;
        padding: 10px 10px 0 10px;
        border: 1px solid #D8E6EB;
        margin-top: -2px;
            height:80px;
    }
    .googleplus {
        background: #F5FCFE;
        border-top: 1px solid #FFF;
        border-bottom: 1px solid #ebebeb;
        border-right: 1px solid #D8E6EB;
        border-left: 1px solid #D8E6EB;
        border-image: initial;
        font-size: .90em;
        font-family: "Arial","Helvetica",sans-serif;
        color: #000;
        padding: 9px 11px;
        line-height: 1px;}
    .googleplus span {
        color: #000;
        font-size: 11px;
        position: absolute;
        display:inline-block;
        margin: 9px 70px;}
    .g-plusone {    float: left;}
    .twitter {
        background: #EEF9FD;
        padding: 10px;
        border: 1px solid #C7DBE2;
        border-top: 0;}
    #mashable {
        background: #EBEBEB;
        border: 1px solid #CCC;
        border-top: 1px solid white;
        padding: 2px 8px 2px 3px;
        text-align: right;
        border-image: initial;}
    #mashable .author-credit {}
    #mashable .author-credit a {
        font-size: 10px;
        font-weight: bold;
        text-shadow: 1px 1px white;
        color: #1E598E;
        text-decoration:none;}
    #email-news-subscribe .email-box{
        padding: 5px 10px;
        font-family: "Arial","Helvetica",sans-serif;
        border-top: 0;
        border-right: 1px solid #C7DBE2;
        border-left: 1px solid #C7DBE2;         background: #d3e0ed;
        border-image: initial;
       height:35px;}
    #email-news-subscribe .email-box input.email{
        background:#FFFFFF;
        border: 1px solid #dedede;
        color: #999;
        padding: 7px 10px 8px 10px;
        -moz-border-radius: 3px;
        -webkit-border-radius: 3px;
        -o-border-radius: 3px;
        -ms-border-radius: 3px;
        -khtml-border-radius: 3px;
        border-radius: 3px;
        border-image: initial;
        font-family: "Arial","Helvetica",sans-serif;}
    #email-news-subscribe .email-box input.email:focus{color:#333}
    #email-news-subscribe .email-box input.subscribe{
        background: -moz-linear-gradient(center top,#FFCA00 0,#FF9B00 100%);
        background: -webkit-gradient(linear,left top,left bottom,color-stop(0,#FFCA00),color-stop(1,#FF9B00));
        background: -moz-linear-gradient(center top,#FFCA00 0,#FF9B00 100%);
        -pie-background: linear-gradient(270deg,#ffca00,#ff9b00);
        font-family: "Arial","Helvetica",sans-serif;
        border-radius:3px;
        -moz-border-radius:3px;
        -webkit-border-radius:3px;
        border:1px solid #cc7c00;
        color:white;
        text-shadow:#d08d00 1px 1px 0;
        padding:7px 14px;
        margin-left:3px;
        font-weight:bold;
        font-size:12px;
        cursor:pointer;
        border-image: initial;}
    #email-news-subscribe .email-box input.subscribe:hover{
        background: #ff9b00;
        background-image:-moz-linear-gradient(top,#ffda4d,#ff9b00);
        background-image:-webkit-gradient(linear,left top,left bottom,from(#ffda4d),to(#ff9b00));
        filter:progid:DXImageTransform.Microsoft.Gradient(startColorStr=#ffffff,endColorStr=#ebebeb);
        outline:0;-moz-box-shadow:0 0 3px #999;
        -webkit-box-shadow:0 0 3px #999;
        box-shadow:0 0 3px #999
        background:-webkit-gradient(linear,left top,left bottom,color-stop(0,#ffda4d),color-stop(1,#ff9b00));
        background:-moz-linear-gradient(center top,#ffda4d 0,#ff9b00 100%);
        -pie-background:linear-gradient(270deg,#ffda4d,#ff9b00);
        border-radius:3px;
        -moz-border-radius:3px;
        -webkit-border-radius:3px;
        border:1px solid #cc7c00;
        color:#FFFFFF;
        text-shadow:#d08d00 1px 1px 0}
    #other-social-bar {
        background-color: #D8E6EB;
        box-shadow: 0 1px 1px #FFFFFF inset;
        padding: 0px;
        font-family: "Arial","Helvetica",sans-serif;
        font-weight:bold;
        overflow: hidden;
        border: 1px solid #B6D0DA;
           height:30px;
    }
    #other-social-bar ul {list-style: none outside none; padding-left: 4px;}
    #other-social-bar .other-follow {
        float: left;
        color:#1E598E;
        overflow: hidden;
        height:20px;
        padding:7px;
        width: 270px;}
    #other-social-bar .other-follow ul {
        list-style: none outside none;
        padding-left: 4px;}
    #other-social-bar .other-follow ul li {
        font-size: 12px;
        font-weight: bold;
        display:inline;
        border:0;
        text-shadow: 1px 1px white;}
    #other-social-bar .other-follow ul li a {
        font-size: 12px;
        color:#1E598E;
        font-weight: bold;
        display:inline;
        text-shadow: 1px 1px white;}
    #other-social-bar .other-follow li {
        font-size: 12px;
        font-weight: bold;
        display:inline;
        border:0;
        text-shadow: 1px 1px white;}
    #other-social-bar .other-follow li a {
        font-size: 12px;
        color:#1E598E;
        font-weight: bold;
        display:inline;
        text-shadow: 1px 1px white;}
    #other-social-bar .other-follow li.my-rss {
        background: url('http://3.bp.blogspot.com/-sR72SM_Wets/TwHZG9y4hXI/AAAAAAAAFv8/0bP2R3Qkl8c/s400/rss-16x16.png') no-repeat transparent;
        line-height: 1;
        padding: 0px 3px 1px 20px;
        width: 60px;
        margin-bottom:0px;
            margin-left:5px;}

    #other-social-bar .other-follow li.my-rss a, #other-social-bar .other-follow li.my-linkedin a, #other-social-bar .other-follow li.my-gplus a{
    text-decoration:none;
    }

    #other-social-bar .other-follow li.my-rss a:hover, #other-social-bar .other-follow li.my-linkedin a:hover, #other-social-bar .other-follow li.my-gplus a:hover{
    text-decoration:underline;
    }

    #other-social-bar .other-follow li.my-linkedin {
        background: url('http://madbaydesigns.com/shop/images/social_bookmarks/twitter.png') no-repeat transparent;
        line-height: 1;
        padding: 0px 3px 1px 20px;
        width: 60px;
        margin-bottom:0px;}
    #other-social-bar .other-follow li.my-gplus {
        background: url(http://4.bp.blogspot.com/-cC729VpBxrk/TwHZE71ZgoI/AAAAAAAAFvk/_UMyIgA8vj8/s400/gplus-16x16.png) no-repeat transparent;
        line-height: 1;
        width: 60px;
        padding: 0px 3px 1px 20px;
        margin-bottom:0px;}

    </style>

    <!--[if IE]>

    <style>
    #email-news-subscribe .email-box input.subscribe{
        background: #FFCA00;
        }
    </style>

    <![endif]-->

    <!--begin of social widget--> <div style="margin-bottom:10px;"> <div id="ABT-mashable-bar" > <!-- Begin Widget --> <div> <!-- Facebook --> <iframe src="//www.facebook.com/plugins/like.php?href=http://facebook.com/allbloggingtips&amp;send=false&amp;layout=standard&amp; width=200px&amp;show_faces=true&amp;action=like&amp;colorscheme=light&amp;

    font&amp;height=100px&amp;appId=234513819928295" scrolling="no" frameborder="0" style="border:none; overflow:hidden; "></iframe> </div> <div> <!-- Google --> <span>Recommend us on Google!</span><div data-size="medium"></div> <script type="text/javascript" src="https://apis.google.com/js/plusone.js"></script> </div> <div> <!-- Twitter --> <iframe title="" style="width: 300px; height: 20px;" src="http://platform.twitter.com/widgets/follow_button.html#_=1319978796351&amp;

    align=&amp;button=blue&amp;id=twitter_tweet_button_0&amp;

    lang=en&amp;link_color=&amp;screen_name=allbloggingtips&amp;show_count=&amp;

    show_screen_name=&amp;text_color=" frameborder="0" scrolling="no"></iframe> </div> 

 <div id="email-news-subscribe"> <!-- Email Subscribe --> <div>

    <form action="http://feedburner.google.com/fb/a/mailverify" method="post" target="popupwindow" onsubmit="window.open('http://feedburner.google.com/fb/a/mailverify?uri=tntbystc', 'popupwindow', 'scrollbars=yes,width=550,height=520');return true">
            <input type="text" style="width: 150px; font-size: 12px;" id="email" name="email" value="Enter Your Email here.." onfocus="if(this.value==this.defaultValue)this.value=&#39;&#39;;" onblur="if(this.value==&#39;&#39;)this.value=this.defaultValue;" />
            <input type="hidden" value="tntbystc" name="uri" />
            <input type="hidden" name="loc" value="en_US" />
            <input name="commit" type="submit" value="Subscribe" />
        </form>

    </div> </div>

<div id="other-social-bar"> <!-- Other Social Bar --> <ul> <li> <a rel="nofollow" title="RSS" href="http://feeds.feedburner.com/allbloggingtips" target="_blank">RSS Feed</a> </li> <li> <a rel="nofollow" title="linkedin" rel="author" href="AllBloggingtips" target="_blank">Twitter</a> </li> <li> <a rel="nofollow" title="Google Plus" rel="author" href="http://plus.google.com/44448117245314564536" target="_blank">Google Plus</a> </li> </ul> </div><div id="mashable" style="background: #e3e3e3;border: 1px solid #CCC;border-top: 1px solid white;padding: 1px 8px 1px 3px;text-align: right;border-image: initial;font-size:10px;font-family: "arial","helvetica",sans-serif;"> <span style="font-family: Arial, Helvetica, sans-serif;"></span></div></div>
    <!-- End Widget --> </div> <!--end of social widget-->

Make these important changes:

  • Replace AllBloggingTips with your Facebook username
  • Replace AllBloggingTips with your twitter username
  • Replace AllBloggingTips with your Feedburner title. Your Feedburner title is the word added at the end of your Feedburner link. Example: Allbloggingtips
  • Replace AllBloggingTips with your feedburner  link.
  • Replace Allbloggingtips with your Twitter profile link
  • Replace Google+Profile Link with your Google Plus profile link

5.   Hit save and you are all done!

Visit your blogs to see it working just perfectly. :)

I have set the width of the widget to 290px. If in case your sidebar is small or big, you may then have to adjust the two width values in brown highlight color. The first will set the width of the entire container and the second value will set the width of the subscription input box.

Credits:

You are most welcomed to share this widget with your readers. You will have to give credits to AllBloggingTips blog by attaching a link back to this post. You may also give credits to the author for the wordpress version of this sharing plugin.

Power of The WordPress Website Design

CMS which is also said to be the Content Management System, this is one of the most considerable tools which we should have in our website it would take care of al our website development needs. Initially in our online business we want to set it up as cost-effective one, this also includes the locating of our website as well.

Over the period we should observe that word press is the best blogging platform in the market, and it would be the most popular platform in the online hosting and content management. Whether we start a blog or the website, there are a number of CMS platform that we could pick from, but only with the word press website design we could obtain certain benefits that we do not get in the other CMS frame works.
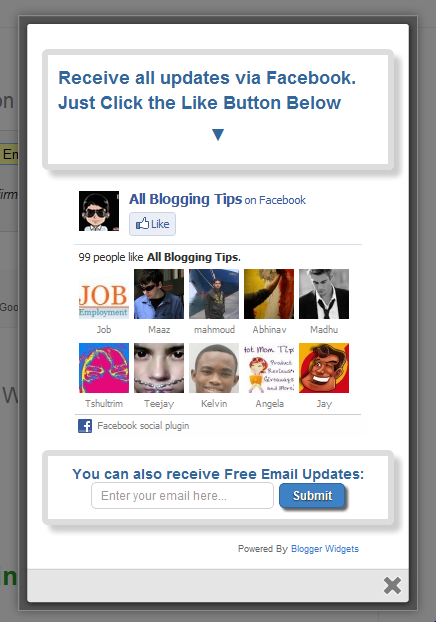
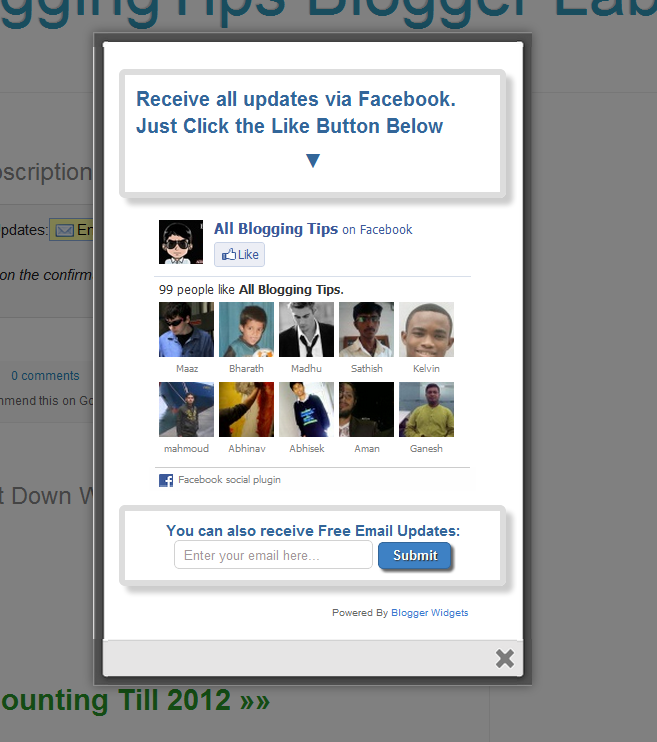
Image Source Code

The merits of the wordpress frameworks are:

  • As a laymen we would find for usual updates and changes, which are often required for blogs, nothing could make more logic than the wordpress. There is no need to have any sort of technical or the computer proficiency to take care about the updates, modifications and also the changes.
  • The most important merits of the notorious wordpress is, it is super SEO friendly. For many companies being SEO friendly is a mandatory necessity, and this is considered to be a thing which the wordpress could automatically provide.
  • We could decide on so many different wordpress themes. All these would provide our website a unique and dynamic look; there are so many custom wordpress themes that we could pick from and we could even see for ourselves, which would be the most suited for our website.
  • This would also make the work of the developers easy and fast, when we try to get to see the immediate results.
  • Along with the wordpress CMS templates building and designing websites, from scratch is no longer a problem. We could even set up our own website with ease. All we need is to pick the right developer to seek help from him.
  • The bus words with word press are Add-ons, plugins, and the themes. There are several things to choose from and the most of them are low at cost. We could have lot of varieties at the same time and it is all very low on cost, word press has just got better.

These are only the few of the advantages which we could get with wordpress, but for the great experience we not only require the best CMS framework but we also require expert, experienced, qualified and also the skilled wordpress theme designers so hope you had enjoyed Power of The WordPress Website Design. See also Tips To Design And Launch a New Website – blog.sgsmediasoft.com

Another Cool jQuery Popup For Facebook Like Box – v2

jQuery Popup For Facebook Like BoxAfter our previous Cute jQuery Popup For Facebook Like Box.  We decided to release Another Cool jQuery Popup For Facebook Like Box – v2. This is a great widget to increase likes. You may see on most sites or blogs which are using Popups to increase there subscribers, fans and followers.  As soon as new visitors arrive your blog the popup will be showed to your visitors which can help you to increase likes and get more traffic from Facebook.

Check out demo below and than I show you How to Add Another Cool jQuery Popup For Facebook Like Box – v2  in Blogger or WordPress?

Live Demo

How To Another Cool jQuery Popup For Facebook Like Box – v2

I am discussing here steps for WordPress and Blogger but if you know how to deal simple HTML code then you can easily add it to your any blog too.

Adding To Blogger

  1. Go to Design > Page Elements.
  2. Click Add A Gadget.
  3. In Add A Gadget window, select HTML/Javascript .
  4. Copy the code below and paste it inside the content box.
  5. Save the gadget.
  6. Drag the gadget and reposition it under Blog Posts gadget.
  7. Click Save button (top right hand corner).

Adding To WordPress

  1. Go to Dashboard > Appearance > Widgets > Available Widgets.
  2. Drag Text widget into a sidebar.
  3. Paste in the code.
  4. Save.


Download Code Here!

Make this simple change:

  • Replace allbloggingtips with your facebook username.
  • Replace latestbloggingtips4u with your feedburner name

Are you Want the widget to appear Repeatedly

If you want to prompt the likebox every time the visitor enters your blog then simply delete this *30 from the code above.
Visit your blog to see Facebook popup. To review the widget again and again just delete your browser cookies and refresh the page to see it appearing again. That’s it a cool Facebook pop up widget that will surly increase your facebook fan count.Thanks again to MBT for the original gadget.

jQuery Popup For Facebook Like Box

Need Help?

I hope that all unanswered queries on the previous tutorial are covered in this post. If you still need help in changing colors and other stuff then you are most welcomed to post your queries below. Have a nice day pals! )

New Floating Social Media Buttons With Cool Hover Effect

Today  I comes with New Floating Social Media Buttons With Cool Hover Effect. You can add floating social media buttons to WordPress and Blogger. You may have seen floating social media buttons on other website and blogs but we try to provide you some unique style widget which you never seen anywhere. I made this into a simple widget so you don’t need to go into your template or theme source just paste code below to your blog.

Only of best feature of this is a hover effect. When you hover your mouse the button comes with a cool background hover. I had included some most used social media sharing buttons like Google+, Facebook Like Buttons, Stumbleupon, Twitter and Digg. Each of them comes with a live counter.You can add more social bookmarking or sharing buttons later if you wish.


Social Media Sharing Buttons from ABT


Live Demo


Adding Floating Social Media Buttons With Cool Hover Effect

You just need to place a code to your blog widget Follow following steps to add floating social media buttons to WordPress and Blogger.

Adding To Blogger

  1. Go to Design > Page Elements.
  2. Click Add A Gadget.
  3. In Add A Gadget window, select HTML/Javascript .
  4. Copy the code below and paste it inside the content box.
  5. Save the gadget.
  6. Drag the gadget and reposition it under Blog Posts gadget.
  7. Click Save button (top right hand corner).

Adding To WordPress

  1. Go to Dashboard > Appearance > Widgets > Available Widgets.
  2. Drag Text widget into a sidebar.
  3. Paste in the code.
  4. Save.
 <!-- floating share bar Start AllBloggingTips.com-->
<style type="text/css">
.sbutton{
background:#f0f0f0;
cursor:pointer;
color:#fff;
border:none;
padding:4px;
text-shadow:0 -1px 1px rgba(0,0,0,0.25);
-moz-border-radius:6px;
-webkit-border-radius:6px;
border-radius:6px; margin-left:8px;
font:12px sans-serif;
}
.sbutton:hover{
background:#336699;
}
#pageshare {position:fixed; bottom:15%; margin-left:-81px; float:left; border-radius:5px;-moz-border-radius:5px;-webkit-border-radius:5px;background:#fff;border: 1px solid #f7f7f7; padding:0 0 2px 0;z-index:10;}
#pageshare .sbutton {float:left;clear:both;margin:5px 2px 0 5px;}
#pageshare:hover {-moz-border-radius:6px;
    -moz-box-shadow: 0 2px 4px hsla(0,0%,0%,.35);
    -webkit-box-shadow: 0 2px 4px hsla(0,0%,0%,.35);border: 1px solid #ddd;}
.fb_share_count_top {width:48px !important;}
.fb_share_count_top, .fb_share_count_inner {-moz-border-radius:3px;-webkit-border-radius:3px;}
.FBConnectButton_Small, .FBConnectButton_RTL_Small {width:49px !important; -moz-border-radius:3px;/*bs-fsmsb*/-webkit-border-radius:3px;}
.FBConnectButton_Small .FBConnectButton_Text {padding:2px 2px 3px !important;-moz-border-radius:3px;-webkit-border-radius:3px;font-size:8px;}
</style>
<div id='pageshare' title="Get this from AllBloggingTips.com">
<div class='sbutton' id='fb'>
<a name="fb_share" type="box_count" href="http://www.facebook.com/sharer.php">Share</a><script src="http://static.ak.fbcdn.net/connect.php/js/FB.Share" type="text/javascript"></script>
</div>

<div class='sbutton' id='su'>
<script src="http://www.stumbleupon.com/hostedbadge.php?s=5"></script>
</div>

<div class='sbutton' id='digg' style='margin-left:3px;width:48px'>
<script src='http://widgets.digg.com/buttons.js' type='text/javascript'></script>
<a></a>
</div>
<div class='sbutton' id='gplusone'>
<script type="text/javascript" src="https://apis.google.com/js/plusone.js"></script>
<g:plusone size="tall"></g:plusone>
</div>
<div class='sbutton' id='rt'>
<a class='twitter-share-button' data-count='vertical' href='https://twitter.com/share'>Tweet</a><script src='//platform.twitter.com/widgets.js' type='text/javascript'/></script></div><div style="clear: both;font-size: 9px;text-align:center;"></div><!-- Do not remove this link -->
</div><!-- floating share bar End -->

Credits

This New Floating Social Media Buttons With Cool Hover Effect is first shared on AllBloggingTips. Bloggers are requested to link back if they are going to share above widget with there visitors.

If you face any problem in adding this floating social media buttons feel free to drop your comments. Enjoy! Peace

New Cool Social Icons With Hover Effect Widget V2

After a lot of trial, efforts and modify Previous Cool Social Icons With Hover Effect Widget. I finally created this cool, stylish , awesome Social Icons With Hover Effect Widget v2. You can now add this social icons with hover effect v2 widget to both WordPress and Blogger. You can easily add this to your sidebar which is a better option to take attention of visitors. This social icons with hover effect is available only on AllBlogggingTips. I made it to work for both Blogger and WordPress Blogs. I show you How TO Add Cool Social Icons With Hover Effect v2 Widget To WordPress and Blogger. Check out demo below.

Features: We had added new most commonly used social media profile icons like Google+, Facebook, Twitter, RSS and Email which was not in previous V1

See alsoSocial Icons with hover effects


Live Demo

Credits

This Cool Social Icons With Hover Effect Widget V2 is first shared on AllBloggingTips. Bloggers are requested to link back if they are going to share above widget with there visitors.

Add Cool Social Icons With Hover Effect v2 Widget To Blogger

Adding CSS Code

  1. Go To Blogger > Layout > Edit HTML
  2. Search For ]]></b:skin>
  3. And paste the code below just above ]]></b:skin>
/* Social Widget by AllBloggingTips*/

#subscribe2 {
background:#f3f3f3;
border: 1px solid #ECEDE8;
font-size: 90%;
margin: 0 0 15px 0;
padding: 7px 5px 3px 5px;
width: 288px;
}
.subscribe-icons2 {
margin: 0 auto;
width: 286px;     background: #f7f7f7;
}
.subscribe-icons2 li {     -moz-border-radius:6px;
display: inline;
float: left;
font-size: 11px;
margin: 0 2px 10px 2px;
width: 52px;
text-align: center;
}
.subscribe-icons2 a {
color: #444 !important;
display: block;
padding: 56px 0 2px;
-moz-transition: all .2s ease-out;
-webkit-transition: all .2s ease-out;
}
.subscribe-icons2 a:hover {     -moz-border-radius:6px;
-moz-box-shadow: 0 2px 4px hsla(0,0%,0%,.35);
-webkit-box-shadow: 0 2px 4px hsla(0,0%,0%,.35);
color: #369 !important;
text-decoration: none;
}
.subscribe-icons2 .subscribe-youtube a {
background: url(http://karrersimpson.com/obituaries/tomchuk-helen-1575/icon64_googleplus.png) center top no-repeat;
}
.subscribe-icons2 .subscribe-twitter a {
background: url(http://karrersimpson.com/obituaries/tomchuk-helen-1575/icon64_twittert.png) center top no-repeat;
}
.subscribe-icons2 .subscribe-facebook a {
background: url(http://karrersimpson.com/obituaries/tomchuk-helen-1575/icon64_facebook.png) center top no-repeat;
}
.subscribe-icons2 .subscribe-rss a {
background: url(http://karrersimpson.com/obituaries/tomchuk-helen-1575/icon64_rss.png) center top no-repeat;
}
.subscribe-icons2 .subscribe-email a {
background: url(http://1.bp.blogspot.com/-ee20tH09o24/Ty1cavc7UtI/AAAAAAAAAVQ/0wIS7Fgjs_k/s320/gmail-email%2B21.png) center top no-repeat;
}

Adding social icons with hover in sidebar

  1. Go To Blogger > Design
  2. Click choose a gadget
  3. Select HTML/javascript widget
  4. Paste the following code inside it
<div class='subscribe2'>

        <ul>
            <li><a target="_blank" rel="nofollow" href="https://plus.google.com/103280517588083500359">Google+</a></li>
            <li><a target="_blank" rel="nofollow" href="http://twitter.com/allbloggingtips">Twitter</a></li>
            <li><a target="_blank" rel="nofollow" href="http://www.facebook.com/allbloggingtips">Facebook</a></li>
            <li><a target="_blank" rel="nofollow" href="http://feeds.feedburner.com/latestbloggingtips4u">RSS</a></li>
            <li><a target="_blank" rel="nofollow" href="http://feedburner.google.com/fb/a/mailverify?uri=latestbloggingtips4u&amp;loc=en_US"> Email</a></li>

        </ul> <!--end .subscribe-icons-->

        <div/>

    </div>

Make Following Changes

  • Replace AllBloggingTips with your Twitter, Youtube, facebook, Feed and Email username.
  • Replace https://plus.google.com/+AmmarAlii/ with your google+ ID

Add Cool Social Icons With Hover Effect v2 Widget To WordPress

  1. Goto WordPress Dashboard > Appearance > Editor and Select Style.css from right side .
  2. Copy And Paste The Below Code Into The CSS file:


/* Social Widget by AllBloggingTips*/

#subscribe2 {
background:#f3f3f3;
border: 1px solid #ECEDE8;
font-size: 90%;
margin: 0 0 15px 0;
padding: 7px 5px 3px 5px;
width: 288px;
}
.subscribe-icons2 {
margin: 0 auto;
width: 286px; background: #f7f7f7;
}
.subscribe-icons2 li { -moz-border-radius:6px;
display: inline;
float: left;
font-size: 11px;
margin: 0 2px 10px 2px;
width: 52px;
text-align: center;
}
.subscribe-icons2 a {
color: #444 !important;
display: block;
padding: 56px 0 2px;
-moz-transition: all .2s ease-out;
-webkit-transition: all .2s ease-out;
}
.subscribe-icons2 a:hover { -moz-border-radius:6px;
-moz-box-shadow: 0 2px 4px hsla(0,0%,0%,.35);
-webkit-box-shadow: 0 2px 4px hsla(0,0%,0%,.35);
color: #369 !important;
text-decoration: none;
}
.subscribe-icons2 .subscribe-youtube a {
background: url(http://karrersimpson.com/obituaries/tomchuk-helen-1575/icon64_googleplus.png) center top no-repeat;
}
.subscribe-icons2 .subscribe-twitter a {
background: url(http://karrersimpson.com/obituaries/tomchuk-helen-1575/icon64_twittert.png) center top no-repeat;
}
.subscribe-icons2 .subscribe-facebook a {
background: url(http://karrersimpson.com/obituaries/tomchuk-helen-1575/icon64_facebook.png) center top no-repeat;
}
.subscribe-icons2 .subscribe-rss a {
background: url(http://karrersimpson.com/obituaries/tomchuk-helen-1575/icon64_rss.png) center top no-repeat;
}
.subscribe-icons2 .subscribe-email a {
background: url(http://1.bp.blogspot.com/-ee20tH09o24/Ty1cavc7UtI/AAAAAAAAAVQ/0wIS7Fgjs_k/s320/gmail-email%2B21.png) center top no-repeat;
}

Adding social icons with hover in sidebar

  1.  Goto WordPress Dashboard > Appearance > Widget
  2. Click choose a Text widget
  3. Paste the following code inside it
<div class='subscribe2'>

        <ul>
            <li><a target="_blank" rel="nofollow" href="https://plus.google.com/103280517588083500359">Google+</a></li>
            <li><a target="_blank" rel="nofollow" href="http://twitter.com/allbloggingtips">Twitter</a></li>
            <li><a target="_blank" rel="nofollow" href="http://www.facebook.com/allbloggingtips">Facebook</a></li>
            <li><a target="_blank" rel="nofollow" href="http://feeds.feedburner.com/latestbloggingtips4u">RSS</a></li>
            <li><a target="_blank" rel="nofollow" href="http://feedburner.google.com/fb/a/mailverify?uri=latestbloggingtips4u&amp;loc=en_US"> Email</a></li>

        </ul> <!--end .subscribe-icons-->

        <div/>

    </div>

Make Following Changes

  • Replace AllBloggingTips with your Twitter, Youtube, facebook, Feed and Email username.
  • Replace https://plus.google.com/+AmmarAlii/ with your google+ ID

That’s All IF you face any problem adding New Cool Social Icons With Hover Effect Widget V2 in WordPress and Blogger feel free to ask.

Credits

This Cool Social Icons With Hover Effect Widget V2 is first shared on AllBloggingTips. Bloggers are requested to link back if they are going to share above widget with there visitors.

Peace!!