Add Post Views Counter In WordPress Posts Without Plugin

Add Post Views Counter In WordPress Posts Without PluginDid you ever want to know how many times a particular post has been viewed? I will show you How To Add Post Views Counter In WordPress Posts Without Plugin. This is very useful to track post views this will help you in future to write more interesting, quality content articles which can attract more visitors. Just add the following snippets to your template files and you are ready to go for Post Views Counter In WordPress!

I am not responsible if you done any mistake. So Check this video to Adding Code Though File Manager


Step 1: Adding Post Views Counter Code in Functions.PHP
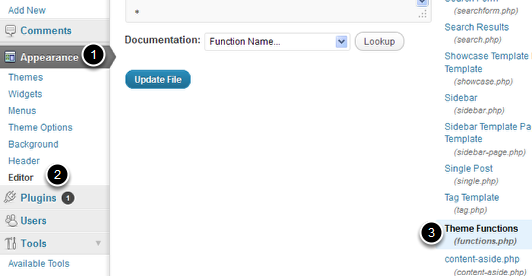
  • Go to Appearance > EditorHow to Edit Functions.PHP
  • Under Editor section Select Functions.php in the list of php files on the right of your screen (or just see image below)
  • Paste Below code in functions.php
// Display or Count how many times a post has been viewed. // id = the post id and action = display or count function arixWp_PostViews( $id, $action ) { $axCountMeta = 'ax_post_views'; // Your Custom field that stores the views $axCount = get_post_meta($id, $axCountMeta, true); if ( $axCount == '' ) { if ( $action == 'count' ) { $axCount = 0; } delete_post_meta( $id, $axCountMeta ); add_post_meta( $id, $axCountMeta, 0 ); if ( $action == 'display' ) { echo "0 Views"; } } else { if ( $action == 'count' ) { $axCount++; update_post_meta( $id, $axCountMeta, $axCount ); } else { echo $axCount . ' Views'; } } }
  • After adding above code Click Update File
Step 2: Showing Posts Views Counter in WordPress Posts
  •  Select Single.PHP from right of your screen (See image below)
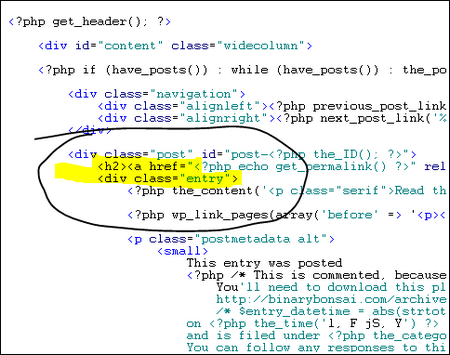
Single.PHP Screenshot

  • Now Paste below code just after High Lighted Section in above image.
 
    <?php echo arixWp_PostViews( get_the_ID(), 'count' ); ?>

To display the count outside the loop use this:

  <?php echo arixWp_PostViews( get_the_ID(), 'display' ); ?>

If you want them to show in the loop use this instead.

 <?php echo arixWp_PostViews( $post->ID, 'display' ); ?>
  • Finally Click on Update File and You had done.

Check your blog post to check whether counter is working or not!. Feel Free to Ask any question about this Post Views Counter In WordPress

<credit>

How to Show Blog Stats In WordPress Sidebar Widget

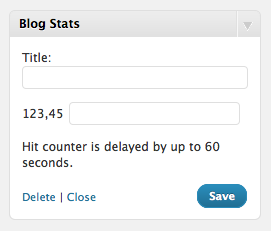
This Blog Stats Widget displays the total number of views to your blog (not including your own views). It’s a nice way of showing off how popular your blog is.

Here’s an example what it looks like when it’s activated on a blog sidebar:

Here is how to Show Blog Stats In WordPress. Once you add the widget to your sidebar from Appearance -> Widgets, you’ll see that the widget settings look like this:

Title – Set the title to use above the blog stats count. (i.e. Stats, Traffic Love)

123,45 – Set the word(s) to use along with the number. “Hits” and “views” are popular choices, but feel free to get creative and make up your own.

Video

Hope this post How to Show Blog Stats In WordPress Sidebar Widget will help you. Feel free to ask any question in comment section about Show Blog Stats In WordPress

Source: WordPress Support

Use Facebook Smileys and Emotions On Facebook Chat

There’s a stack of guides all over the net listing all the smileys you can send in Facebook and many forum posts discussing the formatting options. We’re yet to find one good one that lumps it all into one page, with the latest facebook smileys codes, in a nice easy to read format, so we’ve decided to oblige. If you know of any facebook smileys or emotions we are missing, let us know!

Al Facebook Chat Emotions and Smiyles

Use Facebook Smileys and Emotions : Complete List !

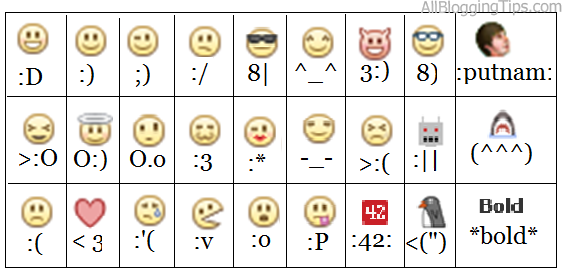
Here is the list of all Facebook Smileys Emoticons and their shortcuts:


Emoticons Shortcut Key Description
like thump up facebook chat emoticons (y) (Y) Like / Thumb Up Facebook Chat Emoticons NEW!!
42 red facebook chat emoticon :42: 42 Red Number FaceBook Chat Emoticon
facebook chat emoticon angel O:) O:-) Angel FaceBook Chat Emoticon
facebook chat emoticon confused o.O O.o Confused FaceBook Chat Emoticon
facebook chat emoticon cry :'( Cry / Tears Eye FaceBook Chat Emoticon
facebook chat emoticon curly lips :3 Curly Lips Facebook Emoticon / cute / cat-like
facebook chat emoticon devil 3:) 3:-) Devil / Satan / Vampire FaceBook Chat Emoticon
facebook chat emoticon frown :-( :( :[ =( Frown / Sad FaceBook Chat Emoticon
Facebook Chat Emoticon Gasp :-O :O :-o :o Gasp / Surprise FaceBook Chat Emoticon
facebook chat emoticon glasses 8-) 8) B-) B) Glasses / Blue Glasses FaceBook Chat Emoticon
facebook chat emoticon grin :-D :D =D Grin Facebook Chat Emoticon (Big Smile)
facebook chat emoticon grumpy >:( >:-( Grumpy FaceBook Chat Emoticon
facebook chat emoticon heart <3 Heart / Love FaceBook Chat Emoticon
facebook chat emoticon kiki ^_^ Kiki FaceBook Chat Emoticon
facebook chat emoticon kiss :-* :* Kiss Facebook Chat Emoticon
facebook chat emoticon pacman :v Pacman Facebook Chat Emoticon
facebook chat emoticon penguin <(") Penguin Facebook Chat Emoticon
facebook chat emoticon chris putnam :putnam: Putnam (Chris Putnam) Facebook Chat Emoticon
facebook chat emoticon robot :|] Robot Facebook Chat Emoticon
facebook chat emoticon shark (^^^) Shark FaceBook Chat Emoticon
facebook chat emoticon smile :-) :) :] =) Smile Facebook Chat Emoticon
facebook chat emoticon squint -_- Squint FaceBook Chat Emoticon
facebook chat emoticon sun glasses 8-| 8| B-| B| Sun / Black Glasses FaceBook Chat Emoticon
facebook chat emoticon tongue :-P :P :-p :p =P Tongue FaceBook Chat Emoticon
facebook chat emoticon unsure :/ :-/ : :- Unsure Facebook Chat Emoticon
facebook chat emoticon upset >:O >:-O >:o >:-o Upset FaceBook Chat Emoticon
facebook chat emoticon wink ;-) ;) Wink FaceBook Chat Emoticon

 
Facebook smileys and emoticons can add a hint of personality to the message you’re sending and maybe even some humor. If you happen to be at a loss for words, insert an emoticon. There are different variations the emoticons can be used for but they all generally follow the same rules. IF i miss any emotion in this tutorial Use Facebook Smileys and Emotions On Facebook Chat : Complete List !

How to Setup Free Domain co.cc with Blogger Blog

Now a day Everyone Provides great Features free of cost to attract the Internet Users towards itself. Blogger is the Fastest Growing free Blog. Sometimes ago, You could not Installed Your own Domain with Blogger. But Now You can easily use Your Custom Domain with Blogger. This is one thing But Now You can also Use Free Custom Domain with Blogger. I am talking about Co.cc Free Domain. Where Co.cc Provides Domain free of cost also providing Custom Domain Feature for Blogger. Haven’t it fun?
Before Reading! You Must have an Co.cc Account. If You Don’t Have Then Create This at  >>  Get co.cc Domain

Lets me show How to Setup Free Domain co.cc with Blogger Blog!

How to setup Blogger for my domain?
Blogger l Co.cc

Here are steps in simple words

  • Login Your Co.cc Account and Goto Domain Settings.
  • Click on Manage Domain on Right side of Your User Panel.
  • Setup Your Respective Domain. (If You don’t have already a Registered Domain. Then First Register a Free Domain)
  • You will see Three Options. Select 2nd Option (Zone Records).
  • Enter the Following Information in the Visible Form:
  1. In Host Field: Enter Co.cc Domain (www is Required)
  2. TTL: 1D
  3. Type: CName
  4. Value: ghs.google.com
  5. Click on Setup Button. After Fill the Form with the Above Information.


Now! Login Your Blogger Account:

  • Goto Settings > Publishing and Click on Custom Domain.
  • Click on Switch to Advanced settings.
  • In the Domain Field: Enter Your Co.cc Domain (www is Required)
  • After Word Verification. Click on Save Settings.
  • On the Next Screen! Enter Your Co.cc Domain again and Select the Check box Below (Redirect ..)
  • Again Word Verification and Save Settings.

And you have. Done Check your blog for new domain!

How to Add Three Column Footer Widget in Blogger

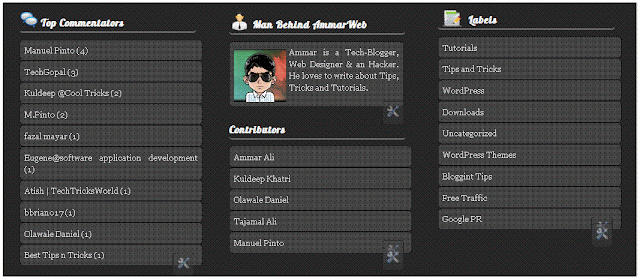
You might have seen a three column footer at many professional or commercial blogs. Where you can add stuffs. Take my three column footer as example. Footer make visitors busy and give him a good impression at End of your blog. It contains 3 columns widgets where you can add your own choice of widgets. You can easily Three Column Footer Widget and customize it as you want. If you are using WordPress Thesis Theme than check out this tutorial to add Footer Widget  in Thesis. See a screenshot.

footer


How to Add Three Column Footer Widget in Blogger (updated)

Follow these steps, to add Three Column Footer Widget

Step 1:

Go to Blogger Dashboard > Design > Edit Html

Step 2:

Backup Your Template

Step 3:

Search for ]]></b:skin> now paste the following CSS code just above ]]></b:skin>

#lower {
border-top: #737373 6px solid;
margin:auto;
font-family: Georgia;
width: 960px;
padding: 0px 0px 10px 0px;
background:#1f1f1f;
}
#lower a {
color: #DBDBDB;
font-family: Georgia;
}
#lower-wrapper {
margin:auto;
font-family: Georgia;
padding: 20px 0px 20px 0px;
width: 960px;
}
#lowerbar-wrapper {
background:#1f1f1f;
float: left;
color: #ebedee;
font-family: Georgia;
margin: 0px 5px auto;
padding-bottom: 20px;
width: 32%;
text-align: justify;
font-size:100%;
line-height: 1.6em;
word-wrap: break-word;
overflow: hidden;
}
.lowerbar {margin: 0; padding: 0;}
.lowerbar .widget {margin: 0; padding: 10px 20px 0px 20px;}
.lowerbar h2 {
margin: 0px 0px 10px 0px;
padding: 3px 0px 3px 0px;
text-align: left;
color:#fff;
text-transform:uppercase;
font: bold 16px Arial, Tahoma, Verdana;
border-bottom:3px solid #666666;
}
.lowerbar ul {
list-style:none;
margin: 0;
padding: 0;
}.lowerbar li a {
width: 265px;
font-family: Georgia;
background: #3f3f3f;
border: 1px solid #111;
line-height: 1.4em;
-moz-border-radius: 5px;
padding: 0.5em;
margin-bottom: 11px;
margin-right: 3px;
-webkit-border-radius: 5px;
overflow: hidden;
color:#000000;
}.lowerbar li a:visited {
width: 265px;
font-family: Georgia;
background: #3f3f3f;
border: 1px solid #111;
line-height: 1.4em;
-moz-border-radius: 5px;
padding: 0.5em;
margin-bottom: 11px;
margin-right: 3px;
-webkit-border-radius: 5px;
overflow: hidden;
color:#000000;
}.lowerbar li a:hover {
background: #4f4f4f;
border: 1px solid #7a7a7a;
line-height: 1.4em;
-moz-border-radius: 5px;
padding: 0.5em; -webkit-border-radius: 5px;
overflow: hidden;
color:#000000;
}.lowerbar a {
font-family: Georgia;
background: #3f3f3f;
border: 1px solid #111;
line-height: 1.4em;
float:left;
-moz-border-radius: 5px;
padding: 0.5em;
margin-right: 3px;
margin-bottom: 11px;
-webkit-border-radius: 5px;
overflow: hidden;
color:#000000;
}.lowerbar a:hover {
background: #4f4f4f;
border: 1px solid #7a7a7a;
line-height: 1.4em;
-moz-border-radius: 5px;
padding: 0.5em; -webkit-border-radius: 5px;
overflow: hidden;
color:#000000;
}

Step 4:

Now search for </body> and paste following code just above </body>

<div id='lower'>
<div id='lower-wrapper'>
<div id='lowerbar-wrapper'>
<b:section class='lowerbar' id='lowerbar1' preferred='yes'>
<b:widget id='HTML12' locked='false' title='Testing' type='HTML'/>
</b:section>
</div>
<div id='lowerbar-wrapper'>
<b:section class='lowerbar' id='lowerbar2' preferred='yes'>
<b:widget id='Profile1' locked='false' title='About Me' type='Profile'/>
<b:widget id='HTML5' locked='false' title='Recent Comments' type='HTML'/>
</b:section>
</div>
<div id='lowerbar-wrapper'>
<b:section class='lowerbar' id='lowerbar3' preferred='yes'>
<b:widget id='HTML3' locked='false' title='Top Commentators @ AmmarWeb.Tk' type='HTML'/>
<b:widget id='HTML9' locked='false' title='Our Partners' type='HTML'/>
</b:section>
</div>

<div style='clear: both;'/></div></div>

Step 5:

Save your template .Now visit the page Layout > Page Elements and start adding widgets! :>>

Customization

You can easily customize the look and colours of the this footer widget. I have bolded the important parts in the CSS code above. Read the descriptions below carefully to better stylize your Three Column Footer Widget.

  • background:#1f1f1f; Changing the six digit colour code will change the background colour of this widget.
  • width: 960px; This is the width of the widget. If you want you can adjust this width value in accordance with the width of your blog.
  • background:#fff; and width: 32%; is the background colour and width of the three columns where the widgets are added.
  • color:#0084ce; This is the Colour of Title Headings
  • font: bold 14px Arial, Tahoma, Verdana; Edit this to change the font size and family.
  • border-bottom:3px solid #0084ce; Edit this to change the thickness, style and colour of the border that appears at the bottom of Title Heading
That’s All
A new tutorial on four column footer will be soon posted till than enjoy this one. Now Three Column Footer Widget is added!