Search Results for: ai image

New Cool Social Icons With Hover Effect Widget V2

After a lot of trial, efforts and modify Previous Cool Social Icons With Hover Effect Widget. I finally created this cool, stylish , awesome Social Icons With Hover Effect Widget v2. You can now add this social icons with hover effect v2 widget to both WordPress and Blogger. You can easily add this to your sidebar which is a better option to take attention of visitors. This social icons with hover effect is available only on AllBlogggingTips. I made it to work for both Blogger and WordPress Blogs. I show you How TO Add Cool Social Icons With Hover Effect v2 Widget To WordPress and Blogger. Check out demo below.

Features: We had added new most commonly used social media profile icons like Google+, Facebook, Twitter, RSS and Email which was not in previous V1

See alsoSocial Icons with hover effects


Live Demo

Credits

This Cool Social Icons With Hover Effect Widget V2 is first shared on AllBloggingTips. Bloggers are requested to link back if they are going to share above widget with there visitors.

Add Cool Social Icons With Hover Effect v2 Widget To Blogger

Adding CSS Code

  1. Go To Blogger > Layout > Edit HTML
  2. Search For ]]></b:skin>
  3. And paste the code below just above ]]></b:skin>
/* Social Widget by AllBloggingTips*/

#subscribe2 {
background:#f3f3f3;
border: 1px solid #ECEDE8;
font-size: 90%;
margin: 0 0 15px 0;
padding: 7px 5px 3px 5px;
width: 288px;
}
.subscribe-icons2 {
margin: 0 auto;
width: 286px;     background: #f7f7f7;
}
.subscribe-icons2 li {     -moz-border-radius:6px;
display: inline;
float: left;
font-size: 11px;
margin: 0 2px 10px 2px;
width: 52px;
text-align: center;
}
.subscribe-icons2 a {
color: #444 !important;
display: block;
padding: 56px 0 2px;
-moz-transition: all .2s ease-out;
-webkit-transition: all .2s ease-out;
}
.subscribe-icons2 a:hover {     -moz-border-radius:6px;
-moz-box-shadow: 0 2px 4px hsla(0,0%,0%,.35);
-webkit-box-shadow: 0 2px 4px hsla(0,0%,0%,.35);
color: #369 !important;
text-decoration: none;
}
.subscribe-icons2 .subscribe-youtube a {
background: url(http://karrersimpson.com/obituaries/tomchuk-helen-1575/icon64_googleplus.png) center top no-repeat;
}
.subscribe-icons2 .subscribe-twitter a {
background: url(http://karrersimpson.com/obituaries/tomchuk-helen-1575/icon64_twittert.png) center top no-repeat;
}
.subscribe-icons2 .subscribe-facebook a {
background: url(http://karrersimpson.com/obituaries/tomchuk-helen-1575/icon64_facebook.png) center top no-repeat;
}
.subscribe-icons2 .subscribe-rss a {
background: url(http://karrersimpson.com/obituaries/tomchuk-helen-1575/icon64_rss.png) center top no-repeat;
}
.subscribe-icons2 .subscribe-email a {
background: url(http://1.bp.blogspot.com/-ee20tH09o24/Ty1cavc7UtI/AAAAAAAAAVQ/0wIS7Fgjs_k/s320/gmail-email%2B21.png) center top no-repeat;
}

Adding social icons with hover in sidebar

  1. Go To Blogger > Design
  2. Click choose a gadget
  3. Select HTML/javascript widget
  4. Paste the following code inside it
<div class='subscribe2'>

        <ul>
            <li><a target="_blank" rel="nofollow" href="https://plus.google.com/103280517588083500359">Google+</a></li>
            <li><a target="_blank" rel="nofollow" href="http://twitter.com/allbloggingtips">Twitter</a></li>
            <li><a target="_blank" rel="nofollow" href="http://www.facebook.com/allbloggingtips">Facebook</a></li>
            <li><a target="_blank" rel="nofollow" href="http://feeds.feedburner.com/latestbloggingtips4u">RSS</a></li>
            <li><a target="_blank" rel="nofollow" href="http://feedburner.google.com/fb/a/mailverify?uri=latestbloggingtips4u&amp;loc=en_US"> Email</a></li>

        </ul> <!--end .subscribe-icons-->

        <div/>

    </div>

Make Following Changes

  • Replace AllBloggingTips with your Twitter, Youtube, facebook, Feed and Email username.
  • Replace https://plus.google.com/+AmmarAlii/ with your google+ ID

Add Cool Social Icons With Hover Effect v2 Widget To WordPress

  1. Goto WordPress Dashboard > Appearance > Editor and Select Style.css from right side .
  2. Copy And Paste The Below Code Into The CSS file:


/* Social Widget by AllBloggingTips*/

#subscribe2 {
background:#f3f3f3;
border: 1px solid #ECEDE8;
font-size: 90%;
margin: 0 0 15px 0;
padding: 7px 5px 3px 5px;
width: 288px;
}
.subscribe-icons2 {
margin: 0 auto;
width: 286px; background: #f7f7f7;
}
.subscribe-icons2 li { -moz-border-radius:6px;
display: inline;
float: left;
font-size: 11px;
margin: 0 2px 10px 2px;
width: 52px;
text-align: center;
}
.subscribe-icons2 a {
color: #444 !important;
display: block;
padding: 56px 0 2px;
-moz-transition: all .2s ease-out;
-webkit-transition: all .2s ease-out;
}
.subscribe-icons2 a:hover { -moz-border-radius:6px;
-moz-box-shadow: 0 2px 4px hsla(0,0%,0%,.35);
-webkit-box-shadow: 0 2px 4px hsla(0,0%,0%,.35);
color: #369 !important;
text-decoration: none;
}
.subscribe-icons2 .subscribe-youtube a {
background: url(http://karrersimpson.com/obituaries/tomchuk-helen-1575/icon64_googleplus.png) center top no-repeat;
}
.subscribe-icons2 .subscribe-twitter a {
background: url(http://karrersimpson.com/obituaries/tomchuk-helen-1575/icon64_twittert.png) center top no-repeat;
}
.subscribe-icons2 .subscribe-facebook a {
background: url(http://karrersimpson.com/obituaries/tomchuk-helen-1575/icon64_facebook.png) center top no-repeat;
}
.subscribe-icons2 .subscribe-rss a {
background: url(http://karrersimpson.com/obituaries/tomchuk-helen-1575/icon64_rss.png) center top no-repeat;
}
.subscribe-icons2 .subscribe-email a {
background: url(http://1.bp.blogspot.com/-ee20tH09o24/Ty1cavc7UtI/AAAAAAAAAVQ/0wIS7Fgjs_k/s320/gmail-email%2B21.png) center top no-repeat;
}

Adding social icons with hover in sidebar

  1.  Goto WordPress Dashboard > Appearance > Widget
  2. Click choose a Text widget
  3. Paste the following code inside it
<div class='subscribe2'>

        <ul>
            <li><a target="_blank" rel="nofollow" href="https://plus.google.com/103280517588083500359">Google+</a></li>
            <li><a target="_blank" rel="nofollow" href="http://twitter.com/allbloggingtips">Twitter</a></li>
            <li><a target="_blank" rel="nofollow" href="http://www.facebook.com/allbloggingtips">Facebook</a></li>
            <li><a target="_blank" rel="nofollow" href="http://feeds.feedburner.com/latestbloggingtips4u">RSS</a></li>
            <li><a target="_blank" rel="nofollow" href="http://feedburner.google.com/fb/a/mailverify?uri=latestbloggingtips4u&amp;loc=en_US"> Email</a></li>

        </ul> <!--end .subscribe-icons-->

        <div/>

    </div>

Make Following Changes

  • Replace AllBloggingTips with your Twitter, Youtube, facebook, Feed and Email username.
  • Replace https://plus.google.com/+AmmarAlii/ with your google+ ID

That’s All IF you face any problem adding New Cool Social Icons With Hover Effect Widget V2 in WordPress and Blogger feel free to ask.

Credits

This Cool Social Icons With Hover Effect Widget V2 is first shared on AllBloggingTips. Bloggers are requested to link back if they are going to share above widget with there visitors.

Peace!!

Top 20 Best WordPress Security Plugins

After my recent 10 Best Stats Plugins for WordPress.
 
Now, it is to share free best wordpress security plugins.
 
It is important to look at the security aspects of your blog,  keeping it safe from hackers. I now decided to share some top Best WordPress Security Plugins. There are many plugins but I listed Top 20 Best WordPress Security Plugins. So go ahead and choose Best WordPress Security Plugins for your self hosted blogs.

Top 20 Best WordPress Security Plugins

Check out these Top 20 Best WordPress Security Plugins to secure your blog from hackers. The list contains plugins for access control, limit logins, spam protection, content theft protection, backup tools, password encryption, email protection, firewall, antivirus and much more.

Login Lock Down

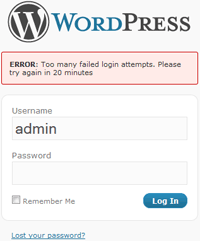
1. Login LockDown

Login LockDown records the IP address and timestamp of every failed login attempt. If more than a certain number of attempts are detected within a short period of time from the same IP range, then the login function is disabled for all requests from that range. This helps to prevent brute force password discovery.

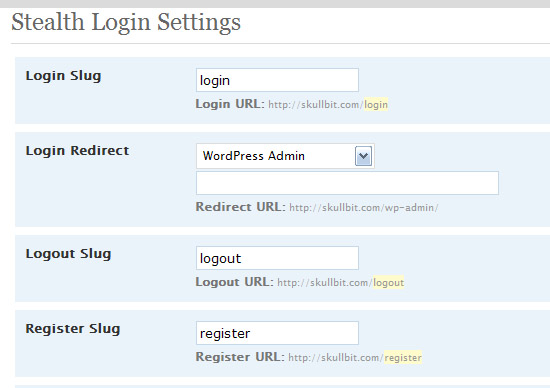
2. Stealth login:

Stealth Login WP

WordPress has default login url. This makes it somewhat easy for hacker. So, we can use Stealth login plugin to change our login url to something skeptic. So, even if the hacker knows our password, he will find it difficult to enter our admin panel as he don’t know our login url. This surely helps us in safeguarding our blogs from hackers.

3. Admin SSL

admin ssl

Admin SSL secures login page, admin area, posts, pages – whatever you want – using Private or Shared SSL. Once you have activated the plugin, you have to go to the Admin SSL config page to enable SSL.

4. User locker:

User Locker

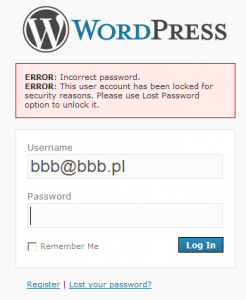
It is used to lock a user after the specified number of login attempts. Very useful to protect your blog from bruteforce attacks.

5. Semisecure Login Reimagined

semisecure-login

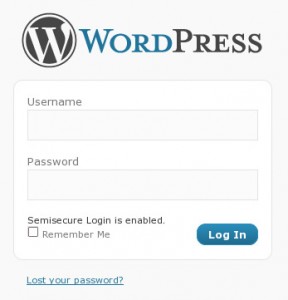
Semisecure Login Reimagined increases the security of the login process by using a combination of public and secret-key encryption to encrypt the password on the client-side when a user logs in. JavaScript is required to enable encryption. It is most useful for situations where SSL is not available, but the administrator wishes to have some additional security measures in place without sacrificing convenience.

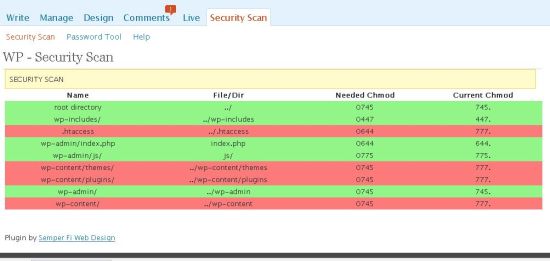
6. WP Security Scan

Wp-security-scanner

This plugin will scan your WordPress installation for security vulnerabilities and it will suggest some corrective actions.

7. Limit login attempts:

limit-login-attempts-wordpress-security-plugin

Limit the number of login attempts possible both through normal login as well as using auth cookies. I’m also using same best wordpress securiy plugin

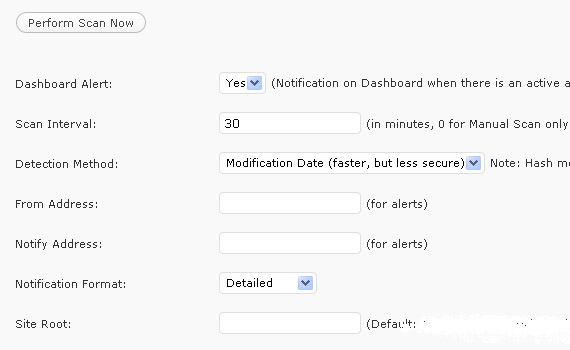
8. WordPress File Monitor

file-monitor-wordpress-security-plugins

Monitors your WordPress installation for added/deleted/changed files. When a change is detected an email alert can be sent to a specified address.

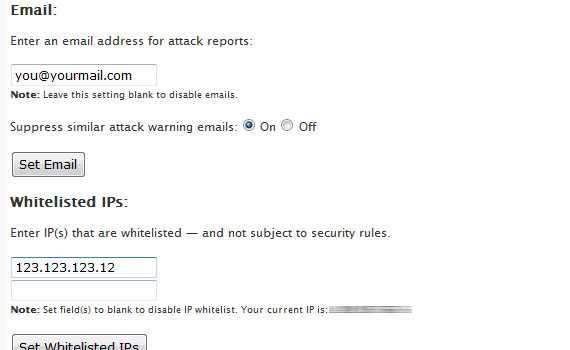
9. WordPress firewall:

firewall-wordpress-security-tools-tips-plugins

This WordPress plugin investigates web requests with simple WordPress-specific heuristics to identify and stop most obvious attacks. It intelligently whitelists and blacklists pathological-looking phrases based on which field they appear within in a page request.

10. Content Security Policy

content-security-policy-wordpress-security-tools-tips-plugins

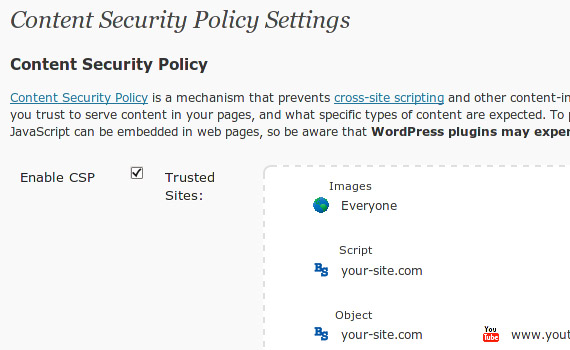
Content Security Policy prevents content injection attacks by allowing admins to specify which sites they trust to serve JavaScript and other types of content in their site. Any content which is not explicitly allowed by the policy will be blocked from loading.

11. Secure WordPress

Little help to secure your WordPress installation. This plugin removes error information on login page, adds index.html to plugin directory, removes the wp-version, except in admin area.

12.HTTP Authentication

The HTTP Authentication plugin allows you to use existing means of authenticating people to WordPress. This includes Apache’s basic HTTP authentication module and many others.

13.AntiVirus

Antiviurs WP plugin

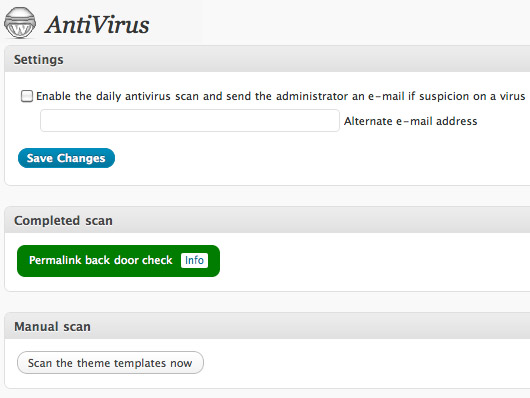
Viruses, worms and malware exist for WordPress and could easily attack your WordPress installation. AntiVirus for WordPress monitors malicious injections and warns you of any possible attacks. It also has multilingual support.

14. WP members:

wp-Member is an advanced WordPress membership plugin that adds many membership features including registration customization, total content protection for posts, pages and categories, content teasers, automated membership management, automated payment processing and many more.

15. Ultimate security check:

One of the rare security plugins which are updated regularly. It is a wordpress security plugin which scans your wordpress installation and assigns security grade based on passed tests.

16. AskApache Password Protect

ask-apache-password-protect-wordpress-security-tools-tips-plugins

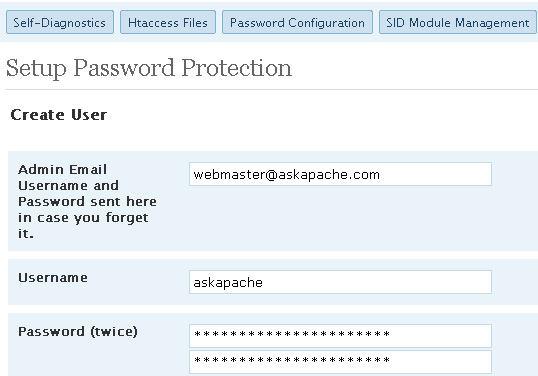
This plugin doesn’t control WordPress or mess with your database, instead it utilizes fast, tried-and-true built-in Security features to add multiple layers of security to your blog. This plugin is specifically designed and regularly updated specifically to stop automated and unskilled attackers attempts to exploit vulnerabilities on your blog resulting in a hacked site.

 17. Exploit scanner:

It seaches in your WordPress database for any sort of infection which may indicate that your blog is accessed by any hacker. It includes all files, comments and database in its scan to detect any sort of suspicion.

18. Login encrypt:


Login Encrypt is a security plugin. It uses a complex combination of DES and RSA. This combination is used to encrypt your password protecting you from hackers.

19. Ultimate security check:

One of the rare security plugins which are updated regularly. It is a wordpress security plugin which scans your wordpress installation and assigns security grade based on passed tests.

20. WP Email Guard

WP Email Guard protects your email addresses included on any post or page from being crawled by spammers. It converts every email written within your post body into a JavaScript code, so the emails is readable and can be clicked by humans only. Spammers can’t crawl JavaScript.

Don’t forget to look at our recent plugin collection for WordPress Blog

Note: Since plugins can increase your page load time, make sure you use optimum number of security plugins for wordpress.

I listed Top 20 Best WordPress Security Plugins in above list. Let me know if I missed any one :D

Cool Social Icons With Hover Effect Widget

After a lot of trial and efforts I finally created Cool Social Icons With Hover Effect Widget for your blogs. You can add this social icons with hover effect widget to both WordPress and Blogger. This widget is a very effective to take attention of your visitors and they will may go to your profile to follow your, hit a like button etc. You can easily add this to your sidebar which is a better option to take attention of visitors. This social icons with hover effect is available on FreshLife WordPress theme only. I converted it to work for both Blogger and WordPress Blogs. I show you How TO Add Cool Social Icons With Hover Effect Widget To WordPRess and Blogger. Check out demo below.

See also


Social Icons with no - hover effectSocial Icons with hover effects
Live Demo

Add Cool Social Icons With Hover Effect Widget To Blogger

Adding CSS Code

  1. Go To Blogger > Layout > Edit HTML
  2. Search For ]]></b:skin>
  3. And paste the code below just above ]]></b:skin>
/* Social Widget by AllBloggingTips*/
#subscribe {
background:#f3f3f3;
border: 1px solid #ECEDE8;
font-size: 90%;
margin: 0 0 15px 0;
padding: 7px 5px 3px 5px;
width: 288px;
}
.subscribe-icons {
margin: 0 auto;
width: 286px;     background: #f7f7f7;
}
.subscribe-icons li {     -moz-border-radius:6px;
display: inline;
float: left;
font-size: 11px;
margin: 0 2px 10px 2px;
width: 52px;
text-align: center;
}
.subscribe-icons a {
color: #444 !important;
display: block;
padding: 40px 0 2px;
-moz-transition: all .2s ease-out;
-webkit-transition: all .2s ease-out;
}
.subscribe-icons a:hover {     -moz-border-radius:6px;
-moz-box-shadow: 0 2px 4px hsla(0,0%,0%,.35);
-webkit-box-shadow: 0 2px 4px hsla(0,0%,0%,.35);
color: #369 !important;
text-decoration: none;
}
.subscribe-icons .subscribe-youtube a {
background: url(http://4.bp.blogspot.com/-swMRIBuYfWE/TybFZPcnV1I/AAAAAAAAASQ/Rtkob1vf92I/s320/icon-youtube.png) center top no-repeat;
}
.subscribe-icons .subscribe-twitter a {
background: url(http://1.bp.blogspot.com/-WmOzzyzsiKk/TybFYxcl6CI/AAAAAAAAASI/Bsv9gjgRpVo/s320/icon-twitter.png) center top no-repeat;
}
.subscribe-icons .subscribe-facebook a {
background: url(http://3.bp.blogspot.com/-viMUReHyino/TybFYXwdRII/AAAAAAAAARw/N0fjYPPc9-8/s320/icon-facebook.png) center top no-repeat;
}
.subscribe-icons .subscribe-rss a {
background: url(http://2.bp.blogspot.com/-YpTDM_cQ_2U/TybFYi6fqJI/AAAAAAAAAR4/LzLcQoWTYuM/s320/icon-rss.png) center top no-repeat;
}
.subscribe-icons .subscribe-email a {
background: url(http://4.bp.blogspot.com/-Im_zOo6iIrY/TybFYIf3GBI/AAAAAAAAARg/2476QicRNUE/s320/icon-email.png) center top no-repeat;
}

Adding social icons with hover in sidebar

  1. Go To Blogger > Design
  2. Click choose a gadget
  3. Select HTML/javascript widget
  4. Paste the following code inside it
<div class='subscribe'>

        <ul>
            <li><a target="_blank" rel="nofollow" href="https://plus.google.com/103280517588083500359">Google+</a></li>
            <li><a target="_blank" rel="nofollow" href="http://twitter.com/allbloggingtips">Twitter</a></li>
            <li><a target="_blank" rel="nofollow" href="http://www.facebook.com/allbloggingtips">Facebook</a></li>
            <li><a target="_blank" rel="nofollow" href="http://feeds.feedburner.com/latestbloggingtips4u">RSS</a></li>
            <li><a target="_blank" rel="nofollow" href="http://feedburner.google.com/fb/a/mailverify?uri=latestbloggingtips4u&amp;loc=en_US"> Email</a></li>

        </ul> <!--end .subscribe-icons-->

        <div/>

    </div>

Make Following Changes

  • Replace AllBloggingTips with your Twitter, Youtube, facebook, Feed and Email username.

That’s all. If you face any problem adding this social icons with hover effect. Feel free to ask.

Add Cute jQuery Popup For Facebook Like Box

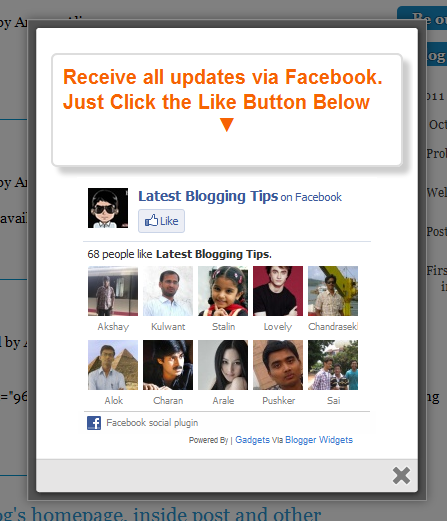
cute facebook popupAfter my recent widget Popup for Adsense. Now i decided to present some cool to you so I comes with a Cute jQuery Popup For Facebook Like Box. This is a great widget to increase likes. You may see on most sites or blogs which are using Popups to increase there subscribers, fans and followers. This Cute jQuery Popup For Facebook Like Box is a great widget for blogger. As soon as new visitors arrive your blog the popup will be showed to your visitors which can help you to increase likes and get more traffic from Facebook.In my next tutorials I will try  to make it more interactive with social media links, profiles and a complete version with everything in it which you may need.Check out demo below and than I show you How to Add Cute jQuery Popup For Facebook Like Box To Blogger or WordPress?

Live Demo


  • Add Cute jQuery Popup For Facebook Like Box To Blogger

I am discussing here steps for blogger but if you know how to deal simple HTML code then you can easily add it to your wordpress blog too.

  1. Go To Blogger > Design
  2. Click choose a gadget
  3. Select HTML/javascript widget
  4. Paste the following code inside it
  •  Add Cute jQuery Popup For Facebook Like Box To WordPress Blogs?

You can add  jQuery Facebook Like Box Popup To WordPress Blogs. Follow following steps to add this.

  1. Goto WordPress Dashboard > Appearance >Widget
  2. Drop a Text Widget to your sidebar.
  3. Now Paste above code in Text Widget.
  4. And CLick on save button. and see your blog
<style>

    /*
       ColorBox Core Style:
       The following CSS is consistent between example themes and should not be altered.
    */
    #colorbox, #cboxOverlay, #cboxWrapper{position:absolute; top:0; left:0; z-index:9999; overflow:hidden;}
    #cboxOverlay{position:fixed; width:100%; height:100%;}
    #cboxMiddleLeft, #cboxBottomLeft{clear:left;}
    #cboxContent{position:relative;}
    #cboxLoadedContent{overflow:auto;}
    #cboxTitle{margin:0;}
    #cboxLoadingOverlay, #cboxLoadingGraphic{position:absolute; top:0; left:0; width:100%;}
    #cboxPrevious, #cboxNext, #cboxClose, #cboxSlideshow{cursor:pointer;}
    .cboxPhoto{float:left; margin:auto; border:0; display:block;}
    .cboxIframe{width:100%; height:100%; display:block; border:0;}
    /*

       User Style:
       Change the following styles to modify the appearance of ColorBox.  They are
       ordered & tabbed in a way that represents the nesting of the generated HTML.
    */
    #cboxOverlay{background:#000;opacity:0.5 !important;}
    #colorbox{
            box-shadow:0 0 15px rgba(0,0,0,0.4);
           -moz-box-shadow:0 0 15px rgba(0,0,0,0.4);
            -webkit-box-shadow:0 0 15px rgba(0,0,0,0.4);
           }

    #cboxTopLeft{width:14px; height:14px; background:url(http://4.bp.blogspot.com/-_VSGGUcsUPE/TwNIXL6W2qI/AAAAAAAAFwQ/5KR8F-N3Mqk/s1600/controls.png) no-repeat 0 0;}
    #cboxTopCenter{height:14px; background:url(http://3.bp.blogspot.com/-dJQm3QEd5Iw/TxohpCter-I/AAAAAAAAF0Q/GRny7olLbv8/s400/border.png) repeat-x top left;}
         #cboxTopRight{width:14px; height:14px; background:url(http://4.bp.blogspot.com/-_VSGGUcsUPE/TwNIXL6W2qI/AAAAAAAAFwQ/5KR8F-N3Mqk/s1600/controls.png) no-repeat -36px 0;}
         #cboxBottomLeft{width:14px; height:43px; background:url(http://4.bp.blogspot.com/-_VSGGUcsUPE/TwNIXL6W2qI/AAAAAAAAFwQ/5KR8F-N3Mqk/s1600/controls.png) no-repeat 0 -32px;}
         #cboxBottomCenter{height:43px; background:url(http://3.bp.blogspot.com/-dJQm3QEd5Iw/TxohpCter-I/AAAAAAAAF0Q/GRny7olLbv8/s400/border.png) repeat-x bottom left;}
         #cboxBottomRight{width:14px; height:43px; background:url(http://4.bp.blogspot.com/-_VSGGUcsUPE/TwNIXL6W2qI/AAAAAAAAFwQ/5KR8F-N3Mqk/s1600/controls.png) no-repeat -36px -32px;}
         #cboxMiddleLeft{width:14px; background:url(http://4.bp.blogspot.com/-_VSGGUcsUPE/TwNIXL6W2qI/AAAAAAAAFwQ/5KR8F-N3Mqk/s1600/controls.png) repeat-y -175px 0;}
         #cboxMiddleRight{width:14px; background:url(http://4.bp.blogspot.com/-_VSGGUcsUPE/TwNIXL6W2qI/AAAAAAAAFwQ/5KR8F-N3Mqk/s1600/controls.png) repeat-y -211px 0;}
         #cboxContent{background:#fff; overflow:visible;}
             #cboxLoadedContent{margin-bottom:5px;}
             #cboxLoadingOverlay{background:url(http://2.bp.blogspot.com/-bMneOFi_UDo/Txohpge3Z9I/AAAAAAAAF0s/AbVgxX9pXtQ/s400/loadingbackground.png) no-repeat center center;}
             #cboxLoadingGraphic{http://3.bp.blogspot.com/-SKktU1-SCCw/TxohpRB19LI/AAAAAAAAF0Y/iwIo3LnjoE0/s400/loading.gif) no-repeat center center;}
             #cboxTitle{position:absolute; bottom:-25px; left:0; text-align:center; width:100%; font-weight:bold; color:#7C7C7C;}
             #cboxCurrent{position:absolute; bottom:-25px; left:58px; font-weight:bold; color:#7C7C7C;}
             #cboxPrevious, #cboxNext, #cboxClose, #cboxSlideshow{position:absolute; bottom:-29px; background:url(http://4.bp.blogspot.com/-_VSGGUcsUPE/TwNIXL6W2qI/AAAAAAAAFwQ/5KR8F-N3Mqk/s1600/controls.png) no-repeat 0px 0px; width:23px; height:23px; text-indent:-9999px;}
             #cboxPrevious{left:0px; background-position: -51px -25px;}
             #cboxPrevious.hover{background-position:-51px 0px;}
             #cboxNext{left:27px; background-position:-75px -25px;}
             #cboxNext.hover{background-position:-75px 0px;}
             #cboxClose{right:0; background-position:-100px -25px;}
             #cboxClose.hover{background-position:-100px 0px;}
             .cboxSlideshow_on #cboxSlideshow{background-position:-125px 0px; right:27px;}
             .cboxSlideshow_on #cboxSlideshow.hover{background-position:-150px 0px;}
             .cboxSlideshow_off #cboxSlideshow{background-position:-150px -25px; right:27px;}
             .cboxSlideshow_off #cboxSlideshow.hover{background-position:-125px 0px;}

    /*-----------------------------------------------------------------------------------*/
    /*   Facebook Likebox popup For Blogger
    /*-----------------------------------------------------------------------------------*/
    #subscribe {
        font: 12px/1.2 Arial,Helvetica,san-serif; color:#666;
    }
    #subscribe a,
    #subscribe a:hover,
    #subscribe a:visited {
        text-decoration:none;
    }
    .box-title {
       color: #F66303;
       font-size: 20px !important;
       font-weight: bold;
       margin: 10px 0;
    border:1px solid #ddd;
    -moz-border-radius:6px;
    -webkit-border-radius:6px;
    border-radius:6px;
    box-shadow: 5px 5px 5px #CCCCCC;
    padding:10px;
    line-height:25px; font-family:arial !important;
    }
    .box-tagline {
       color: #999;
       margin: 0;
       text-align: center;
    }
    #subs-container {
        padding: 35px 0 30px 0;
        position: relative;
    }
    a:link, a:visited {
    border:none;
    }
    .demo {
    display:none;
    }
    </style>

    <script src='https://ajax.googleapis.com/ajax/libs/jquery/1.6.1/jquery.min.js'></script>

    <script src="http://mybloggertricks.googlecode.com/files/jquery.colorbox-min.js"></script>
    <script type="text/javascript">
    jQuery(document).ready(function(){
       if (document.cookie.indexOf('visited=true') == -1) {
           var fifteenDays = 1000*60*60*24*30;
           var expires = new Date((new Date()).valueOf() + fifteenDays);
           document.cookie = "visited=true;expires=" + expires.toUTCString();
       $.colorbox({width:"400px", inline:true, href:"#subscribe"});
           }
    });
    </script>
        <!-- This contains the hidden content for inline calls -->

            <div style='display:none'>
       <div id='subscribe' style='padding:10px; background:#fff;'>
            <h3 class="box-title">Receive all updates via Facebook. Just Click the Like Button Below<center><p style="line-height:3px;" >▼</p></center></h3> 
          <center>

    <iframe src="//www.facebook.com/plugins/likebox.php?href=http%3A%2F%2Fwww.facebook.com%2Fallbloggingtips&amp;width=300&amp;colorscheme=light&amp;show_faces=true&amp;border_color=%23ffffff&amp;stream=false&amp;header=false&amp;height=258" scrolling="no" frameborder="0" style="border:none; overflow:hidden; width:300px; height:258px;" allowtransparency="true"></iframe>

    </center>

</div>
</div>

Visit your blog to see Facebook popup. To review the widget again and again just delete your browser cookies and refresh the page to see it appearing again. That’s it a cool Facebook pop up widget that will surly increase your facebook fan count.Thanks again to MBT for the original gadget.

Are you Want the widget to appear Repeatedly

If you want to prompt the likebox every time the visitor enters your blog then simply delete this *30 from the code above.


Stylish Pure CSS3 Multi Level Drop Down Menu For Blogger V2

I recently posts Pure CSS3 Multi Level Drop Down Menu For Blogger V1. I gets good response for this so I decided to release Pure CSS3 Multi Level Drop Down Menu V1. This Multi Level Drop Down Menu is modifed version of previous css3 menu. I had added some cool features to this menu. This menu is a Stylish Pure CSS3 Multi Level Drop Down Menu For Blogger. It is compatible for almost all browsers like Mozilla Firefox and Google Chrome etc but the rounded corners and shadow will not be rendered properly. I had made installation so easy you just need to copy and paste menu code in your blogger blog widget. This Menu  is provided by webDesignerWall guys and it is widgetized and made compatible with Blogspot blog platform by MBT.

See Also

Pure CSS3 Multi Level Drop Down Menu V2 Preview

stylish drop down menu v1

Live Demo

Add Pure CSS3 Multi Level Drop Down Menu V2 To Blogger

  1. Go To Blogger > Design
  2. Click on “Add a Gadget”
  3. Choose HTML/Javascript widget
  4. Paste the following code inside it


<style>
#ABT-Container {
    font: normal 1em Arial, Helvetica, sans-serif;
    background : #ddd; width:100%; float:left;   
}
a {
    color: #333;
}.example {
    background:#fff url(http://www.gowebbaby.com/wp-content/uploads/2011/12/website-designer.gif)center right  no-repeat;
    width:1200px;
    height:600px;
    border:1px #000 solid;
    margin:20px auto;
    padding:15px;
    border-radius:3px;
    -moz-border-radius:3px;
    -webkit-border-radius:3px;
}

#nav {
    margin: 0;
    padding: 7px 6px 0;
    background: #0080ff url(http://2.bp.blogspot.com/-A86MDTlHnVo/TtC-qF3gIQI/AAAAAAAAFbw/Vv41gIktCig/s1600/gradient.png) repeat-x 0 -110px;
    line-height: 100%;
    border-radius: 2em;
    -webkit-border-radius: 2em;
    -moz-border-radius: 2em;
    -webkit-box-shadow: 0 1px 3px rgba(0,0,0, .4);
    -moz-box-shadow: 0 1px 3px rgba(0,0,0, .4);
}
#nav li {
    margin: 0 5px;
    padding: 0 0 8px;
    float: left;
    position: relative;
    list-style: none; }

/* main level link */
#nav a {
    font-weight: bold;
    color: #e7e5e5;
    text-decoration: none;
    display: block;
    padding:  8px 20px;
    margin: 0;
    -webkit-border-radius: 1.6em;
    -moz-border-radius: 1.6em;
   
    text-shadow: 0 1px 1px rgba(0,0,0, .3);
}
#nav a:hover {
    background: #000;
    color: #fff;
}
/* main level link hover */
#nav .current a, #nav li:hover > a {
    background: #666 url(http://2.bp.blogspot.com/-A86MDTlHnVo/TtC-qF3gIQI/AAAAAAAAFbw/Vv41gIktCig/s1600/gradient.png) repeat-x 0 -40px;
    color: #444;
    border-top: solid 1px #f8f8f8;
    -webkit-box-shadow: 0 1px 1px rgba(0,0,0, .2);
    -moz-box-shadow: 0 1px 1px rgba(0,0,0, .2);
    box-shadow: 0 1px 1px rgba(0,0,0, .2);
    text-shadow: 0 1px 0 rgba(255,255,255, 1);
}
/* sub levels link hover */
#nav ul li:hover a, #nav li:hover li a {
    background: none;
    border: none;
    color: #666;
    -webkit-box-shadow: none;
    -moz-box-shadow: none;
}
#nav ul a:hover {
    background: #0080ff url(http://2.bp.blogspot.com/-A86MDTlHnVo/TtC-qF3gIQI/AAAAAAAAFbw/Vv41gIktCig/s1600/gradient.png) repeat-x 0 -100px !important;
    color: #fff !important;
text-align:left;
    -webkit-border-radius: 0;
    -moz-border-radius: 0;
    text-shadow: 0 1px 1px rgba(0,0,0, .1);
}
/* dropdown */
#nav li:hover > ul {
    display: block;
}
/* level 2 list */
#nav ul {
    display: none;
text-align:left;
    margin: 0;
    padding: 0;
    width: 185px;
    position: absolute;
    top: 35px;
    left: 0;
    background: #ddd url(http://2.bp.blogspot.com/-A86MDTlHnVo/TtC-qF3gIQI/AAAAAAAAFbw/Vv41gIktCig/s1600/gradient.png) repeat-x 0 0;
    border: solid 1px #b4b4b4;
    -webkit-border-radius: 10px;
    -moz-border-radius: 10px;
    border-radius: 10px;
    -webkit-box-shadow: 0 1px 3px rgba(0,0,0, .3);
    -moz-box-shadow: 0 1px 3px rgba(0,0,0, .3);
    box-shadow: 0 1px 3px rgba(0,0,0, .3);
}
#nav ul li {
    float: none;
    margin: 0;
    padding: 0;
}
#nav ul a {
    font-weight: normal;
    text-shadow: 0 1px 0 #fff;
}
/* level 3+ list */
#nav ul ul {
    left: 181px;
    top: -3px;
}
/* rounded corners of first and last link */
#nav ul li:first-child > a {
    -webkit-border-top-left-radius: 9px;
    -moz-border-radius-topleft: 9px;
    -webkit-border-top-right-radius: 9px;
    -moz-border-radius-topright: 9px;
}
#nav ul li:last-child > a {
    -webkit-border-bottom-left-radius: 9px;
    -moz-border-radius-bottomleft: 9px;
    -webkit-border-bottom-right-radius: 9px;
    -moz-border-radius-bottomright: 9px;
}
/* clearfix */
#nav:after {
    content: ".";
    display: block;
    clear: both;
    visibility: hidden;
    line-height: 0;
    height: 0;
}
#nav {
    display: inline-block;
}
</style>

<div id="ABT-Container">
<ul id="nav">
<li><a href="#">Home</a></li>
<li><a href="#">All Blogging Tips</a>
<ul>
<li><a href="#">Sub-Row</a>
<ul>
<li><a href="#">Sub Sub-Row 1
<li><a href="#">Sub Sub-Row 1</a></li>
</a></li></ul>
</li>
<li><a href="#">Sub-Row</a>
<ul>
               
<li><a href="#">Sub Sub-Row 2</a></li>
</ul>
</li>
<li><a href="#">Sub-Row</a></li>
</ul>
</li>

<li><a href="#">Multi-Levels</a>
<ul>
<li><a href="#">Team</a>
<ul>
<li><a href="#">Sub-Level Item 1</a></li>
<li><a href="#">Sub-Level Item 1</a>
<ul>
<li><a href="#">Sub-Level Item 11</a></li>
<li><a href="#">Sub-Level Item 22</a></li>
<li><a href="#">Sub-Level Item 33</a></li>
</ul>
</li>
                   
<li><a href="#">Sub-Level Item 1</a></li>
</ul>
</li>
<li><a href="#">Sales</a></li>
<li><a href="#">Another Link</a></li>
<li><a href="#">Department</a>
<ul>
<li><a href="#">Sub-Level Item 2</a></li>
</ul>
</li>
</ul>
</li><li><a href="#">Sitemap</a></li>   
<li><a href="#">Services</a></li>
<li><a href="#">Contact Us</a></li>
<li><a href="#">About Us</a></li>
<li><a href="https://allbloggingtips.com/2012/01/28/pure-css3-multi-level-drop-down-menu-v2">Create This »</a></li>

</ul></div>
<br/>

The best part about this Multi Level Drop Down Menu is that you can give it any colour you want because here we are using a transparent gradient image which can take any colour you want. Like:

Transperent ExapmleNow kindly make these customization changes to add your own links to menu:

  • Each TAB can be edited by directly understanding the following HTML code,

<li><a href=”#“>TAB TEXT</a></li>

In each case replace the hash sign (#) with your page URL or link and replace the text with your page title. I have kept the page titles unchanged in the code above so that you could easily edit them by seeing the demo.

Confused or Need Help?

If you need some extra help in removing rows or columns then please feel free to post your questions. You can discus it as much with me as possible. This will help others to better understand on how to make further changes. :D