Search Results for: ai image

Stylish & Cute Subscription Form Widget For Blogs

subscribe box v1 demo abtMost of peoples want simple, clean yet Stylish and Cute Subscription Form for their WordPress and Blogger/blogspot Blogs. Today we came with Stylish and Cute Subscription Form Widget  For Blogs , Easy to edit subscription form dozed with new CSS effects. This widget will keep your sidebar neat and clean and will surely attract visitors to subscribe. Follow following steps to add this Stylish and Cute Subscription Form Widget to WordPress and Blogspot

 TipCopy the code given below and paste it inside this editor to see a live demo.

Live Demo

Adding Stylish and Cute Subscription Form Widget

You just need to place a code to your blog widget Follow following steps to add Stylish and Cute Subscription Form Widget to WordPress and Blogger.

Adding To Blogger

  1. Go to Design > Page Elements.
  2. Click Add A Gadget.
  3. In Add A Gadget window, select HTML/Javascript .
  4. Copy the code below and paste it inside the content box.
  5. Save the gadget.
  6. Drag the gadget and reposition it under Blog Posts gadget.
  7. Click Save button (top right hand corner).

Adding To WordPress

  1. Go to Dashboard > Appearance > Widgets > Available Widgets.
  2. Drag Text widget into a sidebar.
  3. Paste in the code.
  4. Save.
Note: If This widget is not working on you blogspot and wordpress blogs then download this code  and place it as a widget nstead of give below.
 <style>
.abt-email{
background:url(https://lh3.googleusercontent.com/-3mMr7bVkJEA/T2mKAcZEBkI/AAAAAAAAAZI/IWMC_nG_foU/h120/service-email.jpg) no-repeat -8px 10px ;
width:240px;
padding:10px 0 0 65px;
float:left;
font-size:1.2em;
font-weight:bold;
margin:0 0 10px 0;
color:#0084CE;
box-shadow: 1px 1px 5px 1px #eee;
-moz-border-radius:10px;
-webkit-border-radius:10px;
border-radius:10px;
}

.abt-emailsubmit{
background:#9B9895;
cursor:pointer;
color:#fff;
border:none;
padding:4.4px;
text-shadow:0 -1px 1px rgba(0,0,0,0.25);
-moz-border-radius:6px;
-webkit-border-radius:6px;
border-radius:6px;
font:12px sans-serif; box-shadow:inset 4px 4px 3px rgba(0,0,0,0.1);

}
.abt-emailsubmit:hover{
background:#0084CE; box-shadow:inset 8px 8px 6px rgba(0,0,0,0.1);
}
.textarea{background: #fff !important;box-shadow:inset 4px 4px 3px rgba(0,0,0,0.1);
border: 1px solid #d2d2d2;
padding: 0px 8px 0px 8px;
color: #888; font-size: 12px;
height: 25px; width: 165px;
border-radius: 5px;
-moz-border-radius: 5px;
-webkit-border-radius: 5px;
margin:0px; }

</style>

<div class='abt-email'>
Subscribe via Email
<form action="http://feedburner.google.com/fb/a/mailverify" id="feedform" method="post" target="popupwindow" onsubmit="window.open('http://feedburner.google.com/fb/a/mailverify?uri=AllBloggingTips', 'popupwindow', 'scrollbars=yes,width=550,height=520');return true">
<input gtbfieldid="3" class="textarea" name="email" onblur="if (this.value == &quot;&quot;) {this.value = &quot;Enter email address here&quot;;}" onfocus="if (this.value == &quot;Enter email address here&quot;) {this.value = &quot;&quot;;}" value="Enter email address here" type="text" />
<input type="hidden" value="AllBloggingTips" name="uri"/><input type="hidden" name="loc" value="en_US"/>
<input class="abt-emailsubmit" value="Submit" type="submit" />
</form> 

</div>

Now make these changes,

  • Now replace AllBloggingTips with your Feedburner Email Feed link. You can get it by visiting your feedburner account then navigate to Publicize and then to Email Subscriptions.
  • Replace AllBloggingTips with your feed title. It appear at the end of your feed link. In my case it is AllBloggingTips

Save your widget and view your blog to see it showcasing live! :)

That’s All!

Do let me know if you needed any help in customizing the widget.

Creating a Classroom Blog

Creating a classroom blog is an excellent way to foster interactions among your students through online teaching. As your students read and react to the blog, their reading and writing skills will improve. They will also gain experience in communicating with one another, formulating opinions, and defending them. In addition, requiring your students to participate in a blog helps them learn about using the Internet for social interaction and networking.blogging

Setting up the Blog

There are several platforms teachers can use to create blogs, many of which are free. Some of the most popular free blogging platforms include WordPress, Blogger, and Edublogs. Make sure that the platform you choose is simple for your students to use. After you choose a platform, you can create and customize a profile for your classroom’s blog. You can also use a platform to create accounts for each student, or you can allow students to create their own accounts.

After your blog is complete, you can begin making live posts for your students to read. If you allow your students to comment on your posts, make sure that you choose options on the blogging platform that allow you to read students’ posts before they go live. Taking this precaution will help prevent inappropriate comments. In addition, instruct your students to use only their first initial and last name when making their posts. Students should never give out personally identifiable information on the Internet.

Technical Concerns

Because you are making posts for students to read, you need to make them as easy to follow as possible. Align all of your writing to the left of the page. Left-aligned text is easier to read than centered text. You should also use paragraphs and subheadings whenever possible. Subheadings and paragraphs break up your text so that students can easily digest it.

Keeping Interest

When your blog is up and running, make sure that you post often enough to keep your students coming back. However, you should not post so often that your students can’t keep up with reading and commenting. Most teachers find that posting two to three times per week is sufficient. Allow students to subscribe to your blog via email so that they know immediately about new posts.

To keep your students interested in your blog, change your themes regularly. Add some fun widgets, but try not to add so many that your students lose track of the blog’s purpose. To help students find past blog content, add a search box to your blog and teach them how to use it. End each post with a question so that students will be inspired to respond with comments. You should also make sure that you reply to the comments students make on your posts. Interacting with your students is the best way to foster their communication skills.

Blogging for Success

Creating an effective classroom blog takes time and dedication. Don’t give up if the blog doesn’t seem immediately successful, especially if your students are inexperienced in the blogging world. Continue to make your posts and encourage communication, and your classroom blog will become a valuable tool that your students can use to share and defend their ideas.


Lindsey Harper Mac is a professional writer living in the Indianapolis area. She specializes in writing guest posts on social media and education and writes on behalf of Colorado Technical University. Currently, Lindsey is completing work on her master’s degree.

AllBloggingTips Redesigned Version 2.0

ABTHi all, We are very proud to announce that we redesigned out blog to meet better experience of you.  Our blog runs on Thesis Theme and is customized by me. We now comes with more cool features and design of this blog. First Check Out our new look of design v2.

allbloggingtips new design v2 0


Features of New Design Version 2.0

This theme is coded with HTML5, CSS3 and using latest version of WordPress 3.3. Valid HTML5 markup, and also a Responsive Design. Check out some features of this new design.

  • Full Width Header and Menu Bar
  • New Logo Added and Favicon
  • Site Background with Texture
  • Post Body with new style
  • Cool Sidebar
  • Animating Footer on Hover
  • Comment Section Updated
  • Stylish Author Box
  • Related Posts with Thumbnails
  • Heading Styles with Author Avatar on Homepage
  • Top Commentators and Author Widget Added

What’s More?

 Not only above features are added we all updated some of our recent pages , widgets and much more some of them are:

 Some Numbers

Stats recorded on 18/03/2012

Number of Posts : 96
Number of Comments : 600
Fans at Facebook 200+
Twitter Followers 2440+
Alexa Rank : 64k
Pagerank : 3


This site is in Version 2.0 , and open for your Feedback. if you found any Dispute or Error, then please let me know through Comments or Contact form.

6 Simple Yet Effective Tips To Design Website Like Pro

web

Think of the websites you visit the most — chances are they are clean, professional, and easy to navigate. This is no coincidence: the human mind takes just a millisecond to make a definitive decision as to a site’s credibility, and this initial judgment is based entirely on aesthetics which means a good web design is critical for retaining visitors. Even the load time of the website matters the most, described below are 6 Simple Yet Effective Tips To Design Website Like Pro that you should follow to make your website look like pro.

See Also: Power of The WordPress Website Design

  • 1) Plan Your Site: Before turning on your computer, consider the layout, page structure and how users will move from one page to another (navigation). Then, sketch out your site on paper.
  • 2) Understand Your Audience: Knowing your audience will help set the tone for your content and layout, as you identify what visitors will be looking for on your site. It’s also important to consider popular web browsers and your visitor’s screen resolution size so that they see your site the way you intended; you can find this data in most site analytics tools. If you’re not sure how wide to make your site, 960px is a great place to start.
  • 3) Allow for Easy Navigation: Since people often read from left to right and top to bottom, the upper left-hand corner of your site is the first place your visitors will look. Place your navigation buttons here and keep them consistent, along with font and color choices, for easy reading and fluid movement from page to page.
  • 4) Choose a Color Scheme: If you’re designing your site around an image, try uploading it to a color palette tool, like DeGraeve.com‘s, for example, for complementary color suggestions. Be sure to remain consistent with your design patterns, and stick to no more than three font types and colors.
  • 5) Use High Quality Photos: In order to give your site a more professional appearance, all images should be clear, focused, and of high resolution. An alternative to taking your own photos is buying them from istockphoto.com; at about five-dollars an image it’s an inexpensive way to visually take your website to the next level.
  • 6) Test Your Site, Then Test Again: When you’ve created or redesigned your site, ask friends and family to test it for you. They may find things you’ve missed, or point out areas of confusion.


How to Embed Tweets In your Blogpost using New Twitter?

Using new Twitter is really easy and it is a matter of fun too. It is more than a simple new layout
and a new and refreshing look. Twitter has incorporated some new features in new rollout to
compete with rising competition from giants like Facebook and Google. Embedding tweets
inside the blog has never been such easier.
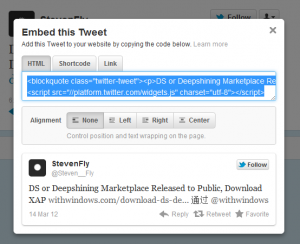
embed tweets
The new twitter layout brings refreshingly new fresh intuitive UI along with heaps on new
features. If you are not aware of how to use the new twitter to embed tweets in any of your
websites or blogs, just have a look at the step-by-step instructions. Also read our post on twitter
apps for Windows Phone users.

How to Embed Tweets In your Blogpost using New Twitter?

To enjoy embedding tweets using the new Twitter you have to enable the new Twitter.

  1. Visit directly to the page of the New Twitter.
  2. You can also visit the ‘user profile’ for embedding tweets.
  3. However, you should remember that you must not use any third party access.
  4. Now you have choose the tweets that you want to embed
  5. The next step is to position the pointer of your mouse on that particular tweet
  6. You will find selection criteria appearing on that tweet
  7. Now click ‘Open’.
  8. Then click ‘Details’.
  9. This will open that tweet with that option by which you can embed the tweet
  10. Now is the final step. You have to click ‘Embed this tweet’.
  11. You will see a pop-up appearing with the code that has been already highlighted.

Twitter borrows pages from the YouTube playbook to offer codes. These codes will help you to
share any interactive tweets with all the visitors of your blogs or websites. Using these tweets
will help to increase the lifespan and visibility of some special tweets.

You can alter the code and if you want you can also keep the code as it is. To keep the code same
you can copy it and paste it when you wish to embed your tweet. The readers of this embedded
tweet can retweet and reply this tweet. They can also favorite tweet by visiting your blogs or
websites. They can also find the option that will give them access to follow that person who has
created that tweet.

So if you want to try something new and interesting, embedding tweets using the new Twitter
is for you. It is needless to mention the popularity of Twitter as one of the top social networking
sites. It is really a wonder that make people able to connect and reconnect within short time. The
new Twitter is also not an exception and it is easier to use, particularly when you want to embed
tweets using it.

This guest post is written by Ricky Shah, a Windows Phone fanatic from India. Follow his unofficial Windows Phone blog to know more about his interest and to find out twitter apps for Windows Phone users.