WordPress

Customized and Stylized Subscription Widget

ABT widget sidebarMany of this blog readers asked me which plugin/code I’m using in sidebar for Stylized Subscription Widget. So today I decide to share this with you! because It’s almost more than 2 months. I’ve not shared any Stylized Subscription for Widget Blogger and WordPress Widget.

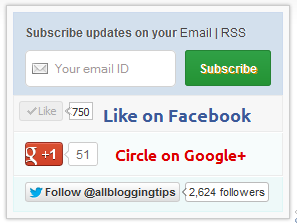
Coming back to topic this widget simple uses HTML and CSS. It’ll keep your sidebar clean! ;) It contains FeedBurner Form, Twitter Follow Button, Facebook and Google buttons.

To see demo copy code below and place it in our HTML Editor.

Adding Customized and Stylized Subscription Widget

You just need to place a code to your blog widget Follow following steps to add Customized and Stylized Subscription Widget to WordPress and Blogger both!

Adding Subscription Widget To Blogger

  1. Go to Dashboard > Design > Page Elements.
  2. Click Add A Gadget. In window, select HTML/Javascript .
  3. Copy the code below and paste it inside the box.
  4. Save the gadget. Drag the gadget and reposition it under Blog Posts gadget.
  5. Click Save button.

Adding Subscription Widget To WordPress

  1. Go to Dashboard > Appearance > Widgets > Available Widgets.
  2. Drag Text widget into a sidebar.
  3. Paste in the code.
  4. Save.

Code for Stylized Subscription Widget

<style>

 #ABT-mashable-bar {
background-color: #f9f9f9; box-shadow: 0 0 3px #b0b0b0;
     border:1px solid #ccc;
       padding:6px; 
width: 270px;

    }

#subscribe-box .fb-like-box { border: 1px solid #EBEBEB; padding: 5px; background:#f7f7f7;}
	#subscribe-box .gplusone { background: #f7fcfc; border: 1px solid #EBEBEB; border-top: 1px solid #fff; color: #000; font-size: 10px; line-height: 1px; padding: 9px 11px;}
	#subscribe-box .twitter-follow { background: #eef9f9; border: 1px solid #dff6f6; border-top: 1px solid #fff; padding:5px 11px;}

	#subscribe-box .email-box { 
   border-right: 1px solid #C7DBE2;
        border-left: 1px solid #C7DBE2;         background: #d3e0ed;

border: 1px solid #ccdaed;  padding:11px; margin-bottom: -4px;}

		#subscribe-box .email-box h4{color: #555;font-family: Arial;font-size: 12px; margin: 0 0 10px;}

#subscribe-box .email-box .txt,#subscribe-box .email-box .txt:focus{

border: 1px solid #d2d2d2;

color: #a19999; font-size: 12px;

border-radius: 5px;
-moz-border-radius: 5px;
-webkit-border-radius: 5px;

height:21px;

padding: 6px 28px 8px; width: 93px;

}

		#subscribe-box .email-box .btn,#subscribe-box .email-box .btn:focus{ float:right;

margin-top: 0px;

background: #30a146; 	background: linear-gradient(top, #30a146 0%, #249334 100%);  background: -moz-linear-gradient(top, #30a146 0%, #249334 100%);   background: -webkit-gradient(linear, left top, left bottom, color-stop(0%, #30a146), color-stop(100%, #249334));  background: -webkit-linear-gradient(top, #30a146 0%, #249334 100%);   text-shadow: 1px 1px 0 rgba(0, 0, 0, .4);  font-weight:bold;    font-family: "Droid Sans","Lucida Grande",Tahoma,sans-serif; 

    font-family: "Arial","Helvetica",sans-serif;
    border-radius:3px;
    -moz-border-radius:3px;
    -webkit-border-radius:3px;
    border:1px solid #248334 ;
    color:white;
    text-shadow:#d08d00 1px 1px 0;
    padding:8.5px 10px;
    margin-left:3px;
    font-weight:bold;
    font-size:12.2px;
    cursor:pointer;
    border-image: initial;} 

			#subscribe-box .email-box .btn:hover{

opacity: .8;
    border-radius:3px;
    -moz-border-radius:3px;
    -webkit-border-radius:3px;
    border:1px solid #248334  ;
    color:#FFFFFF;
    text-shadow:#d08d00 1px 1px 0}  

</style>

<div id="ABT-mashable-bar">
<div id="subscribe-box">
<div class="email-box">
<h4>Subscribe updates on your <a href="http://feedburner.google.com/fb/a/mailverify?uri=latestbloggingtips4u" target="_blank">Email</a> | <a href="http://feeds.feedburner.com/latestbloggingtips4u" target="_blank">RSS</a></h4>
<form action="http://feedburner.google.com/fb/a/mailverify" method="post" onsubmit="window.open('http://feedburner.google.com/fb/a/mailverify?uri=latestbloggingtips4u', 'popupwindow',  'scrollbars=yes,width=700px,height=700px');return true" target="popupwindow">
<input class="txt" style="background: #FFF  url('http://i.imgur.com/2BCD0.png') no-repeat 6px !important;" onfocus="if (this.value == 'Your email ID ')  {this.value = '';}" onblur="if (this.value == '') {this.value = 'Your email ID ';}" type="text" name="email" value="Your email ID " />

<input type="hidden" name="uri" value="latestbloggingtips4u" />

<input type="hidden" name="loc" value="en_US" />

<input class="btn" style="margin-left: 4px;" type="submit" value="Subscribe" />
<div style="clear: both;"></div>
</form></div>

<div class="fb-like-box"><iframe style="border: none; overflow: hidden; width: 80px; height: 21px;" src="//www.facebook.com/plugins/like.php?href=http%3A%2F%2Fwww.facebook.com%2Fallbloggingtips&send=false&layout=button_count&width=80&show_faces=false&action=like&colorscheme=light&font&height=21" frameborder="0" scrolling="no" width="320" height="240"></iframe><a style="color: #3b5998; font-family: ubuntu; font-size: 18px; font-weight: bold; line-height: 20px;" href="http://www.facebook.com/allbloggingtips" rel="nofollow" target="_blank"> Like on Facebook </a>
<div class="clear"></div>
</div>

<div class="gplusone">
<div style="float: left; width: 90px;">
<div id="___plusone_0" style="height: 24px; width: 106px; display: inline-block; text-indent: 0pt; margin: 0pt; padding: 0pt; background: none repeat scroll 0% 0% transparent; border-style: none; float: none; line-height: normal; font-size: 1px; vertical-align: baseline;"><iframe id="I1_1322986463651" style="position: static; left: 0pt; top: 0pt; width: 106px; margin: 0px; border-style: none; height: 24px; visibility: visible;" title="+1" name="I1_1322986463651" src="https://plusone.google.com/_/+1/fastbutton?url=http%3A%2F%2Fwww.allbloggingtips.com%2F&size=standard&count=true&annotation=&hl=en-US&jsh=m%3B%2F_%2Fapps-static%2F_%2Fjs%2Fwidget%2F__features__%2Frt%3Dj%2Fver%3D-8uDua_W7bo.en_GB.%2Fsv%3D1%2Fam%3D%218NuGo4ypxRCIwtBaLA%2Fd%3D1%2F#id=I1_1322986463651&parent=http%3A%2F%2Fwww.allbloggingtips.com&rpctoken=511986996&_methods=onPlusOne%2C_ready%2C_close%2C_open%2C_resizeMe" frameborder="0" marginwidth="0" marginheight="0" scrolling="no" width="100%" height="240"></iframe></div>
</div>
<a style="color: #dd0000; font-family: ubuntu; font-size: 16px; font-weight: bold; line-height: 24px;" href="https://plus.google.com/103280517588083500359" rel="author" target="_blank">Circle on Google+</a>
<div class="clear"></div>
<!-- Place this render call where appropriate -->

<script type="text/javascript">// <![CDATA[
  (function() {

    var po = document.createElement('script'); po.type = 'text/javascript'; po.async = true;

    po.src = 'https://apis.google.com/js/plusone.js';

    var s = document.getElementsByTagName('script')[0]; s.parentNode.insertBefore(po, s);

  })();
// ]]></script></div>
<div class="twitter-follow">
 <iframe style="width: 300px; height: 20px;" title="" src="http://platform.twitter.com/widgets/follow_button.html#_=1322986464549&button=blue&id=twitter-widget-22&lang=en&screen_name=allbloggingtips" frameborder="0" scrolling="no" width="320" height="240"></iframe>

<script type="text/javascript" src="//platform.twitter.com/widgets.js"></script></div>
<div id="mashable" style="height: 12px; background: #f9f9f9; border: 0px solid #CCC; border-top: 1px solid white; text-align: right; border-image: initial; font-size: 10px;"><span class="author-credit" style="font-family: Arial, Helvetica, sans-serif;"><a href="http://www.allbloggingtips.com" target="_blank">Widget »</a></span></div>
</div>
</div>

If you face any problem with code. Please download this code..

Customization!

Due to some issue. I can’t highlight changes you’ve to make in above code. Hope you won’t mind ;) . Now look for bold letter above and replace it with your Username, IDs like;

  • Replace latestbloggingtips4u with your feedburner Feed URL.
  • Replace allbloggingtips with your facebook Page URL.
  • Replace allbloggingtips with your twitter url.
  • Replace allbloggingtips with your blog URL.
  • And at least replace 103280517588083500359 with your Google+ Profile Link.

Credits!

This widget is first shared on AllBloggingTips. Readers are requested to link back if you’re going to share this widget on their blog!

That’s all. I hope you’ll like this widget. Let me know if I missed anything or you face any issue!

Happy Blogging :D

10+ Best eCommerce Plugins For WordPress

Looking for Best eCommerce Plugins For WordPress ? Here it is.

With the recent advancements in technology, internet is being used by more and more people every day.  As a result online shopping has been much popular amongst consumers these days. You can easily check out various brands and compare prices and what’s even more satisfying is that you need not move a muscle.

All of this is done by a single click. You can read reviews and consumer’s advice about various products and brands. Though there is countless number of ways to do this, but in this article we will be discussing about some very cool and popular Best eCommerce Plugins For WordPress which one may easily incorporate in his blog or website for eCommerce.

eCommerce Plugins

10+ Best eCommerce Plugins For WordPress

Ecwid:

The first plugin in our list of Free Best eCommerce Plugins For WordPress is Ecwid. It is always said that the best things in this world are priceless. So is true for this plugin because it is free to use. It is a shopping cart system which is easy to install and even easier to. It is fully customizable so you can decide how it looks on your site.The drawback is that this plugin uses Ajax, so SEO value of website is affected. Moreover the users who do not have JavaScript enabled will not be able to use it.

Cart66:

Irrespective of your product type and services, you can easily take payments from buyers using this plugin called cart66 (formerly known as PHPurchase). This plugin itself will cost you a few bucks but it is very useful. You can create multiple stores using this and can customize their interface as well.

eShop:

This is a full ecommerce plugins system for WP. And moreover it’s free. The admin dashboard is very friendly and it is very simple to add new products, review products and checking statistics. It is very customizable as well.
But the problem is with payment options. One can only use PayPal, Payson accounts or you can use eShop to take in payments, but with eShop option you will not be able to print the customer invoice which is possible with other payment options.

WP eCommerce:

This is a fully feature-rich plugin that is free of cost. This adds a shopping cart to your blog rather easily and quickly. You have various payment options supported including Google checkout and Pay Pal. Various social marketing tools also come integrated with the plugin through which you can also connect to Facebook Marketplace. The only downside is that this plugin requires frequent maintenance and this can become a really cumbersome task. Looks great eCommerce Plugin for wordpress.

Minicart:

This provides a button which can easily be embedded into blogs and websites to accept payments or even request donations. This can be helpful if your blog is shared across the internet via RSS because it allows every blog entry to act as its very own mini store.

Quick Shop:

This is useful with the themes that have a sidebar installed as this plugins gives a sidebar shopping cart option in your cart. The plugin requires PHP 5 and you need to make your own CSS. The plugin is really customizable though.

Shopp:

This is an excellent plugin but comes with a price tag of 55$. What you will be getting is a single license to this plugin, some extra plugins and modules, and priority for support. This plugin is specially designed for big firms which can use this as a solution to all their online shopping problems.

YAK for WP:

If you already have an online retail presence, and want to create a blog to make sure your customers are constantly updated about the latest products and services offered by you, then this YAK plugin is an unbeatable option for you. This is an open-source shopping plugin which allows categorization of products and services, and gives the users a pool of multiple payment options.

WP Auctions:

This is a completely revolutionary Best eCommerce Plugins For WordPress which allows you to auction anything on your website and that too completely for free. You need not hassle about seller fee, gallery fee, final value fee, listing fee or any other type of irritating fee to sell your product online. What you need to do is to just create your own auction and register your plugin on the WP Auctions live page which will generate traffic for your website. A host can create as many auctions he intends to. But you can receive payment only via Pay Pal.

ArtPal:

This is another free WP plugin for selling online. This was originally created for the artists to sell their art work online through their own blogs and websites. One can seamlessly integrate his/her Pay Pal account with this plugin and leave the rest on this plugin. This plugin does real time sales update, so as soon as your product is sold it will be excluded from your catalogue. You need not worry about your product being sold twice.

Are Pay Pal  eCommerce Plugins For WordPress

You can use this plugin if you want to provide privileges to access exclusive content of your blog, only to the registered users. It will restrict the guests from seeing the hidden content. It is basically designed to sell stuff which cannot be shown to all people , like digital arts or some intellectual property. Instead of showing the content to the unregistered users, they are shown with the actions they need to take (such as registering with you via a minimal payment) to view that content. Google’s bot can although index that hidden content, so that users can search for it but they cannot see and access it without registration. This plugin uses Pay Pal – IPN (Instant Payment Notification) protocol so that the payment and content delivery processes are quick and automatic.
These are 10+ Best eCommerce Plugins For WordPress . Did I missed any free eCommerce plugins for WordPress? Let me know in comments!

This article has been authored by Vishal Shetty, who recommends Pacebutler.com , a company which offers cash for used cell phones and also donates a book for each phone sold to them.

Best Advanced Social Subscription Widget for WordPress

Recently we shared Stylish followers count widget for WordPress. Now its time for something new and advance. Today we came with Best Advance Social Subscription Widget for WordPress. This plugin is provided by CodeCanyon one of best marketplace that provide wordpress plugins and much more.

Right now Advance Social Subscription widget comes with 2 editions for WordPress. If you are using feedburner than 1st edition works perfect for you ;) cost is just 8$

  1. Advanced Social Widget FeedBurner Edition
  2. Advanced Social Widget – MailChimp Edition WordPress Plugin

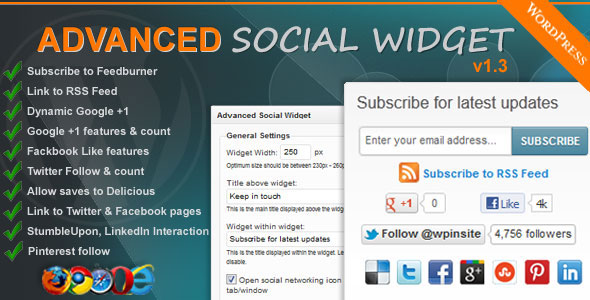
Advanced Social Widget Subscription widget FeedBurner Edition Adds an advanced widget box to your sidebar giving users the ability to link your site/blog to all popular Social Networking websites such as Delicious, Twitter, Facebook, StumbleUpon, Pinterest and awesome FeedBurner Email Subscription with easy.

Advance Social Subscription Widget Preview!
Advance Social Subscription Widget!

Live Demo   |   Download   |   More Info

Features of Advanced Social Subscription Widget

  • Highly functional dynamic widget interface
  • Allow visitors to easily and effortlessly subscribe to your FeedBurner also display link to your sites RSS feed
  • Dynamic Google +1 features & follower count, Facebook Like features and Like count, Twitter Follows features & follower count
  • Allows you to save to Delicious. Automatically determines whether you are on homepage, category pages, single pages or other and dynamically creates the Delicious link to share
  • Links to your Twitter page, Facebook page, Pinterest account and page, LinkedIn
  • Open links in same window or new window with 1 click.
  • Decide whether to display social networking site name under social icons or not to display it.
  • Multiple widgets configurations
  • Inherits CSS styles from current active theme – fonts and colors

How to Install  Advanced Social Subscription Widget ?

It’s very easy. Just download widget from here (Pay 8$ ;) ) and then watch video given below!


So what you are waiting for ? Go and download this great WordPress plugin Best Advanced Social Subscription Widget for WordPress.. :) Let me know if you face any problem?

Boosting Your WordPress Blog’s Performance in 3 Simple Steps

Often users ask me why their WordPress blog is so slow.

Well, there’s no general answer for that question, it could be due to plugins or maybe something related to your server host.

But one thing is certain: speed is one of the most important factors for a good UXP (= “user experience”) and a common reason why visitors leave a page, frustrated.

And were talking about matter of seconds here: From a waiting period of 3 seconds on you will lose approximately 40% of your visitors.

Also Google is very interested in a high build-up speed of your site; if you’re too slow, you are prone to receive penalties in terms of search results.

So let’s begin by finding out how slow your site really is. We are able to do so by downloading the yslow extension of Yahoo.

About Yslow

Yslow is a tool that lets you breakdown and display your site’s performance issues in a very simple way and gives tips on improving these problems.

On the basis of 24 criteria the global settings are then tested as well as your individual content (images / stylesheets / HTML), conclusively giving you school grades and points (maximum 100) based on the preceding analysis.

By clicking “Run Test” you get a detailed breakdown of your blog’s speed. Since problems are highly dependent upon what kind of theme you use, the main focus of this tutorial lies on general solutions that have the power to increase the speed of every blog.

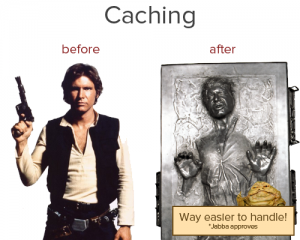
1. Let’s start with the caching:

Caching is the process by which frequently used files are temporarily saved so they do not have to be created / recalculated each time . Your blog’s article overview for example would only have to access a database, even if new articles have been created, instead of obtaining a new list every time a new page viewer accesses the site.

You can achieve this and a lot more, by using caching plugins like the powerful W3 Total Cache tool.

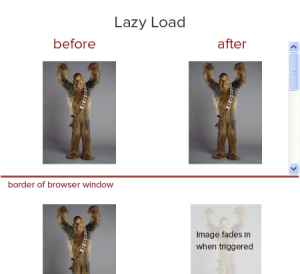
2. Make your images load lazy

When it comes to space, images often claim more than 50% of a given page. They are one of the biggest traffic drivers and significantly connected to the build-up speed of your site.

Especially with very image-heavy blogs it pays off to make sure they are only loaded when the user scrolls towards them.

Thats exactly what the so called lazy load scripts do. They replace content outside of the browser window with placeholders, only calling up the real files when users actually scroll down to the image.

This will increase the build-up speed by a multitude, enhancing the UXP and costing less server bandwidth.

You can do this by going to Plugins → Add New and put in “BJ Lazy Load”. Of course there are several Lazy Load plugins out there, I would recommend the one by Bjørn Johansen tough, because it lags less when reloading and has a better compatibility with coaching-plugins.

READ : HOW TO: Increase Traffic To Your Photography Blog

3. Lazy Share-Buttons for social sharing

Integrating Facebook, Pinterest and Twitter buttons to your blog can considerably slow down your site.

But because social sharing is a thriving motor behind any blog’s success, we have to find a way to work around these issues.

READ: Best Social Sharing Plugins..

Option 1: Reloading Social Buttons per click

The two-click social button solution is mainly used by platforms that have critical privacy conventions. With every click of the like-button, facebook will know from where your IP has been prompted, thereby making it very easy for them to realize your path outside of facebook, which does not appeal to some users and page-owners.

The german tech magazine heide.de wrote a plugin that helps you work yourself around that, by blending out the share-buttons until the second click.

And even though our article here still focusses more on blog-performance, this plugin is definitely worth a try.

Installation:

  • Go to Plugins → Add New
  • Look for “2 Click Social Media Buttons”
  • Click installation
  • After completing installation, click “Activate”

Configuration:

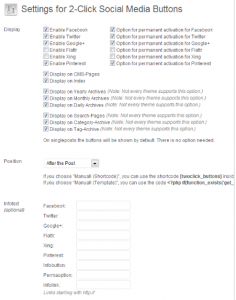
Open the settings in the plugin-overview of “2 Click Social Media Buttons”. There you can decide which share buttons you want to use and where they should appear.

Important: Under Infotext you can change the descriptive paragraph about the plugin. This is important, because the default-text is set to German.

Add the following text in the spaces “Facebook” up to “Pinterest”:

2 clicks for more privacy: Not until you click here will the button activate and you will be able to send a recommendation to Facebook. Even by merely activating it there there will be data transmitted to third parties.

Write this under “Infobutton” :

If you activate these areas by clicking, your information will be sent abroad to Facebook, Twitter, Flattr and Google and they might be saved by these parties.

And under “Permaoption” you add the following text:

Permanently activate the Share-Buttons

Read:  Pinterest’s Contribution to SEO

Option 2 : Newsgrape Mouse-Over share buttons.

Try adding mouse-over share buttons, so that you can make sure your site online transmits data when it is actually needed.

This will significantly enhance your performance, because the scripts are only activated when your users click on the buttons.

You can install the WordPress plugin right here, and it will look something like this:

Conclusion

These were some simple, yet powerful steps to boost the performance of your blog. If you have any further questions on how to conduct these alterations, feel free to contact me via rs@newsgrape.com

WooThemes Celebrating Its 4th Birthday : Get 40% Off (Limited Offer)

Recently I got an email from WooThemes that they are celebrating birthday. WooThemes is currently best and top WP Theme club they are providing WP themes from last 4 years. On birthday they are providing 40% off on all of their themes.

Remember that this promotion offer is only for 3 days, this is Valid until midnight July 13th 2012 (PST). So grab this while its hot! Currently they already dropped price by 40%. So you don’t need to use any coupon.

Why you should pick WooThemes?

They are providing best wordpress themes from last 4 years. They deliver top quality, cutting edge WordPress themes and superior customer support.  Give your WordPress powered website a professional new look, and be up and running in no time at all. That’s what WooThemes are doing from last 4 years. Below I am listing some great features.

Their 90 themes have been downloaded over 7,687,800 times and that’s why 243567 people prefer them as their theme provider including me. ;)

Solid Code Framework : All themes run on the same WooFramework which makes it easy to setup your theme, SEO, and much extra functionality.

Stunning Designs: They have an eye for good design, and many of themes are designed by well respected top web designers. You can see them on their official site/

Incredible Support: Detailed theme documentation with professional video, tutorials, WooCodex and probably the best support forum anywhere. Life time support.

New Themes Every Month:They deliver a minimum of 1 new Great theme every month, so that you always have a wide array of new designs. You can choose 1 year membership to get access to all their themes..

  • If you only want to buy a theme. You will get 2 premium theme of your choice for free!

How to get 40% Off? (limited offer)

Woothemes just turn 4. So they dropped their all themes provide by 40%. You don’t need to use any coupon just follow . You just need to visit their website. Choose the theme that you want to buy. They will give you 40% off. This is limited offer Valid until midnight July 13th 2012 (PST). So grab this while its hot!


Get WooThemes Now!

 
Disclosure: This post may contain affiliate link :

EMSPURAPG7KW