Blogger

Fully Customizable Related Post Widget for Blogger

Related post widget always help us to reduce bounce rate and increase visitors time on the site. Related post are always shown at end of article to engage readers.

In Blogger, there are no official widget available. But now you can easily add Best Customizable Related Post Widget for Blogger using nrelate. nRelate is a free tool that adds related post widget to blogger even in wordpress or any other site. In this post I will only show you how to add  Customizable Related Post Widget for Blogger using nrelate.

nrelated posts

Fully Customizable Related Post Widget for Blogger

  • Go to Partners.Nrelate.com. Register for your new account here.
  • Click Install Tab => Blogger
  • Enter the domain in which you want to add nrelated post widget for blogger. Than click “Submit”
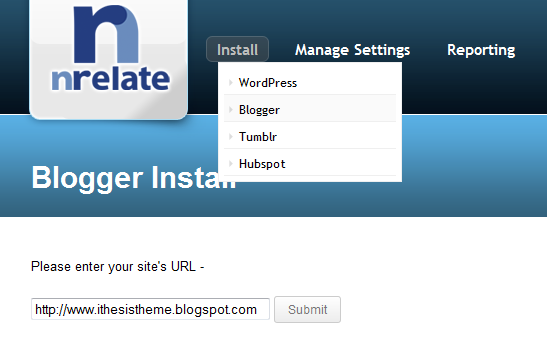
nrelate add site

  • In next page. It will ask you to select option where you want to show related post.  Better to select Post only!
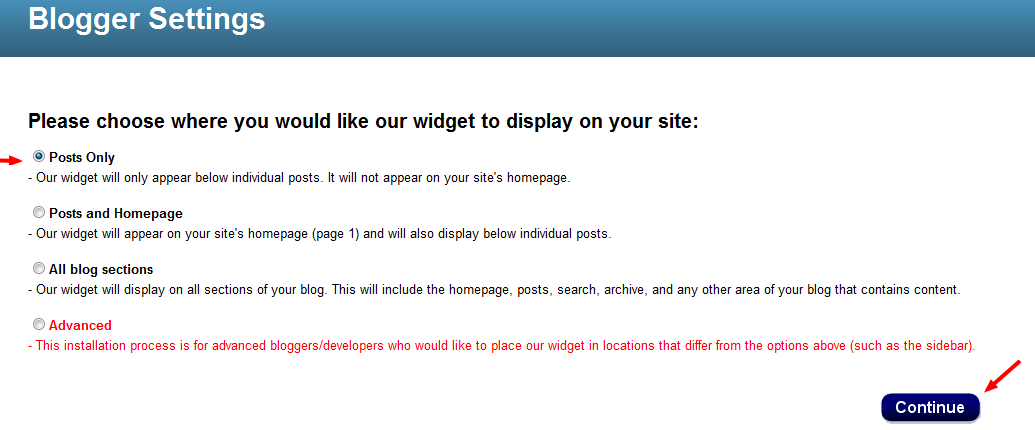
nrelate shows widget option

  • Click the “Add to Blogger” button below and then click “Add Widget” as shown in the following image.

This will complete the installation. It may take up to 2 hours before appearing on your site.

  • After clicking the Continue button you will be presented with a option to Add the widget to your blog. Select your blog and click the Add Widget button
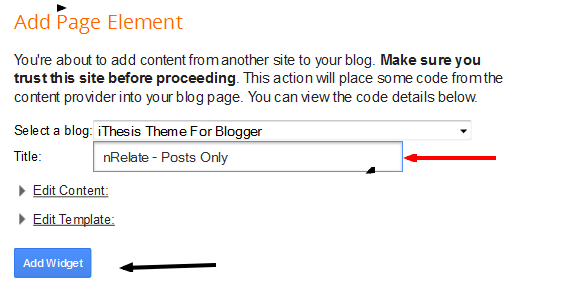
nelate add widget to site

That’s it. Now you had added related post widget for blogger using nrelate. Now its time to customize it ;)

How to Customize nrelate widget ?

Customization is very easy. All you have to do is just customize your site from nrelate menu.B elow are few options that are available in nrelate related post widget for blogger dashboard.

Go to Manage Setting => Blogger. Here you will see main setting first.

  1. In main setting you can edit size of your related post along with number of articles you want to show in related posts.
  2. You also show sponsored ads. If you want to make extra money ;) from your site!
  3. You can also add link back to nrelate site if you like this widget.

Customizing Thumbnail Style!

You can customize this related post widget thumbnails style. This comes with 5+ awesome style for your related post. You can select anyone that you want from that drop down option in “Manage Setting => Blogger => Styles ”

Don’t be panic. :D

It may take 2 hours to show related post widget in your blogspot blogs. I am using nrelate in my wordpress blog too. Its awesome related post widget.

That’s all. I hope you like this article and related post widget for blogger by nrelate.com . Its best widget not only easy to use but also very easy to customize. Isn’t it? ;)

Animated Social Sharing Widget with Cool Hover!

You must have heard about Shareaholic, The Leader in the creation of stylish sharing scripts. After Their Great Success of The Sexy Bookmarks, recently they just have created another awesome design which is known as SassyBookmarks ( Social Sharing Widget ). Here in this post i’ll let you know how to implement SassyBookmarks or Social Sharing Widget on your wordpress and blogger site! :)

animated social sharing widgets
Live Demo!

How to Add Animated Social Sharing Widget to blogs? (Updated!)

Adding to WordPress!

  • Go To Your dashboard, Then Click On Appearance and then Navigate To Editor.
  • Now on The Right Side you can a list of template files, move your mouse to footer.php and then click on that
  • As Soon the page loads completely, Press CTRL+F and Find </body>
  •  Now be careful and paste the below code just about it !
  • Hit on Update File, Now Visit Your WordPress Blog ! You can see it located on The Bottom Left

Adding to Blogger/Blogspot!

  • Go to Blogger Dashboard > Template
  • Take a backup of your template.
  • Now find for below code in your template </body>
  • Add below piece of code just above/before of above code.


<!-- Start Social Sharing Widget Sassy Bookmarks HTML (allbloggingtips.com)-->
<div class="shr_ss shr_publisher">

</div>
<!-- End Shareaholic Sassy Bookmarks HTML -->
<!-- Start Shareaholic Sassy Bookmarks settings -->
<script type="text/javascript">
  var SHRSS_Settings = {"shr_ss":{"src":"//dtym7iokkjlif.cloudfront.net/media/downloads/sassybookmark","link":"","service":"5,7,2,313,38,201,88,74","apikey":"b87f5899d80a5edce8b5e55f58542ef0f","localize":true,"shortener":"bitly","shortener_key":"","designer_toolTips":true,"tip_bg_color":"black","tip_text_color":"white","viewport":true,"twitter_template":"${title} - ${short_link} via @Shareaholic"}};
  </script>
 <!-- End Shareaholic Sassy Bookmarks settings -->
<!-- Start Shareaholic Sassy Bookmarks script -->
<script type="text/javascript">
       (function() {
            var sb = document.createElement("script"); sb.type = "text/javascript";sb.async = true;
            sb.src = ("https:" == document.location.protocol ? "https://dtym7iokkjlif.cloudfront.net" : "http://cdn.shareaholic.com") + "/media/js/jquery.shareaholic-publishers-ss.min.js";
            var s = document.getElementsByTagName("script")[0]; s.parentNode.insertBefore(sb, s);
        })();
        </script>

<!-- End Shareaholic Sassy Bookmarks script -->


Endlines.
Hope You’ve find this implementation interesting. This Social Sharing Widget Code Snippet is a the property of Shareholic so please don’t remove the copyrights ! Peace and Blessing pals :D

Sleek and Cool Search Boxes for Blogger

I recently shared simple yet cool search boxes for blogger. Now its time for something new, cool, beautiful and sleek.

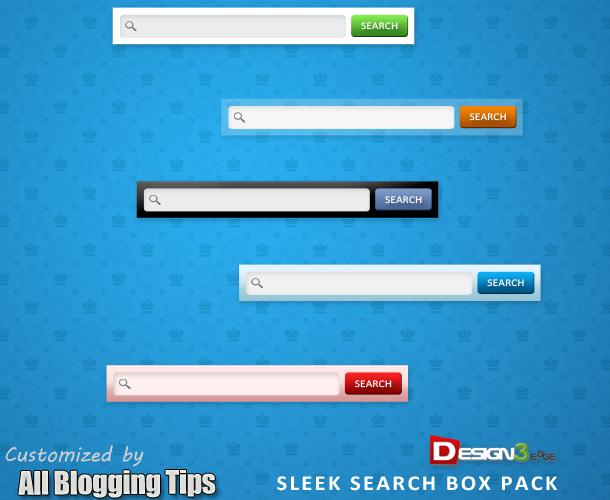
So here comes sleek and cool search boxes for blogger/blogspot. It’s using simple image and css, HTML. Actually these are PSD source designed by Design3edge. I work hard in converting this to Blogger for YOU. Hope you enjoyed with this!

 Update: For WordPress Version Click Here!

sleek search boxes by allbloggingtips

Adding Add Cool Search Boxes For Blogger

  1. Login to Blogger Dashboard   => Design tab  => Page Elements .
  2. Click on Add a Gadget where you wish to place this Search Boxes.
  3. Choose HTML/JavaScript from the List.
  4. Place any one Search Box code in to it and Save the Gadget.

Style 1

search boxes

<style type="text/css">
#abt-searchbox{
border-radius:5px;
background:URL(http://2.bp.blogspot.com/-vGjST2sX6Ts/T88uy-eRYUI/AAAAAAAAAog/xhJ2A0nGnpw/s1600/black.png) no-repeat scroll center center transparent;width:307px;height:50px;disaply:block;}
form#abt-searchform{display: block;padding: 10px 12px;margin:0;}
form#abt-searchform #s{padding-left:16px !important; padding:7.5px;margin:0;width: 235px;font-size:14px;vertical-align: top;border:none;background:transparent;}
form#abt-searchform
#sbutton{margin:0;padding:0;height:40px; width:44px;vertical-align: top;border:none;background:transparent;}
</style>
<div id="abt-searchbox">

<form id="abt-searchform" action="/search" method="get">
    <input type="text" id="s" name="q" value="Search..." onfocus='if (this.value == "Search...") {this.value = ""}' onblur='if (this.value == "") {this.value = "Search...";}'/>
    <input type="image" src="http://img1.blogblog.com/img/blank.gif" id="sbutton" />
</form>
</div>

Style 2

search boxes

<style type="text/css">
#abt-searchbox{
border-radius:5px;
background:URL(http://4.bp.blogspot.com/-hxd1468RbE4/T88u0xTfk1I/AAAAAAAAApQ/BZ1WB9VG_3g/s400/whitez%2Bby%2Babt.png) no-repeat scroll center center transparent;width:307px;height:50px;disaply:block;}
form#abt-searchform{display: block;padding: 10px 12px;margin:0;}
form#abt-searchform #s{padding-left:16px !important; padding:7.5px;margin:0;width: 235px;font-size:14px;vertical-align: top;border:none;background:transparent;}
form#abt-searchform
#sbutton{margin:0;padding:0;height:40px; width:44px;vertical-align: top;border:none;background:transparent;}
</style>
<div id="abt-searchbox">

<form id="abt-searchform" action="/search" method="get">
    <input type="text" id="s" name="q" value="Search..." onfocus='if (this.value == "Search...") {this.value = ""}' onblur='if (this.value == "") {this.value = "Search...";}'/>
    <input type="image" src="http://img1.blogblog.com/img/blank.gif" id="sbutton" />
</form>
</div>

Style 3

search boxes

<style type="text/css">
#abt-searchbox{
border-radius:5px;
background:URL(http://4.bp.blogspot.com/-Z_Bf8C64sWs/T88uy_rLu3I/AAAAAAAAAow/EcYyd6sKjxA/s400/bluez%2Bby%2Ballbloggingtips.png) no-repeat scroll center center transparent;width:307px;height:50px;disaply:block;}
form#abt-searchform{display: block;padding: 10px 12px;margin:0;}
form#abt-searchform #s{padding-left:16px !important; padding:7.5px;margin:0;width: 235px;font-size:14px;vertical-align: top;border:none;background:transparent;}
form#abt-searchform
#sbutton{margin:0;padding:0;height:40px; width:44px;vertical-align: top;border:none;background:transparent;}
</style>
<div id="abt-searchbox">

<form id="abt-searchform" action="/search" method="get">
    <input type="text" id="s" name="q" value="Search..." onfocus='if (this.value == "Search...") {this.value = ""}' onblur='if (this.value == "") {this.value = "Search...";}'/>
    <input type="image" src="http://img1.blogblog.com/img/blank.gif" id="sbutton" />
</form>
</div>

Style 4

search boxes

<style type="text/css">
#abt-searchbox{
border-radius:5px;
background:URL(http://4.bp.blogspot.com/-T2F6d51MVw8/T88u0v_kIqI/AAAAAAAAApE/pB5bbugoVoM/s400/transparent%2Bby%2Ballbloggingtips.png) no-repeat scroll center center transparent;width:307px;height:50px;disaply:block;}
form#abt-searchform{display: block;padding: 10px 12px;margin:0;}
form#abt-searchform #s{padding-left:16px !important; padding:7.5px;margin:0;width: 235px;font-size:14px;vertical-align: top;border:none;background:transparent;}
form#abt-searchform
#sbutton{margin:0;padding:0;height:40px; width:44px;vertical-align: top;border:none;background:transparent;}
</style>
<div id="abt-searchbox">

<form id="abt-searchform" action="/search" method="get">
    <input type="text" id="s" name="q" value="Search..." onfocus='if (this.value == "Search...") {this.value = ""}' onblur='if (this.value == "") {this.value = "Search...";}'/>
    <input type="image" src="http://img1.blogblog.com/img/blank.gif" id="sbutton" />
</form>
</div>

Style 5

search boxes

<style type="text/css">
#abt-searchbox{
border-radius:5px;
background:URL(http://1.bp.blogspot.com/-D98wjamWcwk/T88u0dnSPuI/AAAAAAAAAo4/U4Oy3x-zhRg/s400/pinkz.png) no-repeat scroll center center transparent;width:307px;height:50px;disaply:block;}
form#abt-searchform{display: block;padding: 10px 12px;margin:0;}
form#abt-searchform #s{padding-left:16px !important; padding:7.5px;margin:0;width: 235px;font-size:14px;vertical-align: top;border:none;background:transparent;}
form#abt-searchform
#sbutton{margin:0;padding:0;height:40px; width:44px;vertical-align: top;border:none;background:transparent;}
</style>
<div id="abt-searchbox">

<form id="abt-searchform" action="/search" method="get">
    <input type="text" id="s" name="q" value="Search..." onfocus='if (this.value == "Search...") {this.value = ""}' onblur='if (this.value == "") {this.value = "Search...";}'/>
    <input type="image" src="http://img1.blogblog.com/img/blank.gif" id="sbutton" />
</form>
</div>

Credits

This is again a first time shared tutorial guide by AllBloggingTips. These scripts, widget and style sheets are provided only by ABT  therefore if you wish to share this tutorial with your readers and friends then kindly link back to this post as the only favour in return. :D

That’s all!. We hope you enjoyed this Cool Search Boxes. You can also subscribe  us to get our next tutorial in your inbox ;)

Subscribe Here!

How to Add Cool Floating Notification bar in Blogger

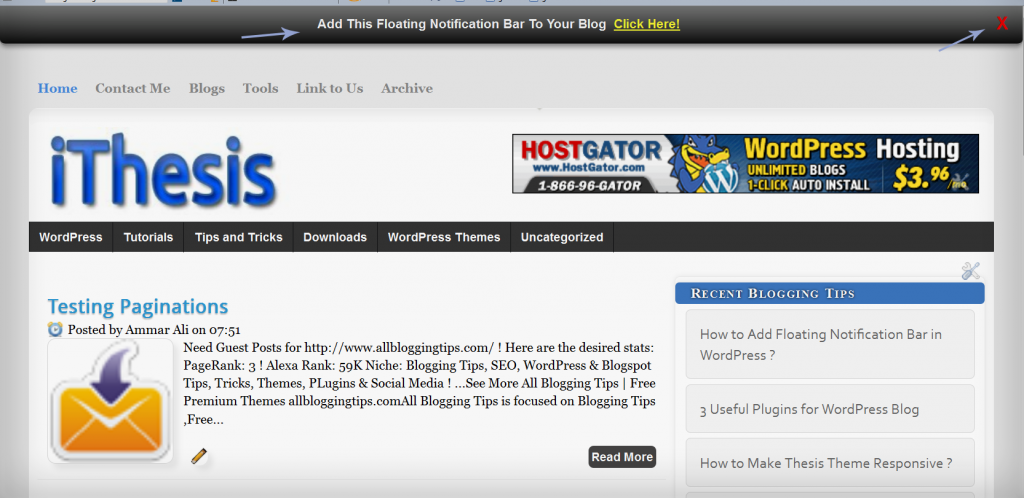
We already shared a floating notification bar for wordpress recently. Many of my readers request to create this floating notification bar for Blogspot/Blogger blogs and today we are sharing a simple yet Cool Floating Notification bar for Blogger. Its very easy to add this widget in blogspot. All you have to do is copy code given below, paste it in to your blog and customize text, link etc according to your needs. Isn’t that simple! :D

Blogger floating notification bar copynotification

Live Demo

Add Cool Floating Notification bar in Blogger !

First  Always Back Up Your Template Before You Any Make Changes – How To Back Up A Blogger Template

  • Goto Blogger  => Design => Edit HTML
  • Next search for this code
<body>
  •   Just below it paste the following code,
<!-- Notification code start -->
<style type='text/css'>
#ut-sticky
{
background: #7d7e7d; /* Old browsers */
background: -moz-linear-gradient(top,  #7d7e7d 6%, #7d7e7d 9%, #0e0e0e 99%); /* FF3.6+ */
background: -webkit-gradient(linear, left top, left bottom, color-stop(6%,#7d7e7d), color-stop(9%,#7d7e7d), color-stop(99%,#0e0e0e)); /* Chrome,Safari4+ */
background: -webkit-linear-gradient(top,  #7d7e7d 6%,#7d7e7d 9%,#0e0e0e 99%); /* Chrome10+,Safari5.1+ */
background: -o-linear-gradient(top,  #7d7e7d 6%,#7d7e7d 9%,#0e0e0e 99%); /* Opera 11.10+ */
background: -ms-linear-gradient(top,  #7d7e7d 6%,#7d7e7d 9%,#0e0e0e 99%); /* IE10+ */
background: linear-gradient(top,  #7d7e7d 6%,#7d7e7d 9%,#0e0e0e 99%); /* W3C */
filter: progid:DXImageTransform.Microsoft.gradient( startColorstr=&#39;#7d7e7d&#39;, endColorstr=&#39;#0e0e0e&#39;,GradientType=0 ); /* IE6-9 */

border-bottom:2px solid #999;

color:#fff;
text-align: center;
margin:-12px auto;
padding-bottom:1px;
border-top: 1px solid #333;
height:38px;
font-size:13px;
position:fixed;
vertical-align: baseline; overflow:hidden;
z-index:999;
width:100%;
border-bottom-left-radius:6px;
border-bottom-right-radius:6px;
display:block;
font-weight: bold;
font-family: arial,&quot;Helvetica&quot;;
font-color:#fff;
 -moz-box-shadow: 0 2px 4px hsla(0,0%,0%,.35);
 -webkit-box-shadow: 0 2px 4px hsla(0,0%,0%,.35);
}
#ut-sticky:hover
{

background-color:#333;background-image:-moz-linear-gradient(top,#555555,#434343);background-image:-ms-linear-gradient(top,#555555,#434343);background-image:-webkit-gradient(linear,0 0,0 100%,from(#555555),to(#434343));background-image:-webkit-linear-gradient(top,#555555,#434343);background-image:-o-linear-gradient(top,#555555,#434343);background-image:linear-gradient(top,#555555,#434343);background-repeat:repeat-x;filter:progid:DXImageTransform.Microsoft.gradient(startColorstr=&#39;#555555&#39;,endColorstr=&#39;#434343&#39;,GradientType=0)

-webkit-transition:all 1.3s ease-in-out;-moz-transition:all 1.3s ease-in-out;-o-transition-duration:all 1.3s ease-in-out;transition:all 1.3s ease-in-out;

 -moz-box-shadow: 0 2px 4px hsla(0,0%,0%,.35);
 -webkit-box-shadow: 0 2px 4px hsla(0,0%,0%,.35);

}

#ut-button {background:#fff; padding:4px; color:black;text-shadow:0 -1px 0 rgba(255,255,255,0.25);background-color:white}

#ut-sticky p{line-height:5px; font-size:13px; text-align:center; width:95%; float:left;}
#ut-sticky p a{ text-decoration:underline; padding:4px; color:#FFFF33;}
.ut-cross{display:block; position:relative; right:15px; top:4px;float:right;}
.ut-cross a{font-size:18px; font-weight:bold; font-family:&quot;Arial&quot;; color:#FF0000; line-height:30px;}
.ut-cross, a:hover{color:#DDD; text-decoration:none;}

</style>
<div id='ut-sticky'>
<p style='padding-top:17px;'>Add This Floating Notification Bar To Your Blog <a class='ut-button' href='https://allbloggingtips.com' target='_blank'>Click Here!</a></p>
<div class='ut-cross'><a href='javascript:hide_cross();'>X</a></div>
</div>
<script language='JavaScript'>
function hide_cross() {
crosstbox = document.getElementById(&quot;ut-sticky&quot;);
crosstbox.style.visibility = &#39;hidden&#39;;
}
</script>
<br/><br/>
<br/><br/>
<!-- End of Notification code, info - https://allbloggingtips.com -->

To Customize it
After adding above code just edit above HIGHLIGHTED text and link to your desire text.

I hope you enjoyed this cool Floating Notification bar widget. Do let me know if you face any problem. Peace, blessing pals :D

Tactics Needed To Increase the Traffic to a Blog

For professional SEO firms, it is very easy to build a blog but it gets very difficult to maintain the correct amount of visitors. The art of tracking the right audience is rare and without it, blogs lack value. There are a few tactics which can help many people with their blogs. These tactics are divided into the following points.

Increasing Traffic Graph

1)  When you are writing content for your blog, you must know the sort of audience you are targeting. When you are writing your blog you must always see if the audience has the ability to spread the word and share the information on your blog. There are certain types of writing styles, content, etc. Which attract a particular community or a certain group of people. For example, any review on the latest Gothic music might attract people who are interested in listening to dark music while videos related to dance might attract all the dancers out there. Targeting a group that would be interested in sharing your blog might help you make your blog become popular. While targeting people who are less likely to share might decrease the chances of your blog being famous across the web.

There are essentially three groups which you need to consider when you are targeting an audience for your blog:

i) Potential Consumers of the Blog
ii) Content Sharers
iii) Content Distributors

2)  You can also share information regarding your blog on web communities where most of your target audience is present. For example, if a company wants to target an audience for sports good, you won’t obviously target a group of video game lovers. Rather you will target a group that is actively involved in some kind of sports. Now you do not have to spend a lot of time searching where your target audience is more likely to be found.

Audience that shares brings in more traffic

You can use the Madison Avenue or the Double Clicks Ad Planner to see where what sort of audience is found. Once you find out the correct target audience you can start communicating with them and start posting things. But you must always post things if you think that they are appropriate instead of creating a hotchpotch. If you do that you will get the reputation of an undeserving, infamous blogger. You must always try to respect the rules of web traffic and be a good web citizen.

3) You must always make the content of your blog SEO friendly as this would help you in finding the correct amount of traffic. Search engines are very easy in tracking the correct traffic and it can be made even better using SEO friendly platforms like Blogger, WordPress, etc.

4) You must use social communities like Twitter, Facebook, MySpace, etc. To spread the word about your blog. This would help you in getting the required traffic as well.

5) Another thing which is recommended by most successful bloggers is that they install Google Analytics which is free and very helpful. It helps in telling you where the target audience is.

6) You must allow guest posts on your blog as this would also attract visitors and help you increase the publicity of your blog.

7) You must be consistent in your blog posts. You must post the content of your blog regularly as any delay would result in your blog losing a large amount of target audience.

Incorporating the above tips will substantially increase the traffic to your blog. For more information, you can also contact professionals like the Simple SEO Group.