Announcement

15 Premium Looking Best Free Blogger Templates

It’s been long time, I’ve not posted any collection of  Best Blogger Templates.  So now it’s the right time to publish great collection of Premium Looking Best Free Blogger Templates.

New year 2013 is also very near. You can use these best free blogger templates in 2013 as well to spice up your blogger blog. ;)

I’ve spend many time collecting best templates. All the templates given below are great, premium looking, magazine style and niche style related free blogger/ blogspot template.

These templates will suit perfect for tech , blogging, SEO niche related blogs!

15 Premium Looking Best Free Blogger Templates

Here are 15 Premium Looking Best Free Blogger Templates.

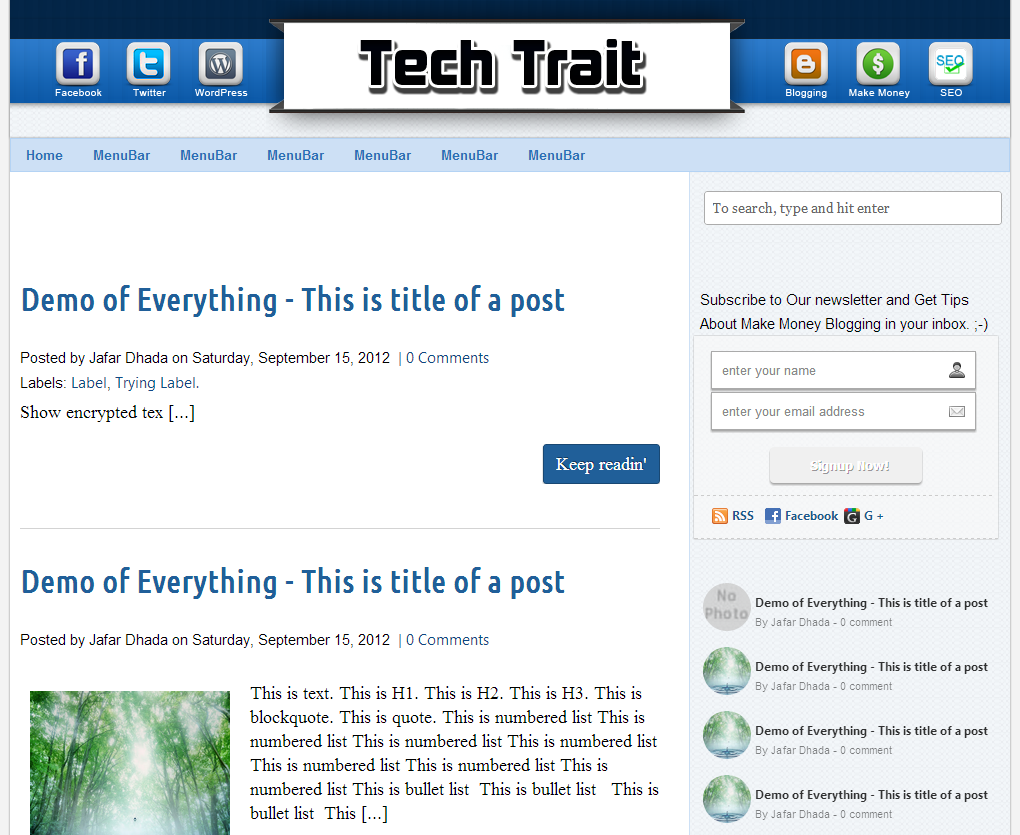
1. iThesis : Free Premium Blogger Template.

iThesis is best free premium looking Blogger template. Designed by me. It’s perfect for tech, blogging and SEO niche blogs

iThesis Theme For Blogger

2. Reporter – News Style Blogger Template

Great template with Ads Ready, Featured Slider and elegant design.

Reporter - News Style Blogger Template

3. Way2Blogging : Elegant Blogger Template

An excellent template by my friend Harish, looks simple, clean and elegant design.

Way2blogging Blogger Template

4. E Style : Free Premium Blogger Template

This template is also designed by Harish, style is awesome, looks great with featured content slider, menu bar and footer!


 E Style

5. Labnol : Premium Blogger Template

Ths best free blogger template looks just like Labnol.org indian best blog. Simple and attractive design and of course fast loading blogger template too.

labnol blogger template

6. MBL Freshable : Custom Blogger Template

Freshable is Free Blogger Template. Widget ready, awesome post style and header.

MBL Freshable

7. Innovative – A Responsive Blogger template

Innovative is a responsive blogger template by Paul. Simple and mac style menu bar and stylized home page.

Innovative Blogger Template

8. CopyBlogger V2 : Premium Looking Blogger Template

This is another great template looks similar to copyblogger. The best feature is its a responsive blogger template 2 menus and elegant look.

Copyblogger Theme V2

9. Personified : Clean Style Blogger Template

Personified is simple, elegant and stylish sidebar blogger template. I like the its sidebar.

10. My WordPress : WordPress style Template

My WordPress is WordPress to Blogger Converted Template. Looks clean and elegant with search bar on header and footer.

My WordPress

11. Perception : Elegant Blogger Template

Prception is a blogger template with simple and clean design. Stylish font and only 1 navigation bar with custom popular post widget.

12. Side Blog

This template is also converted from WordPress to blogger. Ads ready and custom header.

SideBlog-xml-Blogger-Template

13. PersonalPress Blogger Template

Personal-Press-Blogger-Template

14. iOcean

iOcean is really an elegant style blogspot template. Looks smiilar like ShoutMeLoud Theme.

iOcean

15. Westren

Western

That’s the list and the standard was so high there are lots of templates on the web so  it was hard to only choose 15 Great Looking Blogger Best Free Templates.

Check out more Best Free Templates

Hope you will enjoy the Best Free Blogger Templates. Share your comments and views about these best free blogger templates in comment section!!

Blog Monetization – Tips To Reach Higher eCPMs

Since the rise of self-serve ad platforms (e.g. Adsgadget, AdSense, etc.) monetizing a blog has become increasingly easy. But making a LOT of money off your blog requires a little extra effort like good traffic, monetizing blog in better way and many other things.


blog-money

Here are a few tips to help you take the most advantage out of your self-serve ad platform and to generate lot of Money.

Location, location, location.

The position of your banners is a key factor. A banner’s position on a site has a huge influence on its performance, so you would think that better position means better revenue. Generally this is true, but you have to test to really know. Maximize your banner’s performance by placing the ad code near the top of your page or within your site’s content. Place the ad in the most viewed sections (top fold, left sidebar, next to the main buttons of your site, rich media banners such as stay ons, sliders, etc)

High volumes of traffic.

In order to get the highest yield from your site, you need to have enough volumes to analyze the stats and optimize. Self-serve ad platforms, such as Adsgadget, work with an optimization algorithm that allows the system to get to know a site’s traffic and assess how to best monetize it. The higher the traffic volumes you send your ad platform, the faster and more efficient the optimization process will be and will help your ad platform optimize your traffic to reach the highest eCPMs possible.

Read : How To Get Traffic To A New Blog ?

Use rich media.

It’s no secret that interactive ads work better than static ones. By using rich media banners you increase your site visitors‘ experience and entice them to click on your banner ads. Use pop-ups and pop-unders, try sliders and stay ons! These ads can reach 10 times higher eCPMs!

Test different ad sizes.

Variety is important, especially when it comes to advertising online. Test as many ad sizes as possible on your blog; certain ad sizes generate better results than others if integrated correctly with the blog’s content and design layout.

Rotate your ads.

Rotating your banner ads is a great way to maximize their performance. It keeps your site fresh and your visitors from going crazy after seeing the same banners time and time again!  Set frequency caps to monitor the number of times a specific visitor is shown a specific banner.

Don’t stress.

Always remember that monetizing your traffic takes time and effort. Be patient and give your self-serve ad platform the chance to know your traffic. Only then will your platform be able to accurately optimize and give you the high rates you’re looking for.

What Makes ABT a Successful Blog?

Ok, so you too want to know what makes ABT (AllBloggingTips) a successful blog.

Right?

Trust me, I don’t know myself ;) and am still wondering what the secret behind it is. May be we can ask Ammar Ali, the man behind this beautifully maintained blog, himself to write an extensive post on it.

But, with my three months in blogging field, the mention of ABT and Ammar Ali, is not new or rare. I am sure one year back; everyone would have thought it to be yet another blog from a teenager.

template_anniversary_balloons

ABT Completes One Year of Successful Blogging. Thanks For Your Continual Support.

Am I not unnecessarily glorifying the blog?

Has it anything to do with this blog post?

Incase you are not aware of, its ABT’s first anniversary. Many congratulations to it and all its readers, including myself. Here I would like to suggest the reasons for ABT’s success and how newbie bloggers can take a lesson or two from these.

Awesome Domain Name

The best thing about AllBloggingTips is the choice of its domain name. Although at first looks to be a cheeky long URL, but if you see it from SEO point of view, it is one of the best I have seen so far.

Because of the commonly used terms like All, Blogging and Tips, its post usually ranks higher with search queries related to blogging tips. And considering that the domain is just one year old, it is indeed a good find.

Un-paralleled Generosity

Apart from being generous in terms of sharing resourceful information over the Internet, ABT also engages its readers. Periodically it conducts giveaways to make its readers something to look for.

On the occasion of its first anniversary, a lucrative giveaway comprising of 5 web hosting from a2hosting for one year, has been announced. You can see details here. This shows the level of commitment ABT has for its loyal readers. :D

Purposeful Blog Branding

Ammar takes full advantage of ABT’s social presence and popularity, for branding purposes. Being a PR 3 blog, it receives about 4-5 guest posts each week. So ABT is never short of quality content for its readers. This gives Ammar plenty of time to create a brand out of ABT.

If you take a look at ABT’s archive for the month of November, then I am sure you would be amazed at first. Just by posting only five blog posts in 30 days of time, how come ABT been maintaining an Alexa Rank of around 13,000 constantly?

And, yes, 13,000 is not a very stable rank to hold on to for long without posting regularly. It’s all about creating a trustable brand and few SEO techniques. That’s how ABT has been drawing traffic towards it seamlessly.

Social Presence

ABT has strong fan following across all major social networks. Apart from blogging, both ABT and Ammar spend valuable time with readers on social networking sites and forums.

Currently, ABT has 2846 Twitter followers, 267 have it in their circles and 3363 Facebook users have liked it. This is a testimony of the fact that, ABT must be doing something right for which it is so admired.

  • Twitter: 2846 followers
  • Facebook: 3362 likes
  • Google+: 267 circles

Reading Experience

And last, but never the least, in the end its all about improving reader’s experience. Without this, all other fails. ABT makes sure all its content is effective, informative and easy to follow.

Other that the content, it also facilitates distraction free reading. It’s lucid Thesis typography with minimal text formatting, simple website design and color combinations, inviting internal link positing, makes browsing very soothing.

Oh, I forgot to mention. AllBloggingTips is a weblog belonging to the blogging niche. Its CEO, Ammar Ali, is a passionate Blogger, Entrepreneur, Affiliate marketer from Pakistan.  ABT covers regular fresh updates on WordPress, Blogger and SEO related topics. It has been maintaining a constant Alexa Rank of 13,000 for the last three months. It’s a PR 3 blog that accepts guest posts. Feel free to write for it. Also do not forget to subscribe its newsletter.

Stay updated about latest posts and giveaways on Facebook, Twitter and Google+.

This was my three months experience with ABT. Feel free to share yours in the comment section. If you have any suggestion for ABT, do mention too.

Note from Ammar: 

Hurray! One year has just gone. I’m really impressed and excited!! :D

All the credit goes to you. Without YOU I can’t reach this position so fast. As you all know that I started this blog a year back. And it has been growing super fast from then with your support.

A year with many creations, important decisions, new friendships, new ideas. I’m really happy that in one year I managed to have best blog www.allbloggingtips.com. Love all the comments and all the creations that you share with me!!

Thanks for your love and I will promise you that I can do more better for you in the upcoming days.

If you guys want to ask me anything you can comment below. I’ll be happy to hear from you! :)

What’s New with My Blog? New Logo, Comment Luv and Much More!

Recently on 1st June AllBloggingTips.com Completed 6 months :) I was pretty happy to see progress of my blog. So I decided to make some more changed to comes up with something cool.

I’m sure that you might notice these changes here with my blog.

So what’s it, exactly?

Today, I am going to announce few changes that I did recently. I hope you will like these new change. If not? Do comment below to let me know if I missed something ;)

I installed CommentLuv Plugin

wp-plugin-commentluv

CommentLuv is an awesome WP plugin that allows commentators for adding links to their latest blog posts along with their comments. This plugin can help to get more comments, and it also help our readers to build backlinks for blogs effectively.

Now I installed CommentLuv Plugin. If you comment below it will show up your 10 recent post along with your comment. Which will help you to get few traffic, backlinks. Isn’t that cool ;)

Another thing good about Comment Luv Enabled is it automatically fetches ten most from the RSS of the URL you provide. And will show selected post with your comment. So what you are waiting for comment below and get quality backlink.. Currently this blog is page rank 3

We got Google Sitelinks.

Yes, We got google site links on 1st June. Its another good changes for SERP of this blog. To see how site links work see screenshot below!

ABT sitelinks

New Logo

Recently I was planing to use some good fonts for ABT logo and new icon. But I thought current one is better. I just did some customization like changing font, colors, Icon. Have a look below. Do let me know how’s it? BTW I like simple logo ;)

new Allloggingtips logoz

What’s More?

A part from new logo and installing comment luv plugin. I also did some more changes to optimize this blog :)

  1. Adding Subscribe Box After header
  2. Floating Sharing Buttons, After post sharing buttons
  3. Little Changes to Menu
  4. Header, Sidebar, Before, After post option to add banners.
  5. Hot Products Widget in Sidebar
  6. Removing Author Avatar from Homepage
  7. Stylish Related Post
  8. Awesome Commentators Widget!

The main thing I want to write in this post that is Installing CommentLuv Plugin and New Logo. Rest are few things that I wanted to tell you. In the mean time I also join few affiliate networks like KolaKube. Currently this blog runs on Marketer Delight 2.1 Best skin for thesis.

I also added few ads on this blog.  These are some new changes has been added in my blog, I hope you will enjoy with these changing. Do let me know if I missed anything.

Have a great day.  :D

Elegant Style Drop Down Menu With Hover Effect

elegant style menu small iconWe already shared many drop down menus and now its time for Elegant Style Drop Down menu with smooth hover effect. This drop down menu use Css3, HTML. No Images no jquery.  It is compatible for almost all browsers like Mozilla Firefox and Google Chrome etc but the rounded corners and shadow will not be rendered properly. So without wasting anytime lets move on to create Elegant Style Drop Down Menu With Smooth Hover Effect for Blogger or WordPress..

Before we continue have a look at our other drop down menus.

Elegant Style Drop Down Menu With Hover Effect Preview

elegant style drop down menu

Live Demo

The CSS

Below is the css of menu. You can add it to your main site css file. Like If you are using WordPress than paste CSS below in your style.css file and If you are using Blogger/Blogspot than go to Design>Edit HTML and place CSS give below just before  ]]></b:skin>


/* main and secondary top-level navigations */
#nav {
float: left;
font-family: 'Oswald', sans-serif;
-webkit-border-radius: 5px;
-moz-border-radius: 5px;
border-radius: 5px;
overflow: hidden;
width: 100%;
}

#nav ul {
margin:0;
padding:0;
list-style:none;

}

#nav ul li { -webkit-border-radius: 5px;
-moz-border-radius: 5px;
border-radius: 5px;
float:left; 

    background: url(http://4.bp.blogspot.com/-ZQjMkefe9n4/T8xGVbAMgyI/AAAAAAAAAoQ/H9ngLuwgkcc/s320/menu-link-bg.png) bottom center no-repeat;
}

#nav ul li a { 

  width: 100%;
       float: left;
    color:#fff;
    padding: 10px 19px;
    text-decoration:none;

  background:#3C4042;
     background: -webkit-gradient( linear, left bottom, left top, color-stop(0.09, rgb(59,63,65)), color-stop(0.55, rgb(72,76,77)), color-stop(0.78, rgb(75,77,77)) );
    background: -moz-linear-gradient( center bottom, rgb(59,63,65) 9%, rgb(72,76,77) 55%, rgb(75,77,77) 78% );
    background: -o-linear-gradient( center bottom, rgb(59,63,65) 9%, rgb(72,76,77) 55%, rgb(75,77,77) 78% );
    border-left: 1px solid rgba(255, 255, 255, 0.05);
        border-right: 1px solid rgba(0,0,0,0.2);
     text-shadow: 0 -1px 1px rgba(0, 0, 0, 0.6);

     -webkit-border-radius: 5px;
-moz-border-radius: 5px;
border-radius: 5px;

}

#nav ul li a:hover,
#nav ul li:hover > a {
        color: #fff;
        background:#3C4042;
    background: -webkit-gradient( linear, left bottom, left top, color-stop(0.09, rgb(77,79,79)), color-stop(0.55, rgb(67,70,71)), color-stop(0.78, rgb(69,70,71)) );
    background: -moz-linear-gradient( center bottom, rgb(77,79,79) 9%, rgb(67,70,71) 55%, rgb(69,70,71) 78% );
    background: -o-linear-gradient( center bottom, rgb(77,79,79) 9%, rgb(67,70,71) 55%, rgb(69,70,71) 78% );
        text-shadow: 0 1px 0 rgba(255, 255, 255, 0.2), 0 -1px #000;

}

#nav li ul a:hover,
#nav ul li li:hover > a  {
    color: #fff;
      background: #5C9ACD;
    background: -webkit-gradient( linear, left bottom, left top, color-stop(0.17, rgb(61,111,177)), color-stop(0.51, rgb(80,136,199)), color-stop(1, rgb(92,154,205)) );
    background: -moz-linear-gradient( center bottom, rgb(61,111,177) 17%, rgb(80,136,199) 51%, rgb(92,154,205) 100% );
    background: -o-linear-gradient( center bottom, rgb(61,111,177) 17%, rgb(80,136,199) 51%, rgb(92,154,205) 100% );
        border-bottom: 1px solid rgba(0,0,0,0.6);
        border-top: 1px solid #7BAED9;
        text-shadow: 0 1px rgba(255, 255, 255, 0.3);
}

#nav li ul {

        background:#3C4042;
        background-image: -webkit-gradient( linear, left bottom, left top, color-stop(0.09, rgb(77,79,79)), color-stop(0.55, rgb(67,70,71)), color-stop(0.78, rgb(69,70,71)) );
        background-image: -moz-linear-gradient( center bottom, rgb(77,79,79) 9%, rgb(67,70,71) 55%, rgb(69,70,71) 78% );
        background-image: -o-linear-gradient( center bottom, rgb(77,79,79) 9%, rgb(67,70,71) 55%, rgb(69,70,71) 78% );
        border-radius: 0 0 10px 10px;
        -moz-border-radius: 0 0 10px 10px;
        -webkit-border-radius: 0 0 10px 10px;
        left: -999em;
        margin: 35px 0 0;
        position: absolute;
        width: 160px;
        z-index: 9999;
        box-shadow: 0 0 15px rgba(0, 0, 0, 0.4) inset;
        -moz-box-shadow: 0 0 15px rgba(0, 0, 0, 0.4) inset;
        -webkit-box-shadow: 0 0 15px rgba(0, 0, 0, 0.4) inset;
        border: 1px solid rgba(0, 0, 0, 0.5);
}

#nav li:hover ul {
        left: auto;
}

#nav li ul a {
        background: none;
        border: 0 none;
        margin-right: 0;
        width: 120px;
        box-shadow: none;
        -moz-box-shadow: none;
        -webkit-box-shadow: none;
        border-bottom: 1px solid transparent;
        border-top: 1px solid transparent;
}

#nav li li ul {
        margin: -1px 0 0 160px;
        -webkit-border-radius: 0 6px 6px 6px;
        -moz-border-radius: 0 6px 7px 6px;
        border-radius: 0 6px 6px 6px;
        visibility:hidden;
}

#nav li li:hover ul {
        visibility:visible;
}

#nav ul ul li:last-child > a {

    -moz-border-radius:0 0 6px 6px;
    -webkit-border-radius:0 0 6px 6px;
    border-radius:0 0 6px 6px;

}

#nav ul ul ul li:first-child > a {
    -moz-border-radius:0 6px 0 0;
    -webkit-border-radius:0 6px 0 0;
    border-radius:0 6px 0 0;
}


The HTML

You can add this HTML code in any place of your site/blog. If you are using WordPress than add below HTML code in your header.php file and If you are using Blogspot than add below code in header gadget (widget)  ;)

<div id="nav">
<ul>

<li><a href="http://www.allbloggingtips.com/">Home</a></li>

 <li><a href="#">Tutorials</a>
            <ul>
                <li><a href="#">HTML / CSS</a></li>
                <li><a href="#">JS / jQuery</a>
                    <ul>
                        <li><a href="#">jQuery</a></li>
                        <li><a href="#">JS</a></li>
                    </ul>
                </li>
                <li><a href="#">PHP</a></li>
                <li><a href="#">MySQL</a></li>
                <li><a href="#">XSLT</a></li>
                <li><a href="#">Ajax</a></li>
            </ul>
        </li>
        <li><a href="#">Resources</a>
            <ul>
                <li><a href="#">By category</a>
                    <ul>
                        <li><a href="#">PHP</a></li>
                        <li><a href="#">MySQL</a></li>
                        <li><a href="#">XSLT</a></li>
                        <li><a href="#">Ajax</a></li>
                    </ul>
                </li>
                <li><a href="#">By tag name</a>
                    <ul>
                        <li><a href="#">captcha</a></li>
                        <li><a href="#">gallery</a></li>
                        <li><a href="#">animation</a></li>
                    </ul>
                </li>
            </ul>
        </li>

   <li><a href="#">Tools</a></li>
<li><a href="#">Android</a>
<ul>
<li><a href="#">Android Apps</a></li>
<li><a href="#">Android Games</a></li>
</ul>
</li>

<li><a href="#">Linux</a>
<ul>
<li><a href="#">RedHat</a></li>
<li><a href="#">CentOS</a></li>
<li><a href="#">Fedora</a></li>
<li><a href="#">Ubuntu</a></li>
<li><a href="#">Debian</a></li>
<li><a href="#">Linux Mint</a></li>
</ul>
</li>     

                  <li><a href="#">About</a></li>

<li><a href="#">Contact</a></li>

        <li><a href="#">Back To Tutorial </a></li>

</ul>
</div>


Confused or Need Help?

If you need some extra help in removing rows or columns then please feel free to post your questions. You can discus it as much with me as possible. This will help others to better understand on how to make further changes.

Credits: This Elegant Style Drop Down Menu With Smooth Hover Effect is first shared on AllBloggingTips. Bloggers are requested to link back if they are going to share above menu with there visitors.