Search Results for: ai content

3 Ways To Add Floating Go To Top Button In WordPress Blogs

We all don’t want to lose visitors. When after scrolling long deep pages, if a readers has to go back to top of page, he/she has to do this by pressing the up button located on the right side of our browser, which is very annoying.

Isn’t it?

Goto TOp

But don’t worry you can now make  your visitors stay on your blog by using our tutorial How To Add Floating Go To Top Button In WordPress Blogs.

This will Add Floating Go To Top Button In WordPress Blogs which will help you go back to top of page with just one click, no matter what is the position of the page, even if you are half way down the post, you can click this button to go back to top.

3 Ways To Add Floating Go To Top Button In WordPress Blogs

1. Add Simple Code To Your Blog (Best Way)
2. Use Scroll To Top WordPress Plugin
3. Use Go To Top WordPress Plugin

1. Add Simple Code To Your Blog.

This is simple way to add go to top button, best way to add code to your blog. This will also add a cool image but you can change it to your own image.
Goto top code demp

  • Goto WordPress Dashboard > Appearance >Widget
  • Drop a Text Widget to your sidebar.
  • Now Paste below code in Text Widget

 <a style="display:scroll;position:fixed;bottom:5px;right:5px;" href="#"><img src="http://lh6.ggpht.com/_7wsQzULWIwo/SgXYIY37QsI/AAAAAAAABDY/IyDZK-CJzdA/Up1Blue%5B4%5D.png"/></a>

  • Click on Save Button and See the magic!

Note: You can also add image you want to do so just replace http://lh6.ggpht.com/_7wsQzULWIwo/SgXYIY37QsI/AAAAAAAABDY/IyDZK-CJzdA/Up1Blue%5B4%5D.png with your image url.

2. Use Scroll To Top WordPress Plugin.

Fully written in jQuery, the plugin adds a floating box centered in the footer of your site that only appears when you scroll the page down, and when clicked gently roll the site to the top. All this without any modification to your template.

How To use it?
Scroll To Top

  • Download Plugin Here
  • You can either use the automatic plugin installer or your FTP program to upload it to your wp-content/plugins directory the top-level folder. Don’t just upload all the php files and put them in /wp-content/plugins/.
  • Activate the plugin through the ‘Plugins’ menu in WordPress
  • Visit your Scroll to Top Options (Options – Scroll to Top)
  • Configure any options as desired, and then enable the plugin
  • That’s it!

3. Use Go To Top WordPress Plugin.

This plugin will Add a “Go to top” link to your posts. This is a wordpress plugin which based on jQuery, jQuery Easing and Scroll to Top v3

How To use it?Goto Top WP plugin

  1. Download Plugin Here
  2. Upload the plugin folder to the /wp-content/plugins/ directory or use Dashboard Method
  3. Activate the plugin through the ‘Plugins’ menu in WordPress

That’s All. Hope you will like this post. If you face any problem just comment below, I’d be glad to help you out.

Snow Falling Effect With Bells Widget For Your Blog

In this post I have a very cool Snow Falling Effect With Bells widget. You can use to super charge your blog over the Christmas. With just a small piece of code you have Snow Flakes gently falling down your blog. Adding Snow Falling Effect With Bells is very simple and I’m sure it won’t disrupt the readers. Before you add the Snow to your blog you can check out the demo.

LIVE DEMO

Adding Snow Falling Effect With Bells Widget

Adding To Blogger

  1. Go to Design > Page Elements.
  2. Click Add A Gadget.
  3. In Add A Gadget window, select HTML/Javascript .
  4. Copy the code below and paste it inside the content box.
  5. Save the gadget.
  6. Drag the gadget and reposition it under Blog Posts gadget.
  7. Click Save button (top right hand corner).

Adding To WordPress

  1. Go to Dashboard > Appearance > Widgets > Available Widgets.
  2. Drag Text widget into a sidebar.
  3. Paste in the code.
  4. Save.

If below code is not working,  please download this code

<script type="text/javascript">

            //Configure below to change URL path to the snow image
      var snowsrc="http://3.bp.blogspot.com/-0l_0DkjlekY/Tt-6P7Vam3I/AAAAAAAAFjI/ht10gKN3-Ys/s400/falling-snow.png"
      // Configure below to change number of snow to render
      var no = 15;
      // Configure whether snow should disappear after x seconds (0=never):
      var hidesnowtime = 0;
      // Configure how much snow should drop down before fading ("windowheight" or "pageheight")
      var snowdistance = "pageheight";

    ///////////Stop Config//////////////////////////////////

      var ie4up = (document.all) ? 1 : 0;
      var ns6up = (document.getElementById&&!document.all) ? 1 : 0;

        function iecompattest(){
        return (document.compatMode && document.compatMode!="BackCompat")? document.documentElement : document.body
        }

      var dx, xp, yp;    // coordinate and position variables
      var am, stx, sty;  // amplitude and step variables
      var i, doc_width = 800, doc_height = 600;

      if (ns6up) {
        doc_width = self.innerWidth;
        doc_height = self.innerHeight;
      } else if (ie4up) {
        doc_width = iecompattest().clientWidth;
        doc_height = iecompattest().clientHeight;
      }

      dx = new Array();
      xp = new Array();
      yp = new Array();
      am = new Array();
      stx = new Array();
      sty = new Array();
      snowsrc=(snowsrc.indexOf("dynamicdrive.com")!=-1)? "   http://3.bp.blogspot.com/-0l_0DkjlekY/Tt-6P7Vam3I/AAAAAAAAFjI/ht10gKN3-Ys/s400/falling-snow.png" : snowsrc
      for (i = 0; i < no;    i) { 
        dx[i] = 0;                        // set coordinate variables
        xp[i] = Math.random()*(doc_width-50);  // set position variables
        yp[i] = Math.random()*doc_height;
        am[i] = Math.random()*20;         // set amplitude variables
        stx[i] = 0.02   Math.random()/10; // set step variables
        sty[i] = 0.7   Math.random();     // set step variables
            if (ie4up||ns6up) {
          if (i == 0) {
            document.write("<div id=\"dot"  i  "\" style=\"POSITION: absolute; Z-INDEX: "  i  "; VISIBILITY: visible; TOP: 15px; LEFT: 15px;\"><a href=\"http://dynamicdrive.com\"><img src='" snowsrc "' border=\"0\"><\/a><\/div>");
          } else {
            document.write("<div id=\"dot"  i  "\" style=\"POSITION: absolute; Z-INDEX: "  i  "; VISIBILITY: visible; TOP: 15px; LEFT: 15px;\"><img src='" snowsrc "' border=\"0\"><\/div>");
          }
        }
      }

      function snowIE_NS6() {  // IE and NS6 main animation function
        doc_width = ns6up?window.innerWidth-10 : iecompattest().clientWidth-10;
            doc_height=(window.innerHeight && snowdistance=="windowheight")? window.innerHeight : (ie4up && snowdistance=="windowheight")?  iecompattest().clientHeight : (ie4up && !window.opera && snowdistance=="pageheight")? iecompattest().scrollHeight : iecompattest().offsetHeight;
        for (i = 0; i < no;    i) {  // iterate for every dot
          yp[i]  = sty[i];
          if (yp[i] > doc_height-50) {
            xp[i] = Math.random()*(doc_width-am[i]-30);
            yp[i] = 0;
            stx[i] = 0.02   Math.random()/10;
            sty[i] = 0.7   Math.random();
          }
          dx[i]  = stx[i];
          document.getElementById("dot" i).style.top=yp[i] "px";
          document.getElementById("dot" i).style.left=xp[i]   am[i]*Math.sin(dx[i]) "px"; 
        }
        snowtimer=setTimeout("snowIE_NS6()", 10);
      }

        function hidesnow(){
            if (window.snowtimer) clearTimeout(snowtimer)
            for (i=0; i<no; i  ) document.getElementById("dot" i).style.visibility="hidden"
        }

    if (ie4up||ns6up){
        snowIE_NS6();
            if (hidesnowtime>0)
            setTimeout("hidesnow()", hidesnowtime*1000)
            }

    </script>

<br /> <img src="http://2.bp.blogspot.com/_u4gySN2ZgqE/TQ-G1GVAD3I/AAAAAAAABtw/doqIyU32ngs/s1600/christmas-bells-icon.png" style="position:fixed; top: 0px;left:0px;border:none;"/><img class="aneesh" src="http://3.bp.blogspot.com/_u4gySN2ZgqE/TQ-SkcTSrTI/AAAAAAAABt4/Qqpj5MR3tU8/s1600/christmas-bells-icon-right.png" style="position:fixed; top: 0px;right:0px;border:none;"/><br />

<script> if (typeof bp_onload_queue == 'undefined') var bp_onload_queue = [];      if (typeof bp_dom_loaded == 'boolean') bp_dom_loaded = false;     else var bp_dom_loaded = false;      if (typeof bp_async_loader != 'function') {         function bp_async_loader(src, callback, id) {              var script = document.createElement('script');             script.type = "text/javascript";             script.async = true;             script.src = src;             script.id = id;             /*Check if script previously loaded.*/             var previous_script = document.getElementById(id);             if (previous_script) if (previous_script.readyState == "loaded" || previous_script.readyState == "complete") {                 callback();                 return;             } else {                  script = previous_script;             }             if (script.onload != null) previous_callback = script.onload;             script.onload = script.onreadystatechange = function() {                 var newcallback;                 if (previous_script && previous_callback) newcallback = function() {                     previous_callback();                     callback();                 };                 else newcallback = callback;                 if (bp_dom_loaded) {                     newcallback();                 } else bp_onload_queue.push(newcallback);                 /* clean up for IE and Opera*/                 script.onload = null;                 script.onreadystatechange = null;             };             var head = document.getElementsByTagName('head')[0];             if (!previous_script) head.appendChild(script);          }     }      if (typeof bp_domLoaded != 'function') function bp_domLoaded(callback) {         bp_dom_loaded = true;         var len = bp_onload_queue.length;         for (var i = 0; i < len; i  ) {             bp_onload_queue[i]();         }     }     /*JS gets loaded here */      bp_domLoaded();      /*Loading jQuery Asynchronously */     bp_async_loader("http://ajax.googleapis.com/ajax/libs/jquery/1.7.1/jquery.min.js", function() {          bp_async_loader("http://blogergadgets.googlecode.com/svn/trunk/snowfall.min.jquery.js", function() {}, "bp-snow");      }, "jQueryjs"); </script> <a href="https://allbloggingtips.com/2011/12/22/snow-falling-effect-with-bells-widget-for-your-blog/" target="_blank"><img src="https://lh5.googleusercontent.com/-yPvmBp_p424/TuYsnjeIzaI/AAAAAAAACNY/KrkMl02fzh0/I/snowfall-widget-for-blogger.png" alt="Snowfall Widget for Blogger" /></a>


Hope you will like this widget. DO comment if you want to get in touch with me or facing problem with this Snow Falling Effect With Bells!

How To Add Stylish Breadcrumbs Navigation In Blogger

Breadcrumbs or breadcrumb is a navigation used in user interface, typically it appear horizontally across the top of a web page , after navigation, usually below title bars or headers in blog area. You can also find example of breadcrumbs in my blog after navigation. See a screenshot to know what actually are a breadcrumbs.

How To Add Stylish Breadcrumbs Navigation In Blogger

I suggest every Bloggers who are using Blogspot Platform to add breadcrumbs. This help people to easily know about your post and also it helps you in SEO purpose.

Typical breadcrumbs look like this:

Home page > Section page > Subsection page or Home page >> Section page >> Subsection page.

After backing up blogger template Follow below given simple steps on How To Add Stylish Breadcrumbs Navigation In Blogger

Steps to Add Breadcrumbs in Blogger

  • Login to Blogger Dashboard > Design > Edit Html
  • Find Below code

<b:include data='top' name='status-message'/>

and replace it wit this code:

<b:include data=’top’ name=’status-message’/>

<b:include data='posts' name='breadcrumb'/>

#Step 3. Now Find this code:

<b:includable id='main' var='top'>e


  • and replace it with below code
<b:includable id='breadcrumb' var='posts'>
<b:if cond='data:blog.homepageUrl == data:blog.url'>
<!-- No breadcrumb on home page -->
<b:else/>
<b:if cond='data:blog.pageType == "item"'>
<!-- breadcrumb for the post page -->
<p class='breadcrumbs'>
<span class='post-labels'>
<a expr:href='data:blog.homepageUrl' rel='tag'>Home</a>
<b:loop values='data:posts' var='post'>
<b:if cond='data:post.labels'>
<b:loop values='data:post.labels' var='label'>
<b:if cond='data:label.isLast == "true"'> »
<a expr:href='data:label.url' rel='tag'><data:label.name/></a>
</b:if>
</b:loop>
<b:else/>
» Unlabelled
</b:if>
» <span><data:post.title/></span>
</b:loop>
</span>
</p>
<b:else/>
<b:if cond='data:blog.pageType == "archive"'>
<!-- breadcrumb for the label archive page and search pages.. -->
<p class='breadcrumbs'>
<span class='post-labels'>
<a expr:href='data:blog.homepageUrl'>Home</a> » Archives for <data:blog.pageName/>
</span>
</p>
<b:else/>
<b:if cond='data:blog.pageType == "index"'>
<p class='breadcrumbs'>
<span class='post-labels'>
<b:if cond='data:blog.pageName == ""'>
<a expr:href='data:blog.homepageUrl'>Home</a> » All posts
<b:else/>
<a expr:href='data:blog.homepageUrl'>Home</a> » Posts filed under <data:blog.pageName/>
</b:if>
</span>
</p>
</b:if>
</b:if>
</b:if>
</b:if>
</b:includable>
<b:includable id='main' var='top'>

Making It Cool with CSS

To add cool effect to Breadcrumbs follow below steps.

  • Find this code
]]></b:skin>

and replace it with

/* Breadcrumbs Css info @ https://allbloggingtips.com */
.breadcrumbs {
padding:5px 5px 5px 0px;
margin: 0px 0px 15px 0px;
font-size:95%;
line-height: 1.4em;
border-bottom:2px solid #e6e4e3;}
]]></b:skin>
To add Hover Effect
  • Insert below code after adding code in above step
.breadcrumbs :hover{
border-bottom:2px dashed #e6e4e3;
background:#f1f1f1;
}
If you are using multiple labels for one post then this breadcrumbs will show only the last label you have added, so put label at end in Labels for this post: section for which you want to show in your breadcrumb.

That’s All. If you are using WordPress Theme than i will publish a article on How to Add Breadcrumbs in WordPress themes. Till keep visiting. Got any problem feel free to comment!

Use Facebook Smileys and Emotions On Facebook Chat

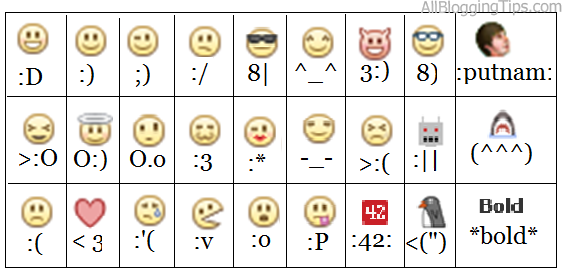
There’s a stack of guides all over the net listing all the smileys you can send in Facebook and many forum posts discussing the formatting options. We’re yet to find one good one that lumps it all into one page, with the latest facebook smileys codes, in a nice easy to read format, so we’ve decided to oblige. If you know of any facebook smileys or emotions we are missing, let us know!

Al Facebook Chat Emotions and Smiyles

Use Facebook Smileys and Emotions : Complete List !

Here is the list of all Facebook Smileys Emoticons and their shortcuts:


Emoticons Shortcut Key Description
like thump up facebook chat emoticons (y) (Y) Like / Thumb Up Facebook Chat Emoticons NEW!!
42 red facebook chat emoticon :42: 42 Red Number FaceBook Chat Emoticon
facebook chat emoticon angel O:) O:-) Angel FaceBook Chat Emoticon
facebook chat emoticon confused o.O O.o Confused FaceBook Chat Emoticon
facebook chat emoticon cry :'( Cry / Tears Eye FaceBook Chat Emoticon
facebook chat emoticon curly lips :3 Curly Lips Facebook Emoticon / cute / cat-like
facebook chat emoticon devil 3:) 3:-) Devil / Satan / Vampire FaceBook Chat Emoticon
facebook chat emoticon frown :-( :( :[ =( Frown / Sad FaceBook Chat Emoticon
Facebook Chat Emoticon Gasp :-O :O :-o :o Gasp / Surprise FaceBook Chat Emoticon
facebook chat emoticon glasses 8-) 8) B-) B) Glasses / Blue Glasses FaceBook Chat Emoticon
facebook chat emoticon grin :-D :D =D Grin Facebook Chat Emoticon (Big Smile)
facebook chat emoticon grumpy >:( >:-( Grumpy FaceBook Chat Emoticon
facebook chat emoticon heart <3 Heart / Love FaceBook Chat Emoticon
facebook chat emoticon kiki ^_^ Kiki FaceBook Chat Emoticon
facebook chat emoticon kiss :-* :* Kiss Facebook Chat Emoticon
facebook chat emoticon pacman :v Pacman Facebook Chat Emoticon
facebook chat emoticon penguin <(") Penguin Facebook Chat Emoticon
facebook chat emoticon chris putnam :putnam: Putnam (Chris Putnam) Facebook Chat Emoticon
facebook chat emoticon robot :|] Robot Facebook Chat Emoticon
facebook chat emoticon shark (^^^) Shark FaceBook Chat Emoticon
facebook chat emoticon smile :-) :) :] =) Smile Facebook Chat Emoticon
facebook chat emoticon squint -_- Squint FaceBook Chat Emoticon
facebook chat emoticon sun glasses 8-| 8| B-| B| Sun / Black Glasses FaceBook Chat Emoticon
facebook chat emoticon tongue :-P :P :-p :p =P Tongue FaceBook Chat Emoticon
facebook chat emoticon unsure :/ :-/ : :- Unsure Facebook Chat Emoticon
facebook chat emoticon upset >:O >:-O >:o >:-o Upset FaceBook Chat Emoticon
facebook chat emoticon wink ;-) ;) Wink FaceBook Chat Emoticon

 
Facebook smileys and emoticons can add a hint of personality to the message you’re sending and maybe even some humor. If you happen to be at a loss for words, insert an emoticon. There are different variations the emoticons can be used for but they all generally follow the same rules. IF i miss any emotion in this tutorial Use Facebook Smileys and Emotions On Facebook Chat : Complete List !

Add Meta Tag to Blogger : Make Blogger Blog Fully Search Engine Optimize!


Most of us use Blogger.com to start their free blog which may be for making money or sharing your knowledge, voice through blogging. But if your blog is not Search Engine Friendly than you can not archive your goal. For this purpose you need to make your blog fully Search Engine Optimized and add meta tag to blogger so that people searching their keywords will easily knows your site. Just follow following simple steps to add meta tag to blogger.

How to add Add Meta Tag to Blogger? (Updated)

Step 1:

Go to Blogger Dashboard > Design > Edit Html and search for <head>

Step 2:

Delete Every Thing From <head> to <b:skin><![CDATA[

Step 3:

Place following code just after <head>

<b:include data='blog' name='all-head-content'/>
    <b:if cond='data:blog.pageType == &quot;index&quot;'>
    <title><data:blog.pageTitle/></title>
    <b:else/>
    <title><data:blog.pageName/> - <data:blog.title/></title>
    </b:if>
    <meta content='Your Blog Description here!' name='description'/>
    <meta content='Your Keywords here!' name='keywords'/>
    <meta content='Author Name here!' name='Author'/>
    <meta content='Author Email Address here!' name='Email'/>
    <meta content='document' name='resource-type'/>
    <meta content='all' name='audience'/>
    <meta content='general' name='rating'/>
    <meta content='all' name='robots'/>
    <meta content='index, follow' name='robots'/>
    <meta content='id' name='language'/>
    <meta content='id' name='geo.country'/>
    <meta content='global' name='distribution'/>
    <meta content='1 days' name='revisit-after'/>
    <meta content='Indonesia' name='geo.placename'/>
  • Replace:-

To add your own description, title, keywords. Please replace all above words with your desire words! as shown below.

Blog Description : Write your blog description
Blog Keywords : Write the keywords of your blog
Blog Author : Write the author’s name(Your name)
Email Address : Write your Email address

Step 4:

Click on Save Template.

That’s it. Now your blog is full Search Engine Friendly. If you face any problem. Just Drop your comment. I will be able to help you about blogger Search engine optimization