WordPress

Happy New Year 2012 Balloons Widget

Happy New Year 2012 Ballons WidgetThe year of 2011 will be over soon, and We countdown to welcome the year of 2012, to say a Happy New Year 2012 with a new spirit, the new breakthrough for everything to be better, yes we hope so. I now comes with Happy New Year 2012 Balloons Widget. It is just like we have posted for Christmas Snow Falling Effect in earlier post.

Live Demo

How To Add Happy New Year 2012 Balloons Widget To Blogger

1. Login to Blogger
2. Dashboard > Design > Page Elements. Then you click “Add A Gadget”
3. Now you choose “HTML/Java Script”
4. Now copy and paste the code below to widget box

<img src="https://allbloggingtips.com/wp-content/uploads/2011/12/Widget2-Happy-New-year-20121.png" style="position:fixed; top: 0px;left:0px;border:none;z-index:5;"/><img src="https://allbloggingtips.com/wp-content/uploads/2011/12/Widget1-Happy-New-year-20121.png" style="position:fixed; top: 0px;right:0px;border:none;z-index:5;"/>

5. Now “Save” the widget, enjoy!

How To Add Happy New Year 2012 Balloons Widget To WordPress

  1. Goto WordPress Dashboard > Appearance > Widget and Drop a Text Widget to Sidebar
  2. Copy And Paste The Below Code Into The Text Widget:
<img src="https://allbloggingtips.com/wp-content/uploads/2011/12/Widget2-Happy-New-year-20121.png" style="position:fixed; top: 0px;left:0px;border:none;z-index:5;"/><img src="https://allbloggingtips.com/wp-content/uploads/2011/12/Widget1-Happy-New-year-20121.png" style="position:fixed; top: 0px;right:0px;border:none;z-index:5;"/>
 3.Click on Save Button and check your blog to see

That’s All. See the Happy New Year 2012 Balloons Widget on your blog. Hope you will enjoyed the post.. :)

Snow Falling Effect With Bells Widget For Your Blog

In this post I have a very cool Snow Falling Effect With Bells widget. You can use to super charge your blog over the Christmas. With just a small piece of code you have Snow Flakes gently falling down your blog. Adding Snow Falling Effect With Bells is very simple and I’m sure it won’t disrupt the readers. Before you add the Snow to your blog you can check out the demo.

LIVE DEMO

Adding Snow Falling Effect With Bells Widget

Adding To Blogger

  1. Go to Design > Page Elements.
  2. Click Add A Gadget.
  3. In Add A Gadget window, select HTML/Javascript .
  4. Copy the code below and paste it inside the content box.
  5. Save the gadget.
  6. Drag the gadget and reposition it under Blog Posts gadget.
  7. Click Save button (top right hand corner).

Adding To WordPress

  1. Go to Dashboard > Appearance > Widgets > Available Widgets.
  2. Drag Text widget into a sidebar.
  3. Paste in the code.
  4. Save.

If below code is not working,  please download this code

<script type="text/javascript">

            //Configure below to change URL path to the snow image
      var snowsrc="http://3.bp.blogspot.com/-0l_0DkjlekY/Tt-6P7Vam3I/AAAAAAAAFjI/ht10gKN3-Ys/s400/falling-snow.png"
      // Configure below to change number of snow to render
      var no = 15;
      // Configure whether snow should disappear after x seconds (0=never):
      var hidesnowtime = 0;
      // Configure how much snow should drop down before fading ("windowheight" or "pageheight")
      var snowdistance = "pageheight";

    ///////////Stop Config//////////////////////////////////

      var ie4up = (document.all) ? 1 : 0;
      var ns6up = (document.getElementById&&!document.all) ? 1 : 0;

        function iecompattest(){
        return (document.compatMode && document.compatMode!="BackCompat")? document.documentElement : document.body
        }

      var dx, xp, yp;    // coordinate and position variables
      var am, stx, sty;  // amplitude and step variables
      var i, doc_width = 800, doc_height = 600;

      if (ns6up) {
        doc_width = self.innerWidth;
        doc_height = self.innerHeight;
      } else if (ie4up) {
        doc_width = iecompattest().clientWidth;
        doc_height = iecompattest().clientHeight;
      }

      dx = new Array();
      xp = new Array();
      yp = new Array();
      am = new Array();
      stx = new Array();
      sty = new Array();
      snowsrc=(snowsrc.indexOf("dynamicdrive.com")!=-1)? "   http://3.bp.blogspot.com/-0l_0DkjlekY/Tt-6P7Vam3I/AAAAAAAAFjI/ht10gKN3-Ys/s400/falling-snow.png" : snowsrc
      for (i = 0; i < no;    i) { 
        dx[i] = 0;                        // set coordinate variables
        xp[i] = Math.random()*(doc_width-50);  // set position variables
        yp[i] = Math.random()*doc_height;
        am[i] = Math.random()*20;         // set amplitude variables
        stx[i] = 0.02   Math.random()/10; // set step variables
        sty[i] = 0.7   Math.random();     // set step variables
            if (ie4up||ns6up) {
          if (i == 0) {
            document.write("<div id=\"dot"  i  "\" style=\"POSITION: absolute; Z-INDEX: "  i  "; VISIBILITY: visible; TOP: 15px; LEFT: 15px;\"><a href=\"http://dynamicdrive.com\"><img src='" snowsrc "' border=\"0\"><\/a><\/div>");
          } else {
            document.write("<div id=\"dot"  i  "\" style=\"POSITION: absolute; Z-INDEX: "  i  "; VISIBILITY: visible; TOP: 15px; LEFT: 15px;\"><img src='" snowsrc "' border=\"0\"><\/div>");
          }
        }
      }

      function snowIE_NS6() {  // IE and NS6 main animation function
        doc_width = ns6up?window.innerWidth-10 : iecompattest().clientWidth-10;
            doc_height=(window.innerHeight && snowdistance=="windowheight")? window.innerHeight : (ie4up && snowdistance=="windowheight")?  iecompattest().clientHeight : (ie4up && !window.opera && snowdistance=="pageheight")? iecompattest().scrollHeight : iecompattest().offsetHeight;
        for (i = 0; i < no;    i) {  // iterate for every dot
          yp[i]  = sty[i];
          if (yp[i] > doc_height-50) {
            xp[i] = Math.random()*(doc_width-am[i]-30);
            yp[i] = 0;
            stx[i] = 0.02   Math.random()/10;
            sty[i] = 0.7   Math.random();
          }
          dx[i]  = stx[i];
          document.getElementById("dot" i).style.top=yp[i] "px";
          document.getElementById("dot" i).style.left=xp[i]   am[i]*Math.sin(dx[i]) "px"; 
        }
        snowtimer=setTimeout("snowIE_NS6()", 10);
      }

        function hidesnow(){
            if (window.snowtimer) clearTimeout(snowtimer)
            for (i=0; i<no; i  ) document.getElementById("dot" i).style.visibility="hidden"
        }

    if (ie4up||ns6up){
        snowIE_NS6();
            if (hidesnowtime>0)
            setTimeout("hidesnow()", hidesnowtime*1000)
            }

    </script>

<br /> <img src="http://2.bp.blogspot.com/_u4gySN2ZgqE/TQ-G1GVAD3I/AAAAAAAABtw/doqIyU32ngs/s1600/christmas-bells-icon.png" style="position:fixed; top: 0px;left:0px;border:none;"/><img class="aneesh" src="http://3.bp.blogspot.com/_u4gySN2ZgqE/TQ-SkcTSrTI/AAAAAAAABt4/Qqpj5MR3tU8/s1600/christmas-bells-icon-right.png" style="position:fixed; top: 0px;right:0px;border:none;"/><br />

<script> if (typeof bp_onload_queue == 'undefined') var bp_onload_queue = [];      if (typeof bp_dom_loaded == 'boolean') bp_dom_loaded = false;     else var bp_dom_loaded = false;      if (typeof bp_async_loader != 'function') {         function bp_async_loader(src, callback, id) {              var script = document.createElement('script');             script.type = "text/javascript";             script.async = true;             script.src = src;             script.id = id;             /*Check if script previously loaded.*/             var previous_script = document.getElementById(id);             if (previous_script) if (previous_script.readyState == "loaded" || previous_script.readyState == "complete") {                 callback();                 return;             } else {                  script = previous_script;             }             if (script.onload != null) previous_callback = script.onload;             script.onload = script.onreadystatechange = function() {                 var newcallback;                 if (previous_script && previous_callback) newcallback = function() {                     previous_callback();                     callback();                 };                 else newcallback = callback;                 if (bp_dom_loaded) {                     newcallback();                 } else bp_onload_queue.push(newcallback);                 /* clean up for IE and Opera*/                 script.onload = null;                 script.onreadystatechange = null;             };             var head = document.getElementsByTagName('head')[0];             if (!previous_script) head.appendChild(script);          }     }      if (typeof bp_domLoaded != 'function') function bp_domLoaded(callback) {         bp_dom_loaded = true;         var len = bp_onload_queue.length;         for (var i = 0; i < len; i  ) {             bp_onload_queue[i]();         }     }     /*JS gets loaded here */      bp_domLoaded();      /*Loading jQuery Asynchronously */     bp_async_loader("http://ajax.googleapis.com/ajax/libs/jquery/1.7.1/jquery.min.js", function() {          bp_async_loader("http://blogergadgets.googlecode.com/svn/trunk/snowfall.min.jquery.js", function() {}, "bp-snow");      }, "jQueryjs"); </script> <a href="https://allbloggingtips.com/2011/12/22/snow-falling-effect-with-bells-widget-for-your-blog/" target="_blank"><img src="https://lh5.googleusercontent.com/-yPvmBp_p424/TuYsnjeIzaI/AAAAAAAACNY/KrkMl02fzh0/I/snowfall-widget-for-blogger.png" alt="Snowfall Widget for Blogger" /></a>


Hope you will like this widget. DO comment if you want to get in touch with me or facing problem with this Snow Falling Effect With Bells!

Add Post Views Counter In WordPress Posts Without Plugin

Add Post Views Counter In WordPress Posts Without PluginDid you ever want to know how many times a particular post has been viewed? I will show you How To Add Post Views Counter In WordPress Posts Without Plugin. This is very useful to track post views this will help you in future to write more interesting, quality content articles which can attract more visitors. Just add the following snippets to your template files and you are ready to go for Post Views Counter In WordPress!

I am not responsible if you done any mistake. So Check this video to Adding Code Though File Manager


Step 1: Adding Post Views Counter Code in Functions.PHP
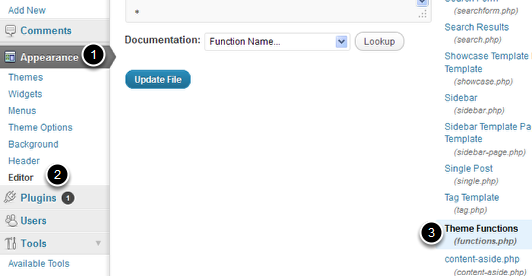
  • Go to Appearance > EditorHow to Edit Functions.PHP
  • Under Editor section Select Functions.php in the list of php files on the right of your screen (or just see image below)
  • Paste Below code in functions.php
// Display or Count how many times a post has been viewed. // id = the post id and action = display or count function arixWp_PostViews( $id, $action ) { $axCountMeta = 'ax_post_views'; // Your Custom field that stores the views $axCount = get_post_meta($id, $axCountMeta, true); if ( $axCount == '' ) { if ( $action == 'count' ) { $axCount = 0; } delete_post_meta( $id, $axCountMeta ); add_post_meta( $id, $axCountMeta, 0 ); if ( $action == 'display' ) { echo "0 Views"; } } else { if ( $action == 'count' ) { $axCount++; update_post_meta( $id, $axCountMeta, $axCount ); } else { echo $axCount . ' Views'; } } }
  • After adding above code Click Update File
Step 2: Showing Posts Views Counter in WordPress Posts
  •  Select Single.PHP from right of your screen (See image below)

Single.PHP Screenshot

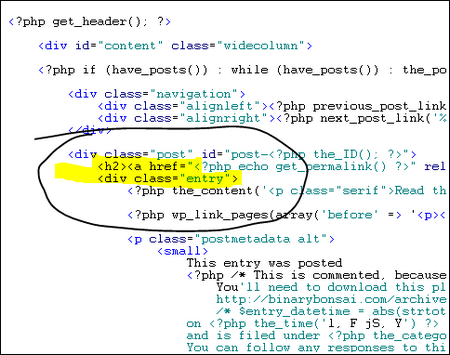
  • Now Paste below code just after High Lighted Section in above image.
 
    <?php echo arixWp_PostViews( get_the_ID(), 'count' ); ?>

To display the count outside the loop use this:

  <?php echo arixWp_PostViews( get_the_ID(), 'display' ); ?>

If you want them to show in the loop use this instead.

 <?php echo arixWp_PostViews( $post->ID, 'display' ); ?>
  • Finally Click on Update File and You had done.

Check your blog post to check whether counter is working or not!. Feel Free to Ask any question about this Post Views Counter In WordPress

<credit>

How to Show Blog Stats In WordPress Sidebar Widget

This Blog Stats Widget displays the total number of views to your blog (not including your own views). It’s a nice way of showing off how popular your blog is.

Here’s an example what it looks like when it’s activated on a blog sidebar:

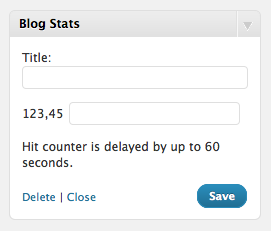
Here is how to Show Blog Stats In WordPress. Once you add the widget to your sidebar from Appearance -> Widgets, you’ll see that the widget settings look like this:

Title – Set the title to use above the blog stats count. (i.e. Stats, Traffic Love)

123,45 – Set the word(s) to use along with the number. “Hits” and “views” are popular choices, but feel free to get creative and make up your own.

Video

Hope this post How to Show Blog Stats In WordPress Sidebar Widget will help you. Feel free to ask any question in comment section about Show Blog Stats In WordPress

Source: WordPress Support