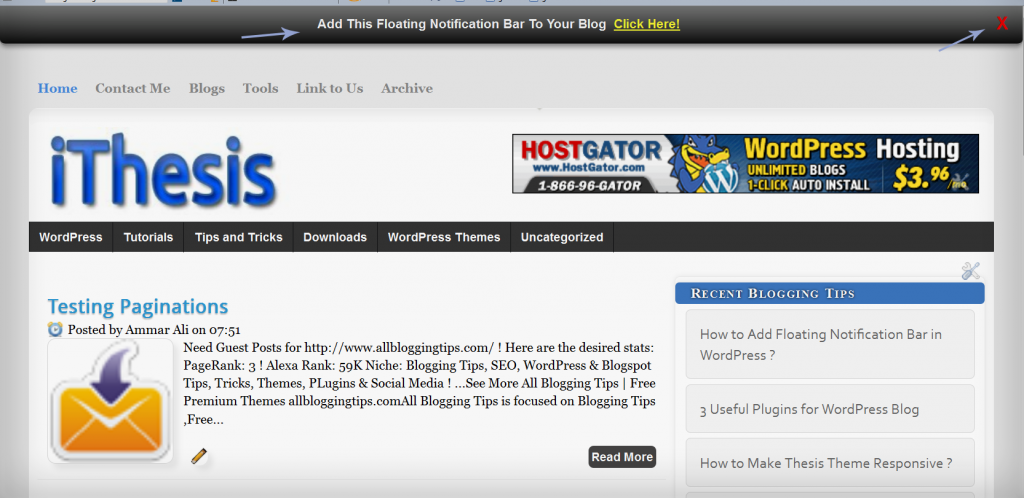
We already shared a floating notification bar for wordpress recently. Many of my readers request to create this floating notification bar for Blogspot/Blogger blogs and today we are sharing a simple yet Cool Floating Notification bar for Blogger. Its very easy to add this widget in blogspot. All you have to do is copy code given below, paste it in to your blog and customize text, link etc according to your needs. Isn’t that simple! :D
Live Demo
Add Cool Floating Notification bar in Blogger !
First Always Back Up Your Template Before You Any Make Changes – How To Back Up A Blogger Template
- Goto Blogger => Design => Edit HTML
- Next search for this code
<body>
- Just below it paste the following code,
<!-- Notification code start -->
<style type='text/css'>
#ut-sticky
{
background: #7d7e7d; /* Old browsers */
background: -moz-linear-gradient(top, #7d7e7d 6%, #7d7e7d 9%, #0e0e0e 99%); /* FF3.6+ */
background: -webkit-gradient(linear, left top, left bottom, color-stop(6%,#7d7e7d), color-stop(9%,#7d7e7d), color-stop(99%,#0e0e0e)); /* Chrome,Safari4+ */
background: -webkit-linear-gradient(top, #7d7e7d 6%,#7d7e7d 9%,#0e0e0e 99%); /* Chrome10+,Safari5.1+ */
background: -o-linear-gradient(top, #7d7e7d 6%,#7d7e7d 9%,#0e0e0e 99%); /* Opera 11.10+ */
background: -ms-linear-gradient(top, #7d7e7d 6%,#7d7e7d 9%,#0e0e0e 99%); /* IE10+ */
background: linear-gradient(top, #7d7e7d 6%,#7d7e7d 9%,#0e0e0e 99%); /* W3C */
filter: progid:DXImageTransform.Microsoft.gradient( startColorstr='#7d7e7d', endColorstr='#0e0e0e',GradientType=0 ); /* IE6-9 */
border-bottom:2px solid #999;
color:#fff;
text-align: center;
margin:-12px auto;
padding-bottom:1px;
border-top: 1px solid #333;
height:38px;
font-size:13px;
position:fixed;
vertical-align: baseline; overflow:hidden;
z-index:999;
width:100%;
border-bottom-left-radius:6px;
border-bottom-right-radius:6px;
display:block;
font-weight: bold;
font-family: arial,"Helvetica";
font-color:#fff;
-moz-box-shadow: 0 2px 4px hsla(0,0%,0%,.35);
-webkit-box-shadow: 0 2px 4px hsla(0,0%,0%,.35);
}
#ut-sticky:hover
{
background-color:#333;background-image:-moz-linear-gradient(top,#555555,#434343);background-image:-ms-linear-gradient(top,#555555,#434343);background-image:-webkit-gradient(linear,0 0,0 100%,from(#555555),to(#434343));background-image:-webkit-linear-gradient(top,#555555,#434343);background-image:-o-linear-gradient(top,#555555,#434343);background-image:linear-gradient(top,#555555,#434343);background-repeat:repeat-x;filter:progid:DXImageTransform.Microsoft.gradient(startColorstr='#555555',endColorstr='#434343',GradientType=0)
-webkit-transition:all 1.3s ease-in-out;-moz-transition:all 1.3s ease-in-out;-o-transition-duration:all 1.3s ease-in-out;transition:all 1.3s ease-in-out;
-moz-box-shadow: 0 2px 4px hsla(0,0%,0%,.35);
-webkit-box-shadow: 0 2px 4px hsla(0,0%,0%,.35);
}
#ut-button {background:#fff; padding:4px; color:black;text-shadow:0 -1px 0 rgba(255,255,255,0.25);background-color:white}
#ut-sticky p{line-height:5px; font-size:13px; text-align:center; width:95%; float:left;}
#ut-sticky p a{ text-decoration:underline; padding:4px; color:#FFFF33;}
.ut-cross{display:block; position:relative; right:15px; top:4px;float:right;}
.ut-cross a{font-size:18px; font-weight:bold; font-family:"Arial"; color:#FF0000; line-height:30px;}
.ut-cross, a:hover{color:#DDD; text-decoration:none;}
</style>
<div id='ut-sticky'>
<p style='padding-top:17px;'>Add This Floating Notification Bar To Your Blog <a class='ut-button' href='https://allbloggingtips.com' target='_blank'>Click Here!</a></p>
<div class='ut-cross'><a href='javascript:hide_cross();'>X</a></div>
</div>
<script language='JavaScript'>
function hide_cross() {
crosstbox = document.getElementById("ut-sticky");
crosstbox.style.visibility = 'hidden';
}
</script>
<br/><br/>
<br/><br/>
<!-- End of Notification code, info - https://allbloggingtips.com -->
To Customize it
After adding above code just edit above HIGHLIGHTED text and link to your desire text.
I hope you enjoyed this cool Floating Notification bar widget. Do let me know if you face any problem. Peace, blessing pals :D


nice tutorial admin…
but i’m looking for something like yours in this site…
“waiting for update bro”
Thank’s before
It’s hellobar. You can get here -> :) https://www.hellobar.com/
Wow this is so awesome Ammar, will try it on my blog.
Wow!! Looking for this widget. Thanks.
This is a great tutorial. Thanks very much, going to try it now :D
LOL! Its for Blogspot :D