Blogger

6 CSS3 Buttons With Hover Effects

CSS3 ButtonsToday we decided to present some cool CSS3 buttons. These are 6 types of different buttons like blue, purple, red, green, blue, orange. These CSS3 buttons are compatible with Mozilla Firefox, Chrome, Safari, Opera, IE9(As it supports CSS3 now) and all other major browsers too.

These buttons do not use any background images, therefore these are purely CSS3 buttons with include hover effects.You can add them to any where in your wordpress and blogger blogSee Also New Floating Social Media Buttons With Cool Effect.

1. Adding Css for Cool CSS3 Buttons:

Place below css in your Theme files where you other CSS is located like style.css

1. Cool White CSS3 Button with Hover Effects

.btn a {background:#B0B0B0; margin:0; padding:3px 10px; -webkit-border-radius:3px; -moz-border-radius:3px; border-radius:3px; -webkit-box-shadow:inset 0 0 1px rgba(0,0,0,0.1); -moz-box-shadow:inset 0 0 1px rgba(0,0,0,0.1); box-shadow:inset 0 0 1px rgba(0,0,0,0.1); -webkit-transition:all 1.0s ease; -moz-transition:all 0.5s ease; -o-transition:all 0.5s ease; display:inline-block; color:#FFF; font-size:12px; font-family:Georgia,serif; text-decoration:none; vertical-align:middle}
.btn a:hover{background:#3C3C3C; -webkit-transition:all 1.0s ease; -moz-transition:all 0.5s ease; -o-transition:all 0.5s ease;}
.btn:active{-webkit-box-shadow:inset 0 0 8px rgba(0,0,0,0.6); -moz-box-shadow:inset 0 0 8px rgba(0,0,0,0.6); box-shadow:inset 0 0 8px rgba(0,0,0,0.6)}

2. Cool Red CSS3 Button with Hover Effects

.redbtn a {background:#F0C3C3; margin:0; padding:3px 10px; -webkit-border-radius:3px; -moz-border-radius:3px; border-radius:3px; -webkit-box-shadow:inset 0 0 1px rgba(0,0,0,0.1); -moz-box-shadow:inset 0 0 1px rgba(0,0,0,0.1); box-shadow:inset 0 0 1px rgba(0,0,0,0.1); -webkit-transition:all 1.0s ease; -moz-transition:all 0.5s ease; -o-transition:all 0.5s ease; display:inline-block; color:#FFF; font-size:12px; font-family:Georgia,serif; text-decoration:none; vertical-align:middle}
.redbtn a:hover{background:#FF4242; -webkit-transition:all 1.0s ease; -moz-transition:all 0.5s ease; -o-transition:all 0.5s ease;}
.redbtn:active{-webkit-box-shadow:inset 0 0 8px rgba(0,0,0,0.6); -moz-box-shadow:inset 0 0 8px rgba(0,0,0,0.6); box-shadow:inset 0 0 8px rgba(0,0,0,0.6)}

3. Cool Purple CSS3 Button with Hover Effects

.purplebtn a {background:#FFC6FC; margin:0; padding:3px 10px; -webkit-border-radius:3px; -moz-border-radius:3px; border-radius:3px; -webkit-box-shadow:inset 0 0 1px rgba(0,0,0,0.1); -moz-box-shadow:inset 0 0 1px rgba(0,0,0,0.1); box-shadow:inset 0 0 1px rgba(0,0,0,0.1); -webkit-transition:all 1.0s ease; -moz-transition:all 0.5s ease; -o-transition:all 0.5s ease; display:inline-block; color:#FFF; font-size:12px; font-family:Georgia,serif; text-decoration:none; vertical-align:middle}
.purplebtn a:hover{background:#FF2BF4; -webkit-transition:all 1.0s ease; -moz-transition:all 0.5s ease; -o-transition:all 0.5s ease;}
.purplebtn:active{-webkit-box-shadow:inset 0 0 8px rgba(0,0,0,0.6); -moz-box-shadow:inset 0 0 8px rgba(0,0,0,0.6); box-shadow:inset 0 0 8px rgba(0,0,0,0.6)}

4. Cool Blue CSS3 Button with Hover Effects

.bluebtn a {background:#A3D1FF; margin:0; padding:3px 10px; -webkit-border-radius:3px; -moz-border-radius:3px; border-radius:3px; -webkit-box-shadow:inset 0 0 1px rgba(0,0,0,0.1); -moz-box-shadow:inset 0 0 1px rgba(0,0,0,0.1); box-shadow:inset 0 0 1px rgba(0,0,0,0.1); -webkit-transition:all 1.0s ease; -moz-transition:all 0.5s ease; -o-transition:all 0.5s ease; display:inline-block; color:#FFF; font-size:12px; font-family:Georgia,serif; text-decoration:none; vertical-align:middle}
.bluebtn a:hover{background:#0037FF; -webkit-transition:all 1.0s ease; -moz-transition:all 0.5s ease; -o-transition:all 0.5s ease;}
.bluebtn:active{-webkit-box-shadow:inset 0 0 8px rgba(0,0,0,0.6); -moz-box-shadow:inset 0 0 8px rgba(0,0,0,0.6); box-shadow:inset 0 0 8px rgba(0,0,0,0.6)}

5. Cool Green CSS3 Button with Hover Effects

.greenbtn a {background:#B9F1C0; margin:0; padding:3px 10px; -webkit-border-radius:3px; -moz-border-radius:3px; border-radius:3px; -webkit-box-shadow:inset 0 0 1px rgba(0,0,0,0.1); -moz-box-shadow:inset 0 0 1px rgba(0,0,0,0.1); box-shadow:inset 0 0 1px rgba(0,0,0,0.1); -webkit-transition:all 1.0s ease; -moz-transition:all 0.5s ease; -o-transition:all 0.5s ease; display:inline-block; color:#FFF; font-size:12px; font-family:Georgia,serif; text-decoration:none; vertical-align:middle}
.greenbtn a:hover{background:#00CF1C; -webkit-transition:all 1.0s ease; -moz-transition:all 0.5s ease; -o-transition:all 0.5s ease;}
.greenbtn:active{-webkit-box-shadow:inset 0 0 8px rgba(0,0,0,0.6); -moz-box-shadow:inset 0 0 8px rgba(0,0,0,0.6); box-shadow:inset 0 0 8px rgba(0,0,0,0.6)}

6. Cool Orange CSS3 Button with Hover Effects

.orangebtn a {background:#EECB84; margin:0; padding:3px 10px; -webkit-border-radius:3px; -moz-border-radius:3px; border-radius:3px; -webkit-box-shadow:inset 0 0 1px rgba(0,0,0,0.1); -moz-box-shadow:inset 0 0 1px rgba(0,0,0,0.1); box-shadow:inset 0 0 1px rgba(0,0,0,0.1); -webkit-transition:all 1.0s ease; -moz-transition:all 0.5s ease; -o-transition:all 0.5s ease; display:inline-block; color:#FFF; font-size:12px; font-family:Georgia,serif; text-decoration:none; vertical-align:middle}
.orangebtn a:hover{background:#FF7700; -webkit-transition:all 1.0s ease; -moz-transition:all 0.5s ease; -o-transition:all 0.5s ease;}
.orangebtn:active{-webkit-box-shadow:inset 0 0 8px rgba(0,0,0,0.6); -moz-box-shadow:inset 0 0 8px rgba(0,0,0,0.6); box-shadow:inset 0 0 8px rgba(0,0,0,0.6)}

How to Add These Buttons In Post

Place below codes where you want these buttons to appear.

For White Button

<a class=”btn” href=”YOUR LINK HERE” rel=”nofollow” style=”float: left;” target=”_blank”><span style=”display: inline-block;”>Link Text</span></a>

For Red Button

<a class=”redbtn”  href=”YOUR  LINK HERE” rel=”nofollow” style=”float: left;” target=”_blank”><span style=”display: inline-block;”>Link Text</span></a>

For Purple Button

<a class=”purplebtn”  href=”YOUR  LINK HERE” rel=”nofollow” style=”float: left;” target=”_blank”><span style=”display: inline-block;”>Link Text</span></a>

For Blue Button

<a class=”bluebtn”  href=”YOUR HOMEPAGE LINK HERE” rel=”nofollow” style=”float: left;” target=”_blank”><span style=”display: inline-block;”>Link Text</span></a>

For Orange Button

<a class=”orangebtn”  href=”YOUR LINK HERE” rel=”nofollow” style=”float: left;” target=”_blank”><span style=”display: inline-block;”>Link Text</span></a>

For  Green Button

<a class=”greenbtn”  href=”YOUR LINK HERE” rel=”nofollow” style=”float: left;” target=”_blank”><span style=”display: inline-block;”>Link Text</span></a>

You just need to replace YOUR LINK HERE, with your ur Link, Link and link. And you can also change text to display with your text.

That’s….. Enjoy!

Another Pure CSS3 Multi Level Drop Down Menu V3

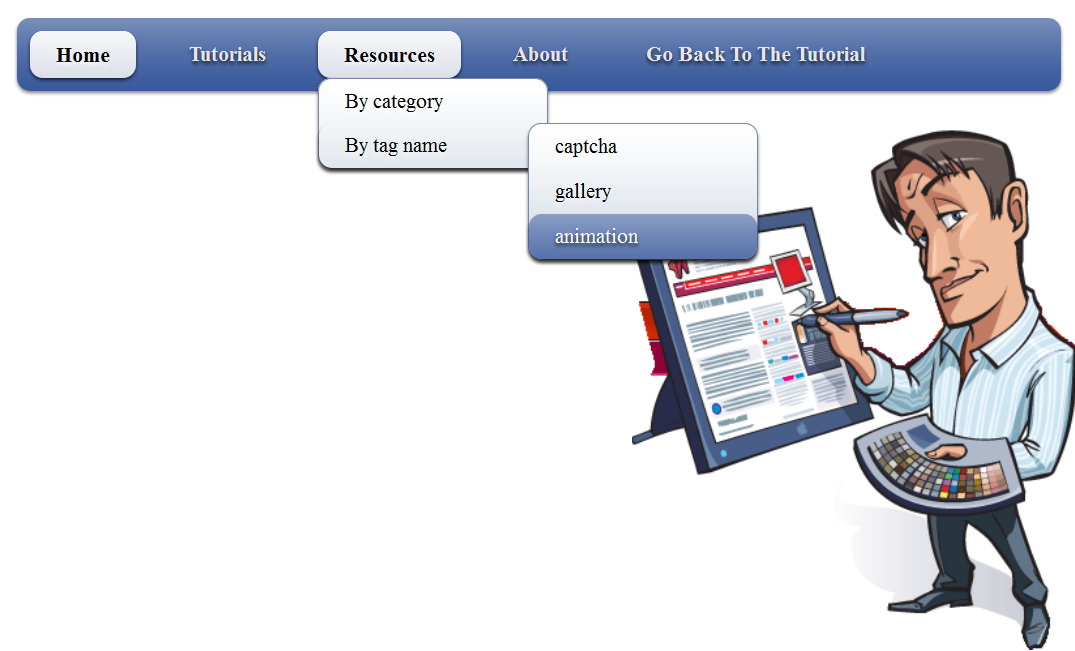
Menu v3After getting some positive comments, search engine visitors of previous Drop Down Menus V1 and Pure CSS3 Menu V3. We decided to release Another Pure CSS3 Drop Down Menu V3 For Blogger. This Multi Level Drop Down Menu is modifed version of previous css3 menu v2. I had added some cool features to this menu. This menu is a Stylish Pure CSS3 Multi Level Drop Down Menu For Blogger. It is compatible for almost all browsers like Mozilla Firefox and Google Chrome etc but the rounded corners and shadow will not be rendered properly. This Multi Level Drop Down Menu is only available on WordPress but I had converted it into Blogger users and had made installation so easy you just need to copy and paste menu code in your blogger blog widget. This Menu  is provided by Script-Tutorials guys and it is widgetized and made compatible with Blogspot blog platform by ABT.
See Also

Another Pure CSS3 Multi Level Drop Down Menu V3 Preview

drop down menu pure v3

Live Demo


Add Pure CSS3 Multi Level Drop Down Menu V3 To Blogger

Adding CSS Code

  1. Go To Blogger > Layout > Edit HTML
  2. Search For ]]></b:skin>
  3. And paste the code below just above ]]></b:skin>
/* main menu styles by AllBloggingTips */
#nav {
display:inline-block;
width:100%;
margin:0px auto;
padding:0;
background:#335599 url(http://2.bp.blogspot.com/-FVx5AvxIkpg/TzP9VsBWmrI/AAAAAAAAAVk/5D5V1QHAhOQ/s320/bg-ABT.png) repeat-x 0 -110px;border-radius:10px; /*some css3*/
-moz-border-radius:10px;
-webkit-border-radius:10px;
box-shadow:0 2px 2px rgba(0,0,0, .5);
-moz-box-shadow:0 2px 2px rgba(0,0,0, .5);
-webkit-box-shadow:0 2px 2px rgba(0,0,0, .5);
}
#nav li {
margin:10px;
float:left;
position:relative;
list-style:none;
}
#nav a {
font-weight:bold;
color:#e7e5e5;
text-decoration:none;
display:block;
padding:8px 20px;border-radius:10px; /*some css3*/
-moz-border-radius:10px;
-webkit-border-radius:10px;
text-shadow:0 2px 2px rgba(0,0,0, .7);
}/* selected menu element */
#nav .current a, #nav li:hover > a {
background:#7788aa url(http://2.bp.blogspot.com/-FVx5AvxIkpg/TzP9VsBWmrI/AAAAAAAAAVk/5D5V1QHAhOQ/s320/bg-ABT.png) repeat-x 0 -20px;
color:#000;
border-top:1px solid #f8f8f8;box-shadow:0 2px 2px rgba(0,0,0, .7); /*some css3*/
-moz-box-shadow:0 2px 2px rgba(0,0,0, .7);
-webkit-box-shadow:0 2px 2px rgba(0,0,0, .7);
text-shadow:0 2px 2px rgba(255,255,255, 0.7);
}/* sublevels */
#nav ul li:hover a, #nav li:hover li a {
background:none;
border:none;
color:#000;
}
#nav ul li a:hover {
background:#335599 url(http://2.bp.blogspot.com/-FVx5AvxIkpg/TzP9VsBWmrI/AAAAAAAAAVk/5D5V1QHAhOQ/s320/bg-ABT.png) repeat-x 0 -100px;
color:#fff;border-radius:10px; /*some css3*/
-moz-border-radius:10px;
-webkit-border-radius:10px;
text-shadow:0 2px 2px rgba(0,0,0, 0.7);
}#nav ul li:first-child > a {
-moz-border-radius-topleft:10px; /*some css3*/
-moz-border-radius-topright:10px;
-webkit-border-top-left-radius:10px;
-webkit-border-top-right-radius:10px;
}
#nav ul li:last-child > a {
-moz-border-radius-bottomleft:10px; /*some css3*/
-moz-border-radius-bottomright:10px;
-webkit-border-bottom-left-radius:10px;
-webkit-border-bottom-right-radius:10px;
}/* drop down */
#nav li:hover > ul {
opacity:1;
visibility:visible;
}
#nav ul {
opacity:0;
visibility:hidden;
padding:0;
width:175px;
position:absolute;
background:#aabbcc url(http://2.bp.blogspot.com/-FVx5AvxIkpg/TzP9VsBWmrI/AAAAAAAAAVk/5D5V1QHAhOQ/s320/bg-ABT.png) repeat-x 0 0;
border:1px solid #7788aa;border-radius:10px; /*some css3*/
-moz-border-radius:10px;
-webkit-border-radius:10px;
box-shadow:0 2px 2px rgba(0,0,0, .5);
-moz-box-shadow:0 2px 2px rgba(0,0,0, .5);
-webkit-box-shadow:0 2px 2px rgba(0,0,0, .5);-moz-transition:opacity .25s linear, visibility .1s linear .1s;
-webkit-transition:opacity .25s linear, visibility .1s linear .1s;
-o-transition:opacity .25s linear, visibility .1s linear .1s;
transition:opacity .25s linear, visibility .1s linear .1s;
}
#nav ul li {
float:none;
margin:0;
}
#nav ul a {
font-weight:normal;
text-shadow:0 2px 2px rgba(255,255,255, 0.7);
}
#nav ul ul {
left:160px;
top:0px;
}


Adding HTML of Menu

  1. Go To Blogger > Design
  2. Click choose a gadget
  3. Select HTML/javascript widget
  4. Paste the following code inside it
    <ul id="nav">
        <li><a href="#">Home</a></li>
        <li><a href="#">Tutorials</a>
            <ul>
                <li><a href="#">HTML / CSS</a></li>
                <li><a href="#">JS / jQuery</a>
                    <ul>
                        <li><a href="#">jQuery</a></li>
                        <li><a href="#">JS</a></li>
                    </ul>
                </li>
                <li><a href="#">PHP</a></li>
                <li><a href="#">MySQL</a></li>
                <li><a href="#">XSLT</a></li>
                <li><a href="#">Ajax</a></li>
            </ul>
        </li>
        <li><a href="#">Resources</a>
            <ul>
                <li><a href="#">By category</a>
                    <ul>
                        <li><a href="#">PHP</a></li>
                        <li><a href="#">MySQL</a></li>
                        <li><a href="#">XSLT</a></li>
                        <li><a href="#">Ajax</a></li>
                    </ul>
                </li>
                <li><a href="#">By tag name</a>
                    <ul>
                        <li><a href="#">captcha</a></li>
                        <li><a href="#">gallery</a></li>
                        <li><a href="#">animation</a></li>
                    </ul>
                </li>
            </ul>
        </li>
        <li><a href="#">About</a></li>
        <li><a href="http://www.allbloggingtips.com">Go Back To The Tutorial</a></li>
    </ul>

Now kindly make these customization changes to add your own links to menu:

  • Each TAB can be edited by directly understanding the following HTML code,

<li><a href=”#“>TAB TEXT</a></li>

In each case replace the hash sign (#) with your page URL or link and replace the text with your page title. I have kept the page titles unchanged in the code above so that you could easily edit them by seeing the demo.


Credits

This Another Pure CSS3 Multi Level Drop Down Menu V3 For Blogger is first shared on AllBloggingTips. Bloggers are requested to link back if they are going to share above widget with there visitors.

Confused or Need Help?

If you need some extra help in removing rows or columns then please feel free to post your questions. You can discus it as much with me as possible. This will help others to better understand on how to make further changes. :D

Add Simple Yet Cool Search Box Widget In Blogger

searchbox-abt

When ever visitor see your blog article and again want to read so he want to search your blog. Here I share a Add Simple Yet Cool Search Box Widget In Blogger. Follow following steps to Add Simple Yet Cool Search Box Widget In Blogger.

Live Demo

How to Install Search Box Widget?

Adding CSS Code

  1. Go To Blogger > Layout > Edit HTML
  2. Search For ]]></b:skin>
  3. And paste the code below just above ]]></b:skin>
.sbox{padding:4px;border-radius:6px;
margin:6px 2px 6px 1px;
background:#f9f9f9 ;
border:1px solid #ccc;
resize:none;
box-shadow:inset 1px 1px 1px rgba(0,0,0,0.1);
-moz-box-shadow:inset 1px 1px 1px rgba(0,0,0,0.1);
-webkit-box-shadow:inset 1px 1px 1px rgba(0,0,0,0.1); font-size:13px;
width:176px;
color:#666;
}.sbutton{
background:#9B9895;
cursor:pointer;
color:#fff;
border:none;
padding:4px;
text-shadow:0 -1px 1px rgba(0,0,0,0.25);
-moz-border-radius:6px;
-webkit-border-radius:6px;
border-radius:6px; margin-left:8px;
font:12px sans-serif;
}
.sbutton:hover{
background:#336699;
}

Adding Cool Search Box Widget with hover in sidebar

  1. Go To Blogger > Design
  2. Click choose a gadget
  3. Select HTML/javascript widget
  4. Paste the following code inside it
<div class=’searchform’>
<form method=”get” id=”searchform” action=”/search”>
<table width=”100%”>
<tr>
<td><input type=”text” style=”width:98%;padding:2px;” value=”Search this blog…” onfocus=”if (this.value == &quot;Search this blog…&quot;) {this.value = &quot;&quot;}” onblur=”if (this.value == &quot;&quot;) {this.value = &quot;Search this blog…&quot;;}” name=”q” id=”sbox” /></td>
<td width=”75px”><input type=”button” value=”Search” id=”sbutton” alt=”” /></td>
</tr>
</table>
</form>
</div>

I will add some Cool Search boxes with Different Color Schemes, SO Keep Updated…  or Subscribe to Our Free Mail Updates!

Credits

This Simple Yet Cool Search Box Widget is first shared on AllBloggingTips. Bloggers are requested to link back if they are going to share above widget with there visitors.


New Cool Social Icons With Hover Effect Widget V2

After a lot of trial, efforts and modify Previous Cool Social Icons With Hover Effect Widget. I finally created this cool, stylish , awesome Social Icons With Hover Effect Widget v2. You can now add this social icons with hover effect v2 widget to both WordPress and Blogger. You can easily add this to your sidebar which is a better option to take attention of visitors. This social icons with hover effect is available only on AllBlogggingTips. I made it to work for both Blogger and WordPress Blogs. I show you How TO Add Cool Social Icons With Hover Effect v2 Widget To WordPress and Blogger. Check out demo below.

Features: We had added new most commonly used social media profile icons like Google+, Facebook, Twitter, RSS and Email which was not in previous V1

See alsoSocial Icons with hover effects


Live Demo

Credits

This Cool Social Icons With Hover Effect Widget V2 is first shared on AllBloggingTips. Bloggers are requested to link back if they are going to share above widget with there visitors.

Add Cool Social Icons With Hover Effect v2 Widget To Blogger

Adding CSS Code

  1. Go To Blogger > Layout > Edit HTML
  2. Search For ]]></b:skin>
  3. And paste the code below just above ]]></b:skin>
/* Social Widget by AllBloggingTips*/

#subscribe2 {
background:#f3f3f3;
border: 1px solid #ECEDE8;
font-size: 90%;
margin: 0 0 15px 0;
padding: 7px 5px 3px 5px;
width: 288px;
}
.subscribe-icons2 {
margin: 0 auto;
width: 286px;     background: #f7f7f7;
}
.subscribe-icons2 li {     -moz-border-radius:6px;
display: inline;
float: left;
font-size: 11px;
margin: 0 2px 10px 2px;
width: 52px;
text-align: center;
}
.subscribe-icons2 a {
color: #444 !important;
display: block;
padding: 56px 0 2px;
-moz-transition: all .2s ease-out;
-webkit-transition: all .2s ease-out;
}
.subscribe-icons2 a:hover {     -moz-border-radius:6px;
-moz-box-shadow: 0 2px 4px hsla(0,0%,0%,.35);
-webkit-box-shadow: 0 2px 4px hsla(0,0%,0%,.35);
color: #369 !important;
text-decoration: none;
}
.subscribe-icons2 .subscribe-youtube a {
background: url(http://karrersimpson.com/obituaries/tomchuk-helen-1575/icon64_googleplus.png) center top no-repeat;
}
.subscribe-icons2 .subscribe-twitter a {
background: url(http://karrersimpson.com/obituaries/tomchuk-helen-1575/icon64_twittert.png) center top no-repeat;
}
.subscribe-icons2 .subscribe-facebook a {
background: url(http://karrersimpson.com/obituaries/tomchuk-helen-1575/icon64_facebook.png) center top no-repeat;
}
.subscribe-icons2 .subscribe-rss a {
background: url(http://karrersimpson.com/obituaries/tomchuk-helen-1575/icon64_rss.png) center top no-repeat;
}
.subscribe-icons2 .subscribe-email a {
background: url(http://1.bp.blogspot.com/-ee20tH09o24/Ty1cavc7UtI/AAAAAAAAAVQ/0wIS7Fgjs_k/s320/gmail-email%2B21.png) center top no-repeat;
}

Adding social icons with hover in sidebar

  1. Go To Blogger > Design
  2. Click choose a gadget
  3. Select HTML/javascript widget
  4. Paste the following code inside it
<div class='subscribe2'>

        <ul>
            <li><a target="_blank" rel="nofollow" href="https://plus.google.com/103280517588083500359">Google+</a></li>
            <li><a target="_blank" rel="nofollow" href="http://twitter.com/allbloggingtips">Twitter</a></li>
            <li><a target="_blank" rel="nofollow" href="http://www.facebook.com/allbloggingtips">Facebook</a></li>
            <li><a target="_blank" rel="nofollow" href="http://feeds.feedburner.com/latestbloggingtips4u">RSS</a></li>
            <li><a target="_blank" rel="nofollow" href="http://feedburner.google.com/fb/a/mailverify?uri=latestbloggingtips4u&amp;loc=en_US"> Email</a></li>

        </ul> <!--end .subscribe-icons-->

        <div/>

    </div>

Make Following Changes

  • Replace AllBloggingTips with your Twitter, Youtube, facebook, Feed and Email username.
  • Replace https://plus.google.com/+AmmarAlii/ with your google+ ID

Add Cool Social Icons With Hover Effect v2 Widget To WordPress

  1. Goto WordPress Dashboard > Appearance > Editor and Select Style.css from right side .
  2. Copy And Paste The Below Code Into The CSS file:


/* Social Widget by AllBloggingTips*/

#subscribe2 {
background:#f3f3f3;
border: 1px solid #ECEDE8;
font-size: 90%;
margin: 0 0 15px 0;
padding: 7px 5px 3px 5px;
width: 288px;
}
.subscribe-icons2 {
margin: 0 auto;
width: 286px; background: #f7f7f7;
}
.subscribe-icons2 li { -moz-border-radius:6px;
display: inline;
float: left;
font-size: 11px;
margin: 0 2px 10px 2px;
width: 52px;
text-align: center;
}
.subscribe-icons2 a {
color: #444 !important;
display: block;
padding: 56px 0 2px;
-moz-transition: all .2s ease-out;
-webkit-transition: all .2s ease-out;
}
.subscribe-icons2 a:hover { -moz-border-radius:6px;
-moz-box-shadow: 0 2px 4px hsla(0,0%,0%,.35);
-webkit-box-shadow: 0 2px 4px hsla(0,0%,0%,.35);
color: #369 !important;
text-decoration: none;
}
.subscribe-icons2 .subscribe-youtube a {
background: url(http://karrersimpson.com/obituaries/tomchuk-helen-1575/icon64_googleplus.png) center top no-repeat;
}
.subscribe-icons2 .subscribe-twitter a {
background: url(http://karrersimpson.com/obituaries/tomchuk-helen-1575/icon64_twittert.png) center top no-repeat;
}
.subscribe-icons2 .subscribe-facebook a {
background: url(http://karrersimpson.com/obituaries/tomchuk-helen-1575/icon64_facebook.png) center top no-repeat;
}
.subscribe-icons2 .subscribe-rss a {
background: url(http://karrersimpson.com/obituaries/tomchuk-helen-1575/icon64_rss.png) center top no-repeat;
}
.subscribe-icons2 .subscribe-email a {
background: url(http://1.bp.blogspot.com/-ee20tH09o24/Ty1cavc7UtI/AAAAAAAAAVQ/0wIS7Fgjs_k/s320/gmail-email%2B21.png) center top no-repeat;
}

Adding social icons with hover in sidebar

  1.  Goto WordPress Dashboard > Appearance > Widget
  2. Click choose a Text widget
  3. Paste the following code inside it
<div class='subscribe2'>

        <ul>
            <li><a target="_blank" rel="nofollow" href="https://plus.google.com/103280517588083500359">Google+</a></li>
            <li><a target="_blank" rel="nofollow" href="http://twitter.com/allbloggingtips">Twitter</a></li>
            <li><a target="_blank" rel="nofollow" href="http://www.facebook.com/allbloggingtips">Facebook</a></li>
            <li><a target="_blank" rel="nofollow" href="http://feeds.feedburner.com/latestbloggingtips4u">RSS</a></li>
            <li><a target="_blank" rel="nofollow" href="http://feedburner.google.com/fb/a/mailverify?uri=latestbloggingtips4u&amp;loc=en_US"> Email</a></li>

        </ul> <!--end .subscribe-icons-->

        <div/>

    </div>

Make Following Changes

  • Replace AllBloggingTips with your Twitter, Youtube, facebook, Feed and Email username.
  • Replace https://plus.google.com/+AmmarAlii/ with your google+ ID

That’s All IF you face any problem adding New Cool Social Icons With Hover Effect Widget V2 in WordPress and Blogger feel free to ask.

Credits

This Cool Social Icons With Hover Effect Widget V2 is first shared on AllBloggingTips. Bloggers are requested to link back if they are going to share above widget with there visitors.

Peace!!

Cool Social Icons With Hover Effect Widget

After a lot of trial and efforts I finally created Cool Social Icons With Hover Effect Widget for your blogs. You can add this social icons with hover effect widget to both WordPress and Blogger. This widget is a very effective to take attention of your visitors and they will may go to your profile to follow your, hit a like button etc. You can easily add this to your sidebar which is a better option to take attention of visitors. This social icons with hover effect is available on FreshLife WordPress theme only. I converted it to work for both Blogger and WordPress Blogs. I show you How TO Add Cool Social Icons With Hover Effect Widget To WordPRess and Blogger. Check out demo below.

See also


Social Icons with no - hover effectSocial Icons with hover effects
Live Demo

Add Cool Social Icons With Hover Effect Widget To Blogger

Adding CSS Code

  1. Go To Blogger > Layout > Edit HTML
  2. Search For ]]></b:skin>
  3. And paste the code below just above ]]></b:skin>
/* Social Widget by AllBloggingTips*/
#subscribe {
background:#f3f3f3;
border: 1px solid #ECEDE8;
font-size: 90%;
margin: 0 0 15px 0;
padding: 7px 5px 3px 5px;
width: 288px;
}
.subscribe-icons {
margin: 0 auto;
width: 286px;     background: #f7f7f7;
}
.subscribe-icons li {     -moz-border-radius:6px;
display: inline;
float: left;
font-size: 11px;
margin: 0 2px 10px 2px;
width: 52px;
text-align: center;
}
.subscribe-icons a {
color: #444 !important;
display: block;
padding: 40px 0 2px;
-moz-transition: all .2s ease-out;
-webkit-transition: all .2s ease-out;
}
.subscribe-icons a:hover {     -moz-border-radius:6px;
-moz-box-shadow: 0 2px 4px hsla(0,0%,0%,.35);
-webkit-box-shadow: 0 2px 4px hsla(0,0%,0%,.35);
color: #369 !important;
text-decoration: none;
}
.subscribe-icons .subscribe-youtube a {
background: url(http://4.bp.blogspot.com/-swMRIBuYfWE/TybFZPcnV1I/AAAAAAAAASQ/Rtkob1vf92I/s320/icon-youtube.png) center top no-repeat;
}
.subscribe-icons .subscribe-twitter a {
background: url(http://1.bp.blogspot.com/-WmOzzyzsiKk/TybFYxcl6CI/AAAAAAAAASI/Bsv9gjgRpVo/s320/icon-twitter.png) center top no-repeat;
}
.subscribe-icons .subscribe-facebook a {
background: url(http://3.bp.blogspot.com/-viMUReHyino/TybFYXwdRII/AAAAAAAAARw/N0fjYPPc9-8/s320/icon-facebook.png) center top no-repeat;
}
.subscribe-icons .subscribe-rss a {
background: url(http://2.bp.blogspot.com/-YpTDM_cQ_2U/TybFYi6fqJI/AAAAAAAAAR4/LzLcQoWTYuM/s320/icon-rss.png) center top no-repeat;
}
.subscribe-icons .subscribe-email a {
background: url(http://4.bp.blogspot.com/-Im_zOo6iIrY/TybFYIf3GBI/AAAAAAAAARg/2476QicRNUE/s320/icon-email.png) center top no-repeat;
}

Adding social icons with hover in sidebar

  1. Go To Blogger > Design
  2. Click choose a gadget
  3. Select HTML/javascript widget
  4. Paste the following code inside it
<div class='subscribe'>

        <ul>
            <li><a target="_blank" rel="nofollow" href="https://plus.google.com/103280517588083500359">Google+</a></li>
            <li><a target="_blank" rel="nofollow" href="http://twitter.com/allbloggingtips">Twitter</a></li>
            <li><a target="_blank" rel="nofollow" href="http://www.facebook.com/allbloggingtips">Facebook</a></li>
            <li><a target="_blank" rel="nofollow" href="http://feeds.feedburner.com/latestbloggingtips4u">RSS</a></li>
            <li><a target="_blank" rel="nofollow" href="http://feedburner.google.com/fb/a/mailverify?uri=latestbloggingtips4u&amp;loc=en_US"> Email</a></li>

        </ul> <!--end .subscribe-icons-->

        <div/>

    </div>

Make Following Changes

  • Replace AllBloggingTips with your Twitter, Youtube, facebook, Feed and Email username.

That’s all. If you face any problem adding this social icons with hover effect. Feel free to ask.